Beginner's guide

So you're getting into chainmaille

Welcome to one of the most meditative crafts you can do with a pair of pliers. Chainmaille (interlocking metal rings into geometric patterns) is more forgiving than it looks, and more addictive than you'd expect. Here's exactly what to buy first.

By Colin B. · Published June 8, 2026 · Last reviewed June 8, 2026

The 60-second version

If you only buy 3 things to start:

  1. TOAOB 1500pcs Assorted Jump Rings Kit — A large anodized aluminum ring assortment: cheap enough to make mistakes, colorful enough to stay interested.
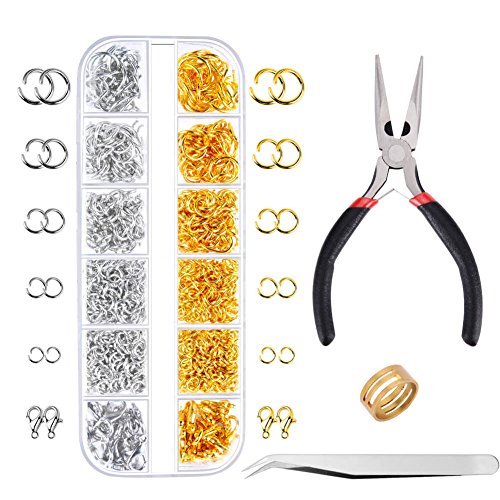
  2. Paxcoo Jump Rings and Lobster Clasps Jewelry Kit — A jump ring and lobster clasp kit so every project you finish actually gets finished.
Budget total
$35
Typical total
$75
A ring assortment, two pliers, and a clasp pack gets you started for about $40. Add a project kit and you're under $80.

We earn commission on qualifying Amazon purchases — see our affiliate disclosure. Price tiers and budget totals shown above are editorial estimates; actual Amazon prices vary.

At a glance

Our top pick in each category

The fastest path through this guide — each best-starter pick by category. Scroll for the budget and upgrade alternatives.

CategoryTop pickPriceWhere to buy
Jump Ring AssortmentsTOAOBTOAOB 1500pcs Assorted Jump Rings Kit$ See on Amazon →
PliersBeadsmithThe Beadsmith Micro-Fine 4 Piece Plier with Springs Set - Chain, Round, Flat, and Bent Nose - 5' in Length$$ See on Amazon →
Clasps & FindingsPaxcooPaxcoo Jump Rings and Lobster Clasps Jewelry Kit$ See on Amazon →
Project KitsWeave Got MailleWeave Got Maille Byzantine Chain Maille Bracelet Kit, Gold$$ See on Amazon →
Before you buy anything

A few things worth knowing first

Start with aluminum, not silver. Anodized aluminum rings are cheap, come in every color, and are forgiving while you're learning to open and close rings without distorting them. Sterling silver costs 10-30x as much and punishes beginner mistakes. Get your technique down first.

You need two pliers, not one. Every chainmaille technique involves holding a ring with one plier while opening or closing it with the other. Both must be smooth-jaw with no teeth. One pair will not do.

The aspect ratio matters more than the gauge. Ring size in chainmaille is described by wire gauge and inner diameter, and those numbers determine which weaves work. Beginner kits handle this for you. If you buy rings separately, match the aspect ratio (AR) to your target weave.

The gear

What you actually need

metal jump rings assortment in a small storage container

Photo by Alexey Demidov on Unsplash

Jump Ring Assortments

Jump rings are the medium. Everything you make in chainmaille is built from interlocking rings, so your first purchase is always rings. For beginners, anodized aluminum is the clear right call: lightweight, cheap, and available in dozens of colors. It's forgiving while you build the muscle memory for opening and closing rings at the correct angle. Once your technique is solid, copper and sterling silver open up. Always buy more rings than you think you need; small ones disappear fast.

Jump Ring Assortments — what's the difference?

A few common shapes, each making a different trade.

Anodized Aluminum

Lightweight, colorful, and cheap. The universal starting metal.

Weight
Very light
Cost
~$0.01/ring
Solderable
No

Best for Learning weaves, colorwork, practice pieces

Tradeoff Not suitable for fine jewelry; cannot be soldered for permanent closure

↓ See our pick
Copper

Warm rustic tones; a natural bridge between aluminum and silver.

Weight
Medium
Cost
~$0.05/ring
Solderable
Yes

Best for Rustic jewelry, practicing before sterling silver

Tradeoff Oxidizes over time; needs polishing or a sealant to stay bright

Sterling Silver

Heirloom quality. Worth the cost once you know your weaves.

Weight
Medium
Cost
~$0.30-0.80/ring
Solderable
Yes

Best for Finished jewelry, gifts, heirloom-quality pieces

Tradeoff 5-10x the cost of aluminum; mistakes are expensive

TOAOB 1500pcs Assorted Jump Rings Kit Best starter
TOAOB

1500pcs Assorted Jump Rings Kit

$8.69 as of Jun 22, 2026

Our rating · In Stock

A large multi-size, multi-color ring assortment at a price where beginner mistakes don't hurt. You get enough rings to practice a dozen weaves, and the size variety lets you learn which dimensions work for which patterns before you commit to a favorite weave.

What we like

  • Hundreds of rings across multiple sizes and colors in one pack
  • Cheap enough that beginner mistakes cost almost nothing
  • Aluminum is the standard learning metal for chainmaille

What to know

  • Some packs have rough saw gaps; check closures before weaving
  • Aluminum cannot be soldered for permanent ring closures
GMMA Red Copper Jump Ring Assortment 1400pcs Specialty pick
GMMA

Red Copper Jump Ring Assortment 1400pcs

$6.59 as of Jun 22, 2026

Our rating

Copper is the natural step up from aluminum: heavier, warmer in color, and solderable. It's still affordable enough to practice with, and the patina copper develops over time is a feature for many chainmaillers, not a flaw.

What we like

  • Warm rustic tones that aluminum and silver can't replicate
  • Solderable, unlike aluminum, for permanent closures

What to know

  • Oxidizes and needs polishing or a sealant to stay bright
  • Much heavier than aluminum; long necklaces feel the weight
Beadaholique Sterling Silver Open Jump Rings, 5mm 18g Upgrade pick
Beadaholique

Sterling Silver Open Jump Rings, 5mm 18g

$13.95 as of Jun 22, 2026

Our rating · Only 20 left in stock - order soon.

When you're ready to make a piece you'll actually wear or gift, sterling silver is worth it. The weight, shine, and finish are categorically different from aluminum or copper. Wait until you can close rings cleanly and consistently; silver doesn't forgive sloppy technique.

What we like

  • Jewelry-grade finish that aluminum and copper cannot match
  • Tarnish-resistant enough for everyday wear

What to know

  • 10-30x the cost of aluminum; mistakes are expensive
  • Harder to close cleanly; requires established ring technique

Pliers

Chainmaille requires two pliers, one in each hand: one to hold a ring still, one to open or close it. The non-negotiable requirement is smooth jaws with no teeth or serrations. Toothed pliers scratch and mar soft metals and ruin rings. Any smooth flat-nose or chain-nose pliers will work technically, but ergonomic handles with a spring-return make a real difference when you're spending two hours on a Byzantine bracelet.

The Beadsmith Micro-Fine 4 Piece Plier with Springs Set - Chain, Round, Flat, and Bent Nose - 5' in Length Best starter
Beadsmith

The Beadsmith Micro-Fine 4 Piece Plier with Springs Set - Chain, Round, Flat, and Bent Nose - 5' in Length

$29.99 as of Jun 22, 2026

Our rating · Only 10 left in stock - order soon.

One chain-nose and one flat-nose, both smooth-jaw and sized right for 18-20 gauge rings. Beadsmith is the go-to brand in the chainmaille community and these hit the sweet spot of quality and price. Buy these first; you won't feel the need to upgrade for a long time.

What we like

  • Chain-nose and flat-nose in one pack, both smooth-jaw
  • Trusted brand in the chainmaille and beading community
  • Spring-return mechanism reduces hand fatigue on long sessions

What to know

  • Tips too large for very fine 22g+ wire work
  • Handles less padded than ergonomic upgrade options
Smooth-Jaw Flat Nose Pliers for Jewelry Making (2-pack) Budget pick

Smooth-Jaw Flat Nose Pliers for Jewelry Making (2-pack)

$7.99 as of Jun 22, 2026

Our rating · In Stock

If you're not yet sure chainmaille will stick, a cheap pair of smooth flat-nose pliers lets you start under $15. Not as refined as Beadsmith, but serviceable for aluminum and copper while you figure out whether you like the craft.

What we like

  • Under $15 for a usable pair to get started immediately
  • Works fine for aluminum practice rings while you learn

What to know

  • Budget quality means faster wear and less jaw precision
  • No ergonomics; hands fatigue sooner on longer sessions
Wubbers ProLine Chain Nose Pliers Upgrade pick
Wubbers

ProLine Chain Nose Pliers

$28.99 as of Jun 22, 2026

Our rating · Only 6 left in stock - order soon.

Wubbers are the pliers that serious chainmaillers upgrade to. The ergonomic suede-grip handles distribute pressure and won't fatigue your hand across a long session. Micro tips handle the smallest rings precisely. If you're weaving Full Persian over several evenings, you'll feel the difference.

What we like

  • Triangular ergonomic handles dramatically reduce hand fatigue
  • Micro tips handle fine 22g ring work with real precision

What to know

  • Premium price; confirm the hobby first before buying
  • Overkill for aluminum practice; shines on silver and copper

Clasps & Findings

Every bracelet and necklace needs a clasp to finish it. For chainmaille, lobster claw clasps are the standard: strong, easy to operate one-handed, and available in every metal finish. Toggle clasps also work and add a decorative T-bar element, but they need a wide enough weave to function. Buy a small assortment before your first project so you're not stuck waiting on shipping to close a finished piece.

Paxcoo Jump Rings and Lobster Clasps Jewelry Kit Best starter
Paxcoo

Jump Rings and Lobster Clasps Jewelry Kit

$8.99 as of Jun 22, 2026

Our rating · In Stock

A 1200-piece kit combining open jump rings and lobster claw clasps in both silver and gold tones. Variety means you can match the finish to whatever ring metal you're using, and the quantity lasts through many projects without reordering.

What we like

  • Multiple sizes and finishes in one pack, covers most projects
  • 100+ pcs means months of projects before you run out

What to know

  • Silver plating, not solid; tarnishes faster on everyday pieces
  • Smallest sizes are fiddly to attach with pliers only
PH PandaHall 60 Sets Toggle Clasps Assortment Specialty pick
PH PandaHall

60 Sets Toggle Clasps Assortment

$11.99 as of Jun 22, 2026

Our rating · In Stock

Toggle clasps add a decorative T-bar and ring that becomes part of the design. They work best on wider chainmaille weaves where the bar passes through the ring cleanly. A nice visual upgrade for bracelets where you want the clasp to be a feature.

What we like

  • Decorative T-bar makes the clasp a visual part of the design
  • Easier to operate one-handed than small lobster clasps

What to know

  • Requires a wide enough weave opening to function properly
  • Not suitable for narrow chain weaves like box chain

Project Kits

A project kit gives you pre-cut rings sized for a specific weave, plus a clasp and instructions. For your first piece, this removes the biggest beginner stumbling block: figuring out which ring dimensions work for which weaves. Byzantine bracelet kits are the most popular starting point. Byzantine looks complex, but once you learn the lock-and-release sequence it's highly repeatable and produces a result you'll actually want to wear.

Weave Got Maille Byzantine Chain Maille Bracelet Kit, Gold Best starter
Weave Got Maille

Byzantine Chain Maille Bracelet Kit, Gold

$$

Our rating

Byzantine is the weave that hooks most people on chainmaille. It looks intricate, but once you learn the lock-and-release sequence the pattern repeats and you enter a flow state. This kit includes rings pre-cut to the right aspect ratio, a clasp, and step-by-step instructions. Most beginners finish a wearable bracelet on the first try.

What we like

  • Rings pre-cut to correct aspect ratio, removes the guessing
  • Byzantine produces an impressive, wearable result on the first try
  • Includes clasp and instructions for a complete first project

What to know

  • One-time use per kit; buy a ring assortment for ongoing practice
  • Ring quality varies by kit brand; saw-cut rings close more cleanly
Weave Got Maille Fizzle! Box Chain Maille Bracelet Kit Specialty pick
Weave Got Maille

Fizzle! Box Chain Maille Bracelet Kit

$21.99 as of Jun 22, 2026

Our rating · Only 11 left in stock - order soon.

Box chain is the simplest four-in-one weave and produces a clean, wearable piece. It's faster to learn than Byzantine and the ideal second project once your ring-closing mechanics are solid. The pattern also scales easily to any length you want.

What we like

  • Simpler pattern than Byzantine; great second project
  • Elegant result works in aluminum, copper, or silver

What to know

  • Unforgiving of inconsistent closure; technique must be solid
  • Less visually dramatic than complex weaves like Full Persian
Going deeper

Your first 5 hours of chainmaille

Most people assume chainmaille is hard. It's not, at least not at first. Within a few hours you can close rings cleanly and have a finished bracelet on your wrist. Here's what those first hours actually look like.

Chainmaille has a reputation for being complicated. And complex weaves — Full Persian 6-in-1, Helm chain, Dragonscale — genuinely are. But the basics are more approachable than they look, and the first meaningful milestone (a finished Byzantine bracelet you’d actually wear) is reachable in an afternoon.

The craft has exactly one core skill: opening and closing a metal ring without distorting it. Everything else is pattern.

Hour 1: Learn the one technique that matters

Before you weave anything, you need to learn how to open and close a jump ring correctly.

The wrong way is to pull the ring apart sideways, widening the gap. That stretches the ring and it never closes cleanly again. The right way is a slight twist: one side of the ring comes toward you while the other goes away, creating a gap at the seam without changing the ring’s shape. When you close it, you reverse the twist and press until you feel the ends click together.

Hold one pair of pliers in each hand, gripping the ring on either side of the cut. The plier on the left stays still. The plier on the right twists forward. That’s the motion.

Practice this with 20 rings before you try any weave. Open them, close them, check the seam. A well-closed ring has no gap at the seam you can feel with a fingernail. After 20, you’ll have the muscle memory.

person holding black and red handle stainless steel tool
Photo by eleonora on Unsplash

Hours 1-2: Your first weave (2-in-2 chain)

The 2-in-2 chain is the best starting weave because it teaches you everything about how chainmaille works while producing something you can actually use as a base for a necklace or bracelet.

The pattern: lay two closed rings flat. Add two open rings through both of them, and close those. Keep adding pairs of rings through the previous pair. That’s it.

When you first try it, the rings won’t want to cooperate. They’ll flip, fall out, or not sit flat. This is normal. Slow down. Work on a flat surface. Once a few pairs are connected, the chain starts to organize itself and the rhythm kicks in.

By the end of two hours, most beginners have a workable 6-inch 2-in-2 chain. It won’t be perfect. The rings probably aren’t all sitting at the same angle. That’s fine. You’re building pattern recognition, not a finished piece yet.

Hours 2-4: Byzantine — the weave that hooks people

Byzantine is the weave most chainmaillers credit for getting them serious about the craft. It looks like something that should take a jewelry class to learn. It doesn’t.

The structure is a 2-in-2 box segment followed by a “flower” that locks the rings into a rigid geometric unit. Once you see the flower open and lock, the pattern is clear and repeatable. You chain the units together and build length.

The key moment is learning to “pop” the unit open — pressing the central pair of rings down with your thumbs so the side rings fold outward into the flower position. It takes a few tries to feel it. Once you feel it once, you’ll recognize it every time.

Work from a video the first time. Watch someone else’s hands do the pop before you try it. Blueprint instructions are hard to follow for Byzantine until you’ve seen the physical motion.

a close up of a chain
Photo by Carlos Felipe Ramírez Mesa on Unsplash

Most beginners complete their first Byzantine bracelet somewhere in hours 3-4. It’s not perfect. Some units are tighter than others; a few rings aren’t quite closed. That’s fine. The piece is wearable and recognizable as Byzantine, and that’s the milestone.

Hours 4-5: Finishing, clasps, and what’s next

A finished bracelet needs a clasp. This is simpler than it sounds: you attach a jump ring to each end of your chain, then connect a lobster claw clasp to one jump ring. The claw clips to the jump ring on the other end.

The clasp jump rings need to be slightly larger than your weave rings so they sit cleanly. If you bought an assortment, you’ll have a size that works. If not, most chainmaille suppliers sell “connector rings” sized for the purpose.

After you close the clasp attachment and put the bracelet on for the first time, something clicks: this is a real object you made from a pile of rings and two pliers. That feeling is why people get into chainmaille.

By hour 5, most beginners have a reasonable answer to “what do I want to make next?” The most common next steps:

  • Box chain necklace: simpler pattern than Byzantine, scales to any length, works beautifully in aluminum or copper.
  • Orbital chain: Byzantine cousin with an added ring that gives it a different texture.
  • Full Persian 6-in-1: the ambitious jump. Significantly harder. Wait until Byzantine feels automatic.

What you’ll do wrong (everyone does)

  • Pulling rings sideways instead of twisting them. The most common beginner mistake. Stretched rings don’t close cleanly and make your finished piece look loose and uneven.
  • Working too fast. Chainmaille rewards patience. Rushing leads to rings in the wrong orientation that you have to unpick later.
  • Skipping the seam check. A ring that looks closed from a foot away may have a gap you can feel. Run a fingernail over every seam. Gaps snag skin and catch on fabric.
  • Starting with sterling silver. Aluminum is the learning metal. Silver at 10-30x the cost just makes your mistakes expensive.

After hour 5

Two things improve the slope of your progress faster than anything else:

Work from the M.A.I.L. database. Maille Artisans International League has hundreds of named weaves with aspect ratio guides and step-by-step instructions. Browse by difficulty. Pick your next weave there, not by Googling.

Find the r/Chainmaille community. Post your first Byzantine bracelet. You’ll get genuine feedback and encouragement, not just likes. The regulars remember what it’s like to be a beginner.

The craft scales indefinitely. There are weavers who’ve been at it for twenty years who are still learning new patterns. Your first five hours are the entry point to something that has a lot of room in it.

Save your money

What you don't need yet

Beginners get pressured to buy a lot of stuff that doesn't help them play better. Here's what we'd skip on day one.

  • A ring saw or coiling setup — Pre-cut ring assortments are cheaper and easier to start with. Make your own rings after you know which gauges and IDs you actually use.
  • Sterling silver rings for your first project — Aluminum is the learning metal. Silver at 10-30x the cost will just make your mistakes expensive.
  • A tumbler or polisher — Nice for finishing copper and silver pieces, but you won't need one until you're making pieces worth polishing.
  • A torch for soldering — Soldering ring closures is jewelry-making, not chainmaille. Most wearers never solder; tight closures are enough.
  • Expensive weave pattern books — M.A.I.L. (the free weave database) and YouTube have more patterns than you'll use in a year.
First week

Your first seven days

A short, real plan to get from gear-on-doorstep to actually playing.

  1. Order an anodized aluminum jump ring assortment. · Buy
  2. Order a smooth-jaw plier set. You cannot do chainmaille with one plier. · Buy
  3. Order a jump ring and lobster clasp kit so you can finish your first piece. · Buy
  4. Watch a 5-minute video on opening and closing rings correctly. The 'up-and-down twist, not sideways pull' technique is the single most important thing to learn before you start. · Learn
  5. Make a simple 2-in-2 chain first. It's 20 minutes of work and teaches you everything about ring mechanics before you attempt a complex weave. · Action
  6. Join r/chainmaille. The community posts weave tutorials, pattern help, and finished-piece inspiration. It's a genuinely welcoming corner of the internet. · Action
  7. Attempt your first Byzantine bracelet by end of week. You'll probably need to undo and redo sections. That's the learning. · Action
FAQ

Common questions

What metal should I start with for chainmaille?

Anodized aluminum, without question. It's cheap (pennies per ring), lightweight, forgiving on technique, and comes in every color. Learn on aluminum until you can close rings cleanly and consistently, then move to copper or sterling silver for finished pieces worth keeping.

Do I really need two pliers?

Yes. Every chainmaille technique requires holding a ring open with one plier while threading and closing it with the other. One plier is not workable. Both must be smooth-jaw with no serrations; toothed jaws mar soft metals.

What weave should I learn first?

Start with a simple 2-in-2 chain to learn ring mechanics, then move to Byzantine. Byzantine is the weave that hooks most beginners: it looks intricate, but the lock-and-release pattern repeats once you understand it, and the result is actually wearable.

How is chainmaille different from jewelry-making?

Chainmaille uses no solder, no wire-wrapping, and no heat. You work entirely by opening and closing pre-cut metal rings with two pliers and weaving them together. The tools are simpler and the barrier to entry is lower. It's its own distinct craft with its own deep community.

How much does it cost to start chainmaille?

About $35-40 for the basics: a ring assortment ($12-15), two pliers ($15-20), and a clasp pack ($5-8). A project kit adds another $15-25 but makes the first piece much easier. Total under $65 for a solid first setup.

Can I make my own rings instead of buying pre-cut ones?

Yes, eventually. You coil wire around a mandrel and cut the rings with flush cutters or a ring saw. But it adds complexity at the start. Buy pre-cut rings until you know which gauges and inner diameters you actually use, then decide if making your own is worth it.

Going further

Where to next

Browse by category

Authoritative sources

  • M.A.I.L. — Maille Artisans International League — The definitive weave database. Hundreds of named weaves with instructions, aspect ratio guides, and difficulty ratings. Bookmark this.
  • The Ring Lord — Major ring supplier and educational resource. Their tutorials and AR charts are the industry standard. Worth browsing even if you buy elsewhere.
  • r/Chainmaille — Active community for beginners and veterans alike. Post your work, ask for help, get pattern recommendations. Genuinely welcoming.
  • Blue Buddha Boutique — Tutorial-heavy supplier with a large YouTube channel. Their weave tutorials are clear and beginner-friendly. One of the best starting points for learning new patterns.
  • ChainMailleLady (YouTube) — Clear, patient tutorials covering beginner through advanced weaves. The Byzantine and Full Persian tutorials are especially good.