Beginner's guide

So you're getting into home fermentation

Fermentation is one of the oldest food preservation methods on earth, and getting started costs almost nothing. Salt, vegetables, time. That's the whole process. Here's the gear that actually matters and the expensive stuff you can safely skip.

By Colin B. · Published June 8, 2026 · Last reviewed June 8, 2026

The 60-second version

If you only buy 3 things to start:

  1. Humble House Sauerkrock Fermentation Crock with Lid, Weights & Pounder — The best beginner crock: water-seal lid, ceramic weights included, sized right for sauerkraut or kimchi.
  2. Masontops Complete Mason Jar Fermentation Kit — The easiest on-ramp: everything you need to ferment in mason jars, no crock required.
  3. Diamond Crystal Kosher Salt 3 lb Box — The right salt: non-iodized kosher, the fermentation community's consensus pick.
Budget total
$30
Typical total
$90
You can ferment in mason jars with salt you probably own for under $30. A proper crock setup with weights and a scale runs $90–150 and will last years.

We earn commission on qualifying Amazon purchases — see our affiliate disclosure. Price tiers and budget totals shown above are editorial estimates; actual Amazon prices vary.

At a glance

Our top pick in each category

The fastest path through this guide — each best-starter pick by category. Scroll for the budget and upgrade alternatives.

CategoryTop pickPriceWhere to buy
Fermentation CrocksHumble HouseHumble House Sauerkrock Fermentation Crock with Lid, Weights & Pounder$$ See on Amazon →
Airlock Jar KitsMasontopsMasontops Complete Mason Jar Fermentation Kit$$ See on Amazon →
Vegetable ShreddersMueller AustriaMueller Austria Adjustable Mandoline Slicer$$ See on Amazon →
Fermentation WeightsMasontopsMasontops Pickle Pebble Glass Infinity Weights for Wide Mouth Jars$ See on Amazon →
Salt & MeasurementDiamond CrystalDiamond Crystal Kosher Salt 3 lb Box$ See on Amazon →
Before you buy anything

A few things worth knowing first

You don't need a ceramic crock to start. A wide-mouth quart mason jar and good salt is all you need for your first batch. Buy the crock after you've confirmed this is something you'll do more than once.

Salt type matters more than anything else you'll buy. Iodized table salt kills the beneficial bacteria that make fermentation work. Use non-iodized: Diamond Crystal Kosher Salt, Morton Canning & Pickling Salt, or any pickling salt. This is the single most common beginner mistake.

Temperature controls speed, not success. Your kitchen counter works fine between 65–75°F. A hot kitchen ferments faster and can go mushy; a cool basement ferments slower and cleaner. The refrigerator stops fermentation almost completely, which is how you pause it when you like the flavor.

The gear

What you actually need

Fermentation Crocks

The vessel you ferment in matters more than anything else you'll buy. Water-sealed crocks (the lid's groove fills with water to create a passive airlock) are the most beginner-friendly: pack the vegetables, add brine, fill the groove, and the crock handles the rest. Open crocks require more daily monitoring but are cheaper and better for learning traditional technique. For most beginners, a 2-liter water-sealed crock is the right starting size. Go larger only if you know you'll ferment at least weekly.

Fermentation Crocks — what's the difference?

A few common shapes, each making a different trade.

2L / Half-Gallon

Best starter size. Fits one pound of shredded vegetables.

Capacity
2 liters
Best for
Single-batch testing

Best for First-time fermenters, single-person households

Tradeoff Fills quickly; one medium cabbage is the limit per batch

↓ See our pick
4–5L / One Gallon

Right for weekly fermenters: fits a full cabbage head.

Capacity
4–5 liters
Best for
Regular household use

Best for Households fermenting weekly, 2–4 people

Tradeoff Heavier and pricier; only commit to this size if you'll actually use it

↓ See our pick
8–10L / Two Gallon

For batch producers stocking a pantry or fermenting for a crowd.

Capacity
8–10 liters
Best for
Large batch production

Best for Experienced fermenters, large families, pantry-stocking

Tradeoff Very heavy when full; needs a dedicated permanent spot on a low shelf

Humble House Sauerkrock Fermentation Crock with Lid, Weights & Pounder Best starter
Humble House

Sauerkrock Fermentation Crock with Lid, Weights & Pounder

$64.99 as of Jun 22, 2026

Our rating

The 2L Sauerkrock is sized right for most first batches: a full pound of kimchi paste or about a third of a medium cabbage. The water-sealed lid creates an anaerobic environment automatically: fill the groove with water, pack your vegetables, and let fermentation do its work. Comes with two ceramic weights included, so you don't need to buy anything else to get started.

What we like

  • Water-seal lid creates a passive airlock, no daily fussing required
  • Comes with two ceramic weights; nothing extra to buy to start
  • 2L is the right size for testing recipes before committing to larger

What to know

  • Fills quickly: one medium cabbage is the limit per batch
  • Ceramic is heavy and fragile; don't drop it on tile
Ohio Stoneware 1 Gallon Preserving Crock Budget pick
Ohio Stoneware

1 Gallon Preserving Crock

$38.95 as of Jun 22, 2026

Our rating · In Stock

An American-made open crock without a water seal. You cover it with a cloth, weight the vegetables with a plate, and monitor it daily. More hands-on than a water-sealed crock, but this is exactly how traditional sauerkraut has been made for generations. Cheaper, simpler, and good for learning the fundamentals before investing in fancier gear.

What we like

  • American-made stoneware that outlasts any plastic alternative
  • No water-seal dependency, simple mechanics for traditional technique

What to know

  • Requires daily monitoring and surface skimming without an airlock
  • Open top invites fruit flies in summer without a cloth cover
HoneyJar Kerazo 5 L (1.3 Gal) K&K Keramik German Made Fermenting Crock Pot Form_1 Upgrade pick
K&K Keramik

HoneyJar Kerazo 5 L (1.3 Gal) K&K Keramik German Made Fermenting Crock Pot Form_1

$$$

Our rating

The Harsch Gairtopf is the crock serious fermenters eventually end up with. Hand-thrown in Germany, the water-seal lid creates an airtight anaerobic environment and the wide base distributes weight for stable long ferments. It is heavy, expensive, and built to last decades. Buy this after six months of regular fermentation when you know you will actually use it.

What we like

  • 5L fits a full head of cabbage in one batch, no trimming needed
  • German ceramic construction holds temperature more evenly than thinner crocks

What to know

  • Heavy (5+ lbs empty); not for upper cabinet storage
  • Overkill until you're fermenting at least twice a month
three jars filled with different types of food

Photo by Anshu A on Unsplash

Airlock Jar Kits

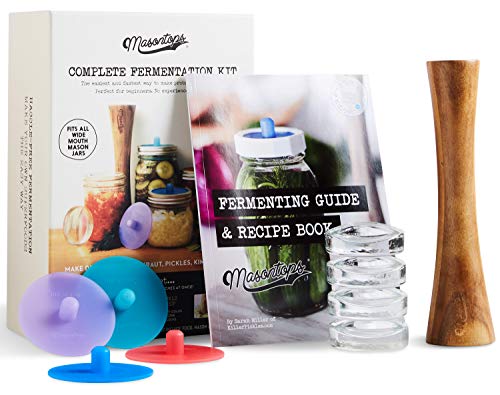
You don't need a ceramic crock to start fermenting. Wide-mouth mason jars with airlock lids are cheaper, easier to source, and let you watch fermentation happen through the glass. A complete kit gives you lids, glass weights, and a tamper (everything except the jars themselves, which you probably already own). The tradeoff over a crock: glass transmits temperature changes from the room faster than ceramic. Still, the jar approach is the fastest and most affordable on-ramp to fermentation.

Masontops Complete Mason Jar Fermentation Kit Best starter
Masontops

Complete Mason Jar Fermentation Kit

$54.95 as of Jun 22, 2026

Our rating · In Stock

Everything you need to ferment in regular wide-mouth mason jars: airlock lids that let CO2 escape without letting air in, glass weights to keep vegetables submerged, a tamper for packing, and a recipe booklet. If you own mason jars, you can start the day this arrives. The kit format beats buying each piece separately on your first order.

What we like

  • Everything in one box, no separate weight or tamper orders needed
  • Airlock lids let CO2 out without letting air or fruit flies in
  • Glass jars let you watch fermentation bubbles as they happen

What to know

  • Wide-mouth mason jars not included; need Ball or Kerr wide-mouth
  • Plastic lids are hand-wash only, no dishwasher
Nourished Essentials Easy Fermenter Wide Mouth Fermentation Kit Budget pick
Nourished Essentials

Easy Fermenter Wide Mouth Fermentation Kit

$

Our rating

Simple airlock lids that fit any standard wide-mouth mason jar. Nothing fancy: you supply the jars and weights. For anyone who wants to test fermentation before committing to a crock or full kit, these lids are the minimum viable setup. Under $25 for four.

What we like

  • Under $25 for four lids, cheapest true airlock setup available
  • Fits all standard wide-mouth mason jars you already own

What to know

  • No weights or tamper included; need to improvise or buy separately
  • Lid construction feels flimsier than Masontops build quality

Vegetable Shredders

A sharp knife will work, but a mandoline or dedicated kraut cutter makes fermentation prep quick enough to do regularly. Sauerkraut needs thin, uniform cabbage shreds (about an eighth of an inch). Kimchi calls for rough-cut cabbage chunks and julienned daikon. Irregular cuts ferment unevenly: thin pieces go soft while thick ones stay crunchy. A mandoline turns a 20-minute hand-slicing job into two minutes of work, and that speed difference is often what separates people who ferment weekly from people who ferment once.

Mueller Austria Adjustable Mandoline Slicer Best starter
Mueller Austria

Adjustable Mandoline Slicer

$34.99 as of Jun 22, 2026

Our rating · In Stock

Mueller's mandoline is the perennial bestseller in this category for a reason: sharp blades, five thickness settings, and a food holder that keeps fingers away from the blade. It handles cabbage, daikon, cucumber, and carrots: everything the standard fermentation repertoire demands. The price makes it impossible to rationalize skipping.

What we like

  • Consistently sharp out of the box, outperforms mandolines twice the price
  • Five thickness settings cover everything from kraut to cucumber chips
  • Food holder significantly reduces cut risk versus bare-hand slicing

What to know

  • Still sharp enough to cut through the guard; wear gloves for safety
  • Plastic build; not heirloom quality but outlasts normal home use
Swissmar Borner V-1001 V-Slicer Plus Mandoline 5 Piece Set Budget pick
Swissmar

Borner V-1001 V-Slicer Plus Mandoline 5 Piece Set

$53.96 as of Jun 22, 2026

Our rating

A single fixed-blade slicer that does one thing extremely well: thin, uniform slices. Less versatile than a full mandoline but significantly safer for beginners because the single-blade design is easier to control. Good for sauerkraut and thin-sliced pickles where consistent thickness is the priority.

What we like

  • Easier to control than multi-blade mandolines, lower cut risk
  • Simple design means simple cleanup: one blade, one slot

What to know

  • Single thickness only; less flexible for different ferment recipes
  • Too small for a full cabbage half; quarter the cabbage first

Fermentation Weights

The cardinal rule of lacto-fermentation: vegetables must stay below the brine. Any vegetable surface exposed to air will mold. Glass weights solve this cleanly: no added flavors, no contaminants, no odor absorption. For mason jar fermentation, purpose-made glass pebbles sized to the jar opening are the cleanest option. For crocks, purpose-made weights or a zip-lock bag filled with brine water works reliably as an improvised option. Once you have proper weights you'll stop worrying about your ferments and let them do their job.

Masontops Pickle Pebble Glass Infinity Weights for Wide Mouth Jars Best starter
Masontops

Pickle Pebble Glass Infinity Weights for Wide Mouth Jars

$21.99 as of Jun 22, 2026

Our rating · In Stock

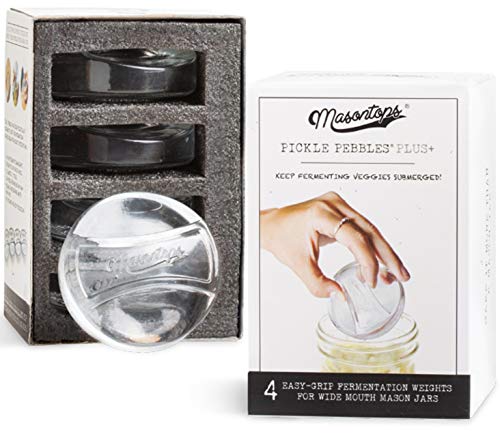
Glass weights that fit standard wide-mouth mason jars, keeping vegetables submerged without introducing any flavor or chemical reaction. The set of four lets you run four jars simultaneously, which matters once you're fermenting a few flavors at once. Dishwasher-safe and indefinitely reusable.

What we like

  • Glass won't absorb odors or react with acidic brine over time
  • Fits any standard wide-mouth mason jar without trimming or improvising
  • Dishwasher-safe; zero maintenance across hundreds of batches

What to know

  • Wide-mouth only; won't fit regular-mouth jars at all
  • No crock compatibility; crocks need a different weight solution
Masontops Pickle Packer Acacia Wood Vegetable Tamper Specialty pick
Masontops

Pickle Packer Acacia Wood Vegetable Tamper

$21.99 as of Jun 22, 2026

Our rating · In Stock

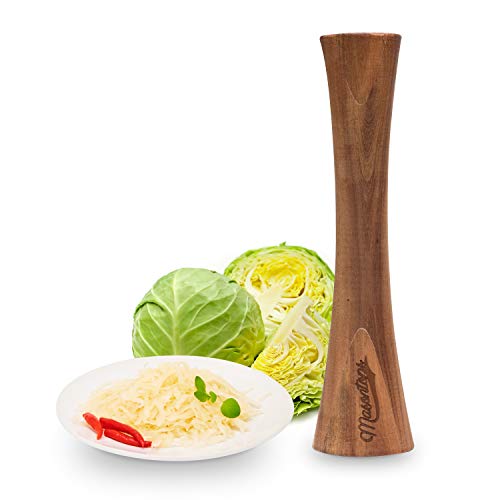
A long-handled wooden tamper for packing shredded cabbage tightly into a jar or crock and pressing out air pockets. Not strictly necessary for quart jars (a wooden spoon works), but the right length makes packing a gallon crock significantly less awkward. Worth adding once you're fermenting in larger vessels regularly.

What we like

  • Long handle reaches the bottom of deep crocks without awkward wrist angles
  • Packs air pockets out of cabbage more effectively than a spoon

What to know

  • Hand-wash only; dishwasher will crack the wood over time
  • A wooden spoon genuinely works for quart-sized jars; this is optional

Salt & Measurement

Salt is not just flavor in fermentation: it selects for the right bacteria. Iodized table salt contains iodine because iodine kills bacteria, which is great for tap water and terrible for fermentation. Non-iodized salt lets lactobacillus bacteria thrive and do the actual fermenting. The other critical variable is measuring by weight: two percent salt by weight (20 grams per kilogram of vegetables) is the standard starting ratio for most ferments. A kitchen scale costs under $30 and eliminates the inconsistency that causes uneven batches.

Diamond Crystal Kosher Salt 3 lb Box Best starter
Diamond Crystal

Kosher Salt 3 lb Box

$10.19 as of Jun 22, 2026

Our rating · In Stock

The fermentation community's consensus pick for one reason: purely non-iodized sodium chloride with no additives, no anti-caking agents, no iodine. It dissolves quickly in cold brine and has a clean flavor that doesn't muddy the vegetables. The hollow crystal structure makes it lighter by volume than Morton, so weigh it rather than measuring by volume.

What we like

  • Pure sodium chloride: no iodine, no anti-caking agents to cloud brine
  • Fermentation community standard; every recipe is calibrated for it
  • Dissolves fast in cold brine, no extended stirring required

What to know

  • Lighter per volume than Morton; measure by weight, not by spoon
  • Cardboard box absorbs moisture in humid kitchens; transfer to a jar
Morton All Natural Canning & Pickling Salt 4 lb Box Budget pick
Morton

All Natural Canning & Pickling Salt 4 lb Box

$

Our rating

A fine-grained, pure pickling salt that is non-iodized and free of anti-caking agents. Dissolves faster than kosher salt in cold water, which makes it ideal for brine-packed ferments like pickles and kimchi. Widely available and cheaper per pound than kosher salt.

What we like

  • Finer grain dissolves in cold brine faster than kosher salt
  • Available at most grocery stores if you run out mid-batch

What to know

  • Denser by volume than Diamond Crystal; recipes need adjustment
  • Fine grain makes it easy to overshoot if you measure by volume
OXO Good Grips 11-Pound Stainless Steel Food Scale with Pull-Out Display Specialty pick
OXO

Good Grips 11-Pound Stainless Steel Food Scale with Pull-Out Display

$54.92 as of Jun 22, 2026

Our rating · In Stock

Fermentation salt ratios are measured by weight, not volume. Two percent salt by weight (20g per 1kg of vegetables) is the standard sauerkraut ratio, and getting there by eye is inconsistent batch to batch. A kitchen scale costs under $30 and eliminates the single biggest variable in amateur fermentation. The OXO is accurate, durable, and reads in grams.

What we like

  • Large platform and pull-out display make mid-prep reading easy
  • Accurate to 1 gram, precise enough for 2% salt ratios on small batches

What to know

  • Pricier than basic scales; similar accuracy available for under $15
  • Pull-out display is the only premium feature; not strictly necessary
Going deeper

Your first month of home fermentation

Fermentation sounds technical until you do it once. Salt and time do most of the work; here's what actually happens in your first four weeks, batch by batch.

A shelf filled with lots of different types of food
Photo by Towfiqu barbhuiya on Unsplash

Most people think fermentation is fussy and technical. It isn’t. The bacteria do the work. Your job is to create the right conditions and then leave it alone.

Here’s what your first month actually looks like, batch by batch, with the things that matter and the things you’ll be tempted to worry about but shouldn’t.

Week 1: Your first sauerkraut

Start with sauerkraut. Not kimchi, not curtido, not a brine pickle. Sauerkraut. It has two ingredients (cabbage and salt) and it is the best possible introduction to how lacto-fermentation works because there is nowhere to hide. You will understand salt, brine, and fermentation timing by doing this one thing.

Here’s the whole process:

  1. Shred half a medium cabbage thinly (an eighth of an inch if you have a mandoline, “thin” if you’re using a knife.
  2. Weigh the shredded cabbage. Write the number down.
  3. Calculate 2% of that weight. If you have 500 grams of cabbage, that’s 10 grams of salt.
  4. Add the salt and massage the cabbage firmly for 5–10 minutes. It will release liquid and collapse in volume. That liquid is your brine.
  5. Pack the cabbage tightly into a wide-mouth mason jar, pressing down until the brine rises above the cabbage. This is the single most important step.
  6. Weight it down so the cabbage stays below the brine line. A glass weight, a small zip-lock bag filled with brine water, even a smaller jar weighted with water (anything that keeps the veg submerged).
  7. Cover it loosely (a lid with an airlock, or a regular lid left slightly loose so CO2 can escape) and leave it at room temperature.

Taste it on day 2. Taste it on day 3. Taste it every day. You are not looking for “done”; you are learning what sour tastes like as it develops. At 65–70°F, you’ll have mild sauerkraut in 3–5 days, pleasantly tangy at 1–2 weeks, and aggressively sour at 3–4 weeks. Stop whenever you like the flavor and refrigerate it.

Week 2: Troubleshooting

Your sauerkraut will probably look alarming at some point. Here is what’s normal:

White film on the surface. This is kahm yeast (a harmless, flat, white film that forms wherever the brine meets air). It is not mold. Skim it off with a spoon and continue. It doesn’t affect the flavor if caught early.

Fuzzy, raised, or colored growth. This is mold, and it means your cabbage was exposed to air. Compost the batch and start over. Check that your weights are keeping everything submerged. This is almost always a weight failure, not a salt failure.

Bubbling and fizzing. Good. This is CO2 being produced by lactobacillus bacteria. Your fermentation is working.

Cloudy brine. Also good. The beneficial bacteria cloud the brine as they multiply. This is not spoilage.

Nothing happening after 3 days. Check the temperature. Below 60°F, fermentation slows dramatically. Move your jar somewhere warmer. Also check your salt: if you used iodized table salt, the iodine killed the bacteria. Unfortunately, you’ll need to start over with non-iodized salt.

The diagnosis process is simple: does it smell sour and clean? Good. Does it smell rotten or putrid (not just funky)? Compost it. In practice, the vast majority of first ferments succeed. The bacteria are very good at their job.

Week 3: Making kimchi

By week three you’ve understood fermentation. Now make kimchi.

Kimchi is more complex than sauerkraut (multiple vegetables, a seasoning paste, a two-step salting process) but the principle is identical: salt selects for good bacteria, good bacteria produce lactic acid, lactic acid preserves the vegetables and transforms the flavor.

The standard beginner kimchi recipe:

  • Napa cabbage, salted separately and rinsed (this draws out moisture without starting the ferment yet)
  • Korean red pepper flakes (gochugaru), not substitutable with regular chili powder
  • Fish sauce or soy sauce for umami
  • Garlic and ginger: both freshly grated, both more than you think
  • Green onions and daikon for texture

The ratio matters less than you’d think. More gochugaru makes it hotter; more garlic makes it punchier; more fish sauce makes it rounder. Make a batch, taste the paste before fermenting, adjust, then ferment. Most beginners underseason the paste.

Kimchi ferments faster than sauerkraut: the paste adds sugars and enzymes that speed the process. At room temperature, 1–2 days is enough for mild kimchi; refrigerate it immediately after opening and it will continue slowly fermenting in the fridge. Most store-bought kimchi was fermented for exactly this long.

a glass jar filled with red liquid on a white background
Photo by Pedro Miguel Aires on Unsplash

Week 4: Expanding your repertoire

After three batches, you understand the fundamentals. Fermentation is: salt (the right kind, the right amount, by weight) + time + the right temperature. Everything else is detail.

A few good next moves:

Half-sour pickles. Cucumber slices in a 3.5% brine (35g salt per liter of water) with garlic and dill, fermented for 24–48 hours. Extraordinarily good on sandwiches and almost instant compared to sauerkraut. This is the ferment that will make other people jealous.

Fermented hot sauce. Blend peppers, add 2% salt by weight, ferment for 1–2 weeks. The fermentation adds a depth that vinegar-based hot sauces can’t touch. Strain, bottle, and keep refrigerated.

Beet kvass. Chopped beets in a 2% brine, fermented for 3–5 days. A traditional Eastern European probiotic drink (earthy, slightly salty, an acquired taste). Make this once and decide if fermented beverages interest you before buying a kombucha setup.

What you do NOT need to expand: starter cultures (the bacteria are already on your vegetables), a fermentation chamber, a pH meter. Those are for people producing commercial quantities or working with dairy ferments. For vegetable lacto-fermentation, the process is so forgiving that extra equipment adds anxiety more than it adds reliability.

a row of jars filled with different types of food
Photo by Steven Ungermann on Unsplash

The things that catch beginners

Every beginner runs into the same handful of problems:

Using iodized salt. The most common mistake. The box says “sea salt” or “kosher salt” but it still contains iodine. Read the label: the ingredients should say “salt” and nothing else.

Not measuring by weight. A tablespoon of Diamond Crystal Kosher Salt is not the same as a tablespoon of Morton Pickling Salt. They have different grain sizes and different densities. A kitchen scale makes this a non-issue. Without one, you’re guessing.

Opening the jar constantly. Every time you open the jar in the first few days, you introduce oxygen. Use an airlock lid or leave a regular lid slightly loose for CO2 to escape, then don’t open it until you’re ready to taste on day 3 or 4.

Fermenting in a warm kitchen during summer. Fermentation doubles in speed for every 18°F increase in temperature. A 90°F kitchen produces sauerkraut in a day and a half and it will be mushy. Keep your fermentation spot between 65–75°F.

What comes next

After your first month, you’ve fermented more variety than most people manage in years of dabbling. You understand the process, you’ve diagnosed at least one alarming-but-normal situation, and you have a jar of something in the refrigerator that you made yourself.

The people who ferment consistently are the ones who always have something in progress. Keep the momentum: before your first batch runs out, start the next one. That rhythm (always fermenting, always tasting, always adjusting) is what separates the people who do this for decades from the people who do it twice.

Save your money

What you don't need yet

Beginners get pressured to buy a lot of stuff that doesn't help them play better. Here's what we'd skip on day one.

  • A fermentation chamber (temperature-controlled) — Your kitchen counter works fine between 65–75°F. A temperature controller becomes useful only once you're producing consistently and want repeatable results across seasons.
  • Commercial starter cultures for vegetables — Lactobacillus bacteria are already living on your vegetables. Starter cultures are needed for dairy ferments (yogurt, kefir) but add nothing for lacto-fermented vegetables.
  • pH test strips — Flavor and smell are reliable fermentation indicators for beginners. Your kraut is ready when it tastes pleasantly sour, not when it hits a specific pH number.
  • Vacuum seal lids — Vacuum seals are for storage after fermentation is complete. During active fermentation, CO2 pressure needs somewhere to go; a vacuum seal traps it and can crack your jar.
  • A dedicated fermentation cookbook subscription — One good book (Wild Fermentation by Sandor Katz) covers every lacto-fermented vegetable you'll make for years. No subscription needed.
First week

Your first seven days

A short, real plan to get from gear-on-doorstep to actually playing.

  1. Buy Diamond Crystal Kosher Salt or Morton Canning & Pickling Salt, non-iodized only. This single choice matters more than any vessel you buy. · Buy
  2. Make sauerkraut this weekend. Shred cabbage, weigh it, add 2% of its weight in salt, massage until brine releases, pack tightly into a jar below the brine line. That's the whole process. · Action
  3. Taste your sauerkraut on day 2 and every day after. Track how the sourness develops. This teaches you more about fermentation than any recipe will. · Learn
  4. Write down your start date, salt percentage, room temperature, and vegetable weight. One inconsistent batch is much easier to diagnose with notes than without. · Action
  5. Read the r/fermentation wiki before your first batch finishes. It answers every beginner question: mold vs. kahm yeast, white film, fizzing, and timeline. · Learn
  6. Plan your second batch before the first one is done. The people who ferment consistently are the ones who always have something in progress. · Action
FAQ

Common questions

Is home fermentation safe? Can I get sick?

Lacto-fermented vegetables are remarkably safe: the lactic acid they produce creates an environment hostile to dangerous pathogens like E. coli and Salmonella. The key safety rule: keep vegetables below the brine at all times. Exposed vegetables can mold; submerged vegetables are protected by the acidic environment. If a batch smells rotten (not just sour), throw it out.

What's the difference between lacto-fermentation and vinegar pickling?

Vinegar pickling uses added acid (acetic acid) to preserve vegetables immediately. Lacto-fermentation uses salt to select for beneficial bacteria that produce their own lactic acid over time. Lacto-fermented vegetables have live active cultures; vinegar pickles don't. Both are delicious; they're different processes with different results and flavor profiles.

How do I know when my ferment is done?

Taste it. Sauerkraut is done when it tastes pleasantly sour (usually 1–4 weeks depending on temperature). There's no single correct endpoint; it's done when you like how it tastes. Want it tangier? Keep fermenting. Like it mild? Refrigerate it, which slows fermentation to almost nothing and holds the flavor where it is.

How much salt should I use?

Two percent salt by weight is the standard starting ratio for sauerkraut and most vegetable ferments: 20 grams of salt per 1 kilogram of vegetables. For kimchi, the salt percentage in the initial brine is separate from the paste; follow the recipe. Measuring by volume is unreliable; weigh your salt.

Do I need an airlock?

No, but it helps beginners. Traditional sauerkraut has been made in open crocks for centuries; you skim the surface and keep veg submerged. An airlock lid or water-sealed crock lets CO2 out without letting air in, which means less daily monitoring and less surface exposure. For your first few batches, use whatever you have.

What's the white stuff on my ferment?

Almost certainly kahm yeast (a harmless, flat, white film that forms when the surface is exposed to air). It is not mold, which is fuzzy, raised, and often colored. Skim kahm yeast off and continue; it doesn't affect flavor if caught early. Fuzzy or colored growth is mold, and that batch should go in the compost.

Going further

Where to next

Authoritative sources

  • Wild Fermentation by Sandor Katz — The foundational text. Sandor Katz effectively started the modern fermentation revival. Read this before buying anything else; it's as much philosophy as recipe book.
  • The Art of Fermentation by Sandor Katz — The longer, more encyclopedic companion to Wild Fermentation. Less beginner-friendly but covers every fermentation category comprehensively. Buy after Wild Fermentation.
  • r/fermentation — Active, beginner-friendly subreddit. The wiki answers every starting question. Post a photo when you're unsure; the community identifies kahm yeast vs. mold in minutes.
  • Cultures for Health — Guides and tutorials for all fermentation categories, plus starter cultures for dairy ferments. Their free beginner resources are some of the best on the internet.
  • Nourished Kitchen — Recipe-focused blog covering lacto-fermentation, sourdough, and traditional food preparation. Well-researched and opinionated in the good way.
  • National Center for Home Food Preservation — USDA-backed resource for canning, pickling, and preservation safety. The authoritative source when you have food safety questions. Bookmark the fermented and pickled products section.