The night sky is the biggest free show in the world, and a decent beginner scope costs less than a weekend camping trip. Point it at Saturn on your first night out and see the rings with your own eyes. That moment is why people get hooked. Here's what you actually need to get there.
By Colin B. · Published June 8, 2026 · Last reviewed June 8, 2026
A functional beginner setup runs $150-200. A genuinely good one is $300-400. Eyepieces, filters, and accessories add up, but none are urgent on night one.
We earn commission on qualifying Amazon purchases — see our
affiliate disclosure.
Price tiers and budget totals shown above are editorial estimates;
actual Amazon prices vary.
At a glance
Our top pick in each category
The fastest path through this guide — each best-starter pick by category.
Scroll for the budget and upgrade alternatives.
Don't buy the most expensive scope you can afford. Aperture matters, but the telescope that gets used is better than the telescope that sits in the closet. A $200 scope you take outside regularly will teach you more than a $1,200 scope you're afraid to scratch.
The biggest beginner mistake is buying a GoTo computerized scope before you know the sky. You'll never learn where anything is. Spend your first six months pointing manually, then upgrade. The sky knowledge is the skill; the GoTo mount is a convenience for later.
Light pollution is a real problem, but it isn't fatal. Suburban skies hide faint galaxies but they don't hide Saturn, Jupiter, the Moon, or double stars. Start where you are. A dark-sky site trip is a milestone, not a prerequisite.
The gear
What you actually need
Telescopes
Your telescope's aperture (the diameter of the mirror or lens) is the number that matters most. More aperture means more light, which means fainter objects and sharper detail. Everything else — mount type, focal length, included eyepieces — is secondary. For a first scope, you want at least 70mm (refractor) or 114mm (reflector), a stable mount, and optics from a brand with a real warranty. Don't buy from toy stores or big-box closeout bins.
Telescopes — what's the difference?
A few common shapes, each making a different trade.
Newtonian Reflector
Most aperture per dollar. The classic beginner's choice.
Aperture for $
Best
Maintenance
Occasional collimation
Best for
Deep sky, value
Best for Beginners who want the most sky for their budget
Tradeoff Open tube collects dew and dust; needs occasional mirror alignment
Compact and versatile. The smart second telescope.
Aperture for $
Moderate
Maintenance
Minimal
Best for
Planets, portability
Best for Upgraders who want portability without sacrificing aperture
Tradeoff More expensive per inch of aperture than a Dobsonian
Best starter
Celestron
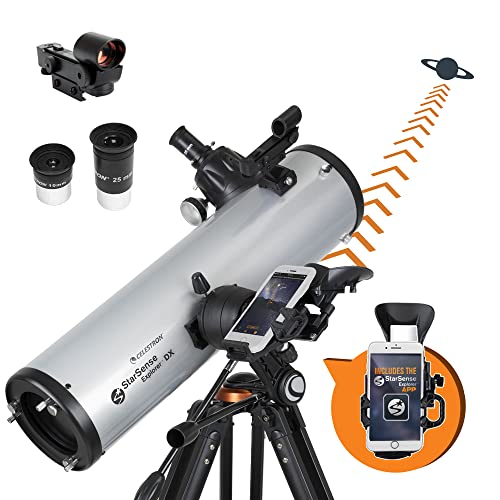
StarSense Explorer DX 130AZ
$439.99 as of Jun 22, 2026
★★★★★Our rating· In Stock
Celestron built a smartphone alignment system into the StarSense Explorer. Hold your phone over the eyepiece slot, point the scope around, and the app tells you exactly where to push it to find any object. No star-hopping required on night one. That removes the biggest beginner frustration: finding anything at all. The 130mm aperture handles rings, moons, and nebulae with room to grow.
What we like
Smartphone app guides you to any object without star-hopping
If you're not ready to spend $300 and just want to try the hobby, the PowerSeeker 70AZ is the honest entry. It will show Saturn's rings, Jupiter's cloud bands, and craters on the Moon on a clear night. Clear expectations: the mount is wobbly, the included eyepieces are mediocre, and you'll hit its ceiling within a year. For under $80, that's a reasonable way to confirm this is really your thing.
What we like
Under $80 and shows Saturn's rings on a clear night
Lightweight and easy to set up; ready in five minutes
What to know
Wobbly mount vibrates with every touch; planets dance onscreen
Included eyepieces are poor; upgrade soon or frustration sets in
An 8-inch Dobsonian is the classic 'telescope for life' upgrade. Four times the light-gathering of a 70mm refractor, which means globular clusters resolved to individual stars, Andromeda's dust lanes, and Saturn's Cassini Division clearly split. Dobsonians are brilliantly simple: a Newtonian mirror in a rocker-box mount. Nothing to align, charge, or calibrate. Push it where you want, look in.
What we like
8 inches of aperture reveals detail smaller scopes simply cannot
Rocker-box mount: no alignment, no batteries, nothing to charge
Upgradeable and long-lived; the platform stays useful forever
What to know
Large and heavy; needs car transport and dedicated storage space
Manual push-to requires learning star-hopping to find objects
Every beginner scope ships with eyepieces that are noticeably worse than the telescope deserves. Upgrading one or two eyepieces is the fastest way to improve your views without replacing the scope. Start with a good 25mm for wide, low-power survey work, then add a shorter focal length (9-12mm) for planets once you know you want more magnification. Don't buy a set of six; buy two good ones.
Best starter
Celestron
X-Cel LX 25mm Eyepiece
$89.00 as of Jun 22, 2026
★★★★★Our rating· In Stock
Sharp to the edge of the field with long, comfortable eye relief that works with eyeglasses. The 25mm focal length gives you the wide, low-power view you'll use for 80% of your sessions: scanning star clusters, finding targets, watching satellites pass. It's the first eyepiece upgrade almost every beginner buys after realizing the included ones aren't great.
What we like
Sharp to the edge of the field, not just the center
Long eye relief works comfortably with eyeglasses
25mm covers the wide view you use most of the time
What to know
One focal length only; you will want a shorter one for planets
Overkill for the cheapest scopes where optics are the limit
1.25" 10mm Plossl Telescope Eyepiece - 4-Element Plossl Design - Threaded for Standard 1.25inch Astronomy Filters
$17.97 as of Jun 22, 2026
★★★★☆Our rating· Only 1 left in stock - order soon.
Once you've found objects with a wide-field eyepiece, the 10mm is your zoom-in tool for planets and tight double stars. The Plossl design is time-tested and genuinely sharp at the center of the field. Pair it with the 25mm X-Cel and you have two distinct magnification levels that cover 90% of what you'll want to do.
What we like
10mm magnification reveals Saturn's rings in clear detail
Plossl design: proven, affordable, and genuinely sharp
What to know
Short eye relief at 10mm makes eyeglass-wearers work harder
Field of view is narrower than premium wide-angle eyepieces
A Barlow doubles the magnification of every eyepiece you own, effectively doubling your collection for $25. Combine it with the 25mm for 50x, or with the 10mm for 100x+ planetary views. Not as optically perfect as a dedicated high-magnification eyepiece, but a reasonable way to add a third magnification without spending $80.
What we like
Doubles magnification on every eyepiece you own for $25
1.25-inch barrel fits nearly all beginner telescopes
What to know
Can amplify optical flaws in entry-level telescope optics
Not a substitute for a genuinely good high-magnification eyepiece
Knowing where to look is half the hobby. A star chart or book saves you hours of frustration trying to find objects by intuition. The best approach is a good book for learning the sky in sequence, and a free app for real-time identification. You don't need both on day one, but the book is the one thing that will actually teach you the sky rather than just pointing at it.
Best starter
Cambridge University Press
Turn Left at Orion
$30.26 as of Jun 22, 2026
★★★★★Our rating· In Stock
The most recommended amateur astronomy book in the hobby, consistently for 30 years. It walks you through the sky season by season, object by object, using real finder charts at the scale you'll see through a beginner scope. The writing is patient and opinionated without being condescending. Buy this before you buy your second eyepiece.
What we like
Thirty-year track record as the best beginner astronomy book
Finder charts match what you actually see in a beginner scope
Season-by-season structure; open it, find tonight's targets
What to know
Physical book only; can't update when new objects trend in forums
Northern Hemisphere focus; Southern Hemisphere observers need more
A planisphere is a rotating star wheel that shows you which constellations are visible right now for your latitude. No batteries, no screen glare, works when your phone is dead. The Orion version is laminated and sturdy enough to last years. Plan your session with it before going out, then fine-tune with a phone app. Two minutes with a planisphere beats ten minutes in any app.
What we like
No batteries, no screen glare killing your night vision
Two minutes with it teaches more sky geography than any app
What to know
Latitude-specific; buy the version for your geographic zone
Static snapshot; doesn't show satellite passes or planet positions
A few cheap items that dramatically improve the experience. A red-light flashlight is non-negotiable: white light destroys your dark adaptation in an instant and takes 20 minutes to recover. A moon filter cuts the Moon's glare enough to see crater detail without squinting. And a collimation cap (for reflectors) keeps your mirror aligned so you're actually seeing what the scope can show.
Best starter
Celestron
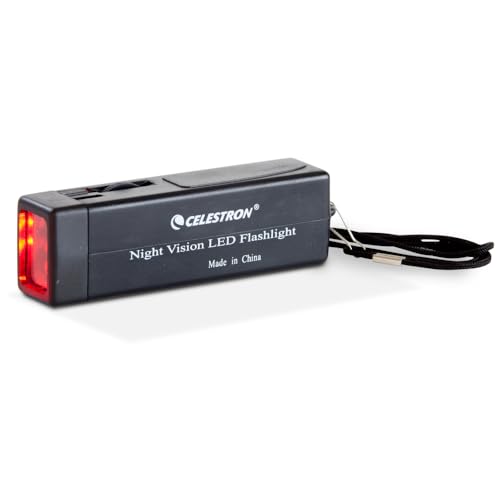
Night Vision Red Flashlight
$12.91 as of Jun 22, 2026
★★★★★Our rating· In Stock
Red light doesn't ruin dark adaptation the way white light does. This is the single most important accessory purchase for any observer: you need to read charts, swap eyepieces, and not trip over your lawn, all without destroying the 20 minutes of dark adaptation you just built. Celestron's version is compact, bright enough, and has a convenient clip.
What we like
Red light preserves your dark adaptation; white light ruins it
Compact and clip-on; stays with you at the eyepiece
What to know
Low brightness; not a substitute for a real flashlight in daylight
Belt clip can loosen; keep a backup red headlamp handy
1.25" Variable Polarizing Eyepiece Moon Filter for Telescope Polarizer
$14.95 as of Jun 22, 2026
★★★★☆Our rating· Only 5 left in stock - order soon.
The Moon is beautiful and blinding. At full phase through a decent scope, it's bright enough to be uncomfortable and washes out surface detail in glare. A polarizing filter cuts the intensity and brings out crater walls, rilles, and the terminator in sharp relief. The variable version lets you dial in the transmission; useful for the Moon at different phases.
What we like
Cuts lunar glare so crater detail becomes sharp instead of washed out
Variable transmission adjusts to Moon phase and magnification
What to know
Moon and bright-planet use only; useless for deep-sky objects
Cheap single-polarizer filters lose effectiveness at low rotation angles
94182 Cheshire 1.25 inch Collimation Eyepiece, Black
$34.95 as of Jun 22, 2026
★★★★☆Our rating· In Stock
Reflector owners (Dobsonians, Newtonians) need to collimate their mirrors periodically. A misaligned mirror makes even good eyepieces look soft. The Cheshire is the go-to collimation tool for beginners: you look through it, see where the reflection is off-center, adjust three knobs on the primary mirror cell until it lines up. Takes five minutes once you've done it twice.
What we like
Essential for reflector owners; misaligned mirrors ruin sharp views
One purchase, lasts forever, solves a real recurring maintenance need
What to know
Reflector-specific; not needed for refractors or compound scopes
Learning curve on first use; watch one video before trying
You don't need dedicated camera equipment to start photographing the sky. A phone adapter is under $30 and lets you capture the Moon and planets through your existing eyepiece. Planetary imagers (small USB cameras) are the next step and show you detail the eye can't integrate in real time. Deep-sky long-exposure imaging is a full second hobby that requires a tracking mount; hold that for later.
Best starter
GOSKY
Smartphone Adapter Mount Regular Size - Compatible with Binoculars, Monoculars, Spotting Scopes, Telescope, Microscopes
$19.99 as of Jun 22, 2026
★★★★★Our rating· In Stock
The simplest entry into astrophotography: clamp your phone over your existing eyepiece and take photos. You'll get passable Moon shots, usable Jupiter images, and the occasional satisfying Saturn photo worth posting. Not serious imaging, but genuinely fun and free if you already have the telescope. The Gosky is well-built and fits most phones.
What we like
Under $30 and works with your existing telescope and eyepiece
Moon photos are genuinely good; Saturn rings clearly visible
What to know
Alignment is fiddly; expect 10 minutes of setup per session at first
No long-exposure capability; faint deep-sky objects need more
When you're ready to take planetary imaging seriously, the ASI120MC-S is where most amateurs start. It connects via USB3, captures high-speed video of Jupiter or Saturn, and you stack the best frames in free software (AutoStakkert) to get genuinely impressive results. The jump in quality from phone photos to a dedicated camera is large and immediately obvious.
What we like
USB3 high-speed capture reveals detail a phone simply can't get
Industry-standard beginner planetary camera; huge community support
What to know
Requires a laptop near the telescope and post-processing software
Overkill until you've done serious visual observing first
The sky is overwhelming until it isn't. Here's exactly what to do in your first four weeks to go from total beginner to someone who can find objects on purpose.
Astronomy has a steeper learning curve than most hobbies, but the curve starts at a specific, predictable point: the moment you look up at 5,000 points of light and have no idea where to point a telescope.
This guide short-circuits that. You don’t need to know the sky before your first night out. You need a sequence: what to look at, in what order, and what you’re actually seeing when you find it.
Week one: Start with what you can’t miss
Your first three nights out, find only these things:
The Moon. It’s always obvious, always bright, and always spectacular through any telescope. Start with a low-magnification eyepiece (your longest focal length, probably 25mm or 20mm). Scan the terminator — the line between light and shadow — where crater walls cast long shadows and the terrain looks almost three-dimensional. This is the most detailed object you’ll ever see through a telescope.
Jupiter. The brightest non-Moon object in the sky most nights. Through even a beginner scope, you’ll see two or three dark equatorial cloud bands and up to four of the Galilean moons (Io, Europa, Ganymede, Callisto) lined up in a row. Check back the next night: the moons have moved. Galileo noticed this in 1610.
Saturn. More effort to find than Jupiter (dimmer), but the payoff is disproportionate. The rings are real, and they are immediately shocking in a way that photographs don’t capture. You’re seeing them with your own eye. That specific moment is why people become amateur astronomers.
Use a free planetarium app (Stellarium or SkySafari) to figure out where Jupiter and Saturn are tonight. They move through the zodiac slowly, so once you find them once, they’ll be in roughly the same spot for months.
Star-hopping is how you find anything that isn’t blindingly obvious. The idea: identify a bright star you know, then use its position relative to other stars as a stepping-stone to your target.
Start with the Big Dipper. Almost everyone in the northern hemisphere can find it. From the Big Dipper:
Follow the pointer stars (the two stars at the end of the cup) straight up: you reach Polaris, the North Star. It’s not particularly bright, but it never moves and it tells you which way is north. Every sky session begins by orienting yourself to Polaris.
Follow the arc of the handle and “arc to Arcturus” — a bright orange star southeast of the Dipper. Continue the arc to “speed to Spica,” a blue-white star further south. Two stars from one sweep of the arm.
Your second-week goal: use Turn Left at Orion (the book) to find the Orion Nebula (M42) if it’s your winter season, or the Hercules Cluster (M13) if it’s summer. Both are easy targets. M42 looks like a smudge of light around a trapezoid of stars. M13 is a fuzzy ball that resolves into individual stars at higher magnification. These are your first deep-sky objects — stuff outside our solar system.
Week three: Understand magnification
Beginners always want more magnification. This is a mistake.
Useful magnification on any telescope is roughly 50x per inch of aperture, on a steady night. For a 130mm (5-inch) scope, that’s about 250x maximum — and most nights, the atmosphere won’t support it. Waves of heat shimmer and blur everything above 150-200x.
The practical rule: use the lowest magnification that shows the detail you’re after.
Moon and wide-field star clusters: 30-80x
Jupiter and Saturn detail: 100-150x
Double stars and planetary detail on good nights: up to 200x
High magnification also makes tracking harder. At 200x, Earth’s rotation moves an object out of your field of view in about 30 seconds. At 50x, you have several minutes. For beginners, lower magnification = more time to actually look at the thing.
Your eyes take 20-30 minutes to fully dark-adapt after white light exposure. This is real physiology, not psychology. Photoreceptors in the retina (rods) produce a pigment called rhodopsin that gets bleached by bright light and regenerates in the dark. A single phone-screen flash erases several minutes of adaptation.
Practical habits:
Use a red flashlight only. Red light doesn’t bleach rhodopsin. This is the most impactful $10 purchase in the hobby.
Let your eyes sit for 20 minutes before making judgments about faint objects.
Averted vision — looking slightly to the side of a faint target — puts it on the rod-heavy periphery of your retina, which is more sensitive to faint light than the center. This trick is real and widely used.
Let your telescope cool outside for 30 minutes before you observe. Thermal currents rising through a warm tube blur planetary images even if the atmosphere is steady.
By the end of week four, you should be able to find a handful of Messier objects by star-hopping, know the magnification sweet spot for your scope, and have developed the habit of going out on clear nights without much friction. That’s the foundation. Everything else — better eyepieces, darker skies, eventually astrophotography — is built on top of it.
What comes next
After your first month, the natural path is:
Work through the Messier catalog. Charles Messier compiled 110 objects specifically so comet hunters could ignore them. They’re the perfect beginner target list: all visible in small scopes, covering every deep-sky type (nebulae, clusters, galaxies). Many observers spend years finishing it.
Find a local astronomy club. Most clubs run monthly star parties at a dark site. Observing next to someone with a 12-inch Dobsonian and decades of experience is an education you can’t replicate from YouTube.
Visit a dark site. Even one night per year under genuinely dark skies recalibrates what you think the hobby is. The difference between suburban and Class 1 dark skies is not subtle.
Save your money
What you don't need yet
Beginners get pressured to buy a lot of stuff that doesn't help them play
better. Here's what we'd skip on day one.
A computerized GoTo mount — Fun later, harmful early. You'll never learn where anything is in the sky. Push manually for six months first.
Nagler or Ethos premium eyepieces ($200-400 each) — Genuinely excellent, but wasteful before you know your observing style. Two good Plossls or X-Cel LX eyepieces cover everything you need for year one.
A deep-sky imaging rig (tracking mount, cooled CCD) — Deep-sky imaging is a separate, expensive hobby. Master visual observing first; imaging can wait until year two.
Narrowband filters for light pollution — These help, but not as much as simply driving 30 minutes from the city. Don't spend $100 on a filter before you've tried a dark site.
An equatorial mount for visual use — EQ mounts track objects as Earth rotates, which matters for photography. For visual work, a simpler alt-az mount is easier and faster to set up.
First week
Your first seven days
A short, real plan to get from gear-on-doorstep to actually playing.
Order your telescope so it arrives before the weekend. · Buy
Learn the Big Dipper and how to follow the arc to Arcturus. Two constellations is enough to anchor the whole northern sky. · Learn
On your first clear night, start with the Moon. It's always bright, always obvious, and the crater detail will stop you cold. · Action
Find Jupiter or Saturn next. Both are visible most of the year, and seeing the rings or the Galilean moons for the first time is the moment most people get hooked for good. · Action
Order Turn Left at Orion to have by your second session. The first night is instinct; after that you need a guide. · Buy
Let your scope cool outside for 30 minutes before your first look. Thermal currents inside a warm tube blur everything. · Action
FAQ
Common questions
What's the best first telescope for a beginner?
The Celestron StarSense Explorer DX 130AZ is the honest answer for most people: the phone-guided pointing system eliminates the biggest beginner frustration (finding anything), and 130mm of aperture handles all the showpiece targets. If budget is the constraint, the Celestron PowerSeeker 70AZ shows Saturn's rings for under $80. Avoid telescopes from toy stores and big-box closeout bins regardless of the aperture number printed on the box.
Do I need to live in the countryside to enjoy amateur astronomy?
No. Light pollution hides faint galaxies, but it doesn't hide Saturn, Jupiter, the Moon, double stars, or open clusters. Suburban observing is genuinely rewarding. Once you've built the habit, a dark-sky site trip once or twice a year for deep-sky work is the natural progression.
How much magnification do I need?
Less than you think. Most beginners immediately crank to maximum magnification and wonder why everything looks blurry. Useful magnification on a beginner scope tops out around 150-200x on a clear night. Higher than that and atmospheric turbulence makes everything wobble. For wide views, 30-80x is ideal. For planets, 100-150x on a steady night.
What will I actually see through a beginner telescope?
Saturn with obvious rings and the Cassini Division on a good night. Jupiter with cloud bands and up to four Galilean moons. Craters on the Moon in extraordinary detail. The Orion Nebula as a soft glow with a bright core. The Andromeda Galaxy as a fuzzy oval. Double stars in vivid color pairs. It's not Hubble, but it's real, and you're seeing it yourself.
How much does amateur astronomy cost to start?
A functional beginner setup costs $150-200: a decent scope and one upgrade eyepiece. A genuinely good setup is $300-400. The real cost creep comes from eyepiece upgrades and dark-sky travel, neither of which you need in year one. The hobby can stay cheap or become expensive; that's a choice, not an inevitability.
Do I need to know the constellations before I start?
No. You need to find two or three bright guide stars to point your scope in the right direction, which you can learn in a single session. The constellations are context, not prerequisites. You'll absorb them naturally over the first few months of observing.
Sky & Telescope — The hobby's flagship publication since 1941. Equipment reviews, sky charts, object-of-the-month guides, and an active online forum. Start here for gear research.
Cloudy Nights — The most active amateur astronomy forum. Brutally honest equipment reviews, observing logs, troubleshooting help. The community is knowledgeable and generally welcoming to beginners.
Stellarium — Free, open-source planetarium software. Use it on desktop before a session to plan what's up. The web version works without downloading anything.
SkySafari (App Store / Google Play) — The best smartphone star-chart app. Free tier works well; SkySafari 6 Pro adds database depth. Hold your phone up and it shows what's in front of you in real time.
Astronomy Sketch of the Day — A quiet corner of the internet: daily sketches of what observers worldwide saw through their eyepieces. Good for calibrating what you can expect to see at different apertures.
r/telescopes — Active buying-advice community. Good for confirming gear choices and troubleshooting optical problems. Read the wiki before posting a 'what scope should I buy' question.
NASA JPL Eyes on the Solar System — Free 3D solar system simulator. Helps you understand where the planets are relative to Earth, which makes finding them in the eyepiece feel less like luck.
As an Amazon Associate, JustBeginning earns from qualifying purchases.
We may also earn commission from other affiliate programs linked on this
page. Editorial recommendations are independent; we don't choose
products based on commission rates.
Product prices and availability are accurate as of the date and time
indicated and are subject to change. Any price and availability
information shown on Amazon at the time of purchase will apply.