Beginner's guide

So you're getting into orienteering

A map, a compass, and terrain to find your way through. Orienteering is a navigation sport where you move through forest, park, or mountain locating numbered control flags in sequence, using only a detailed map and compass as guides. It's part trail running, part puzzle, and addictive in a way most other sports aren't. Here's what you actually need to start.

By Colin B. · Published June 10, 2026 · Last reviewed June 10, 2026

The 60-second version

If you only buy 3 things to start:

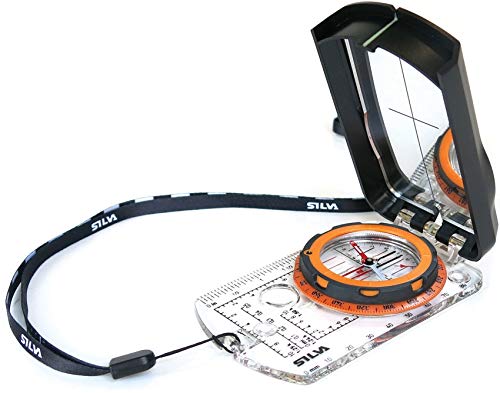
  1. Silva Ranger 2.0 Compass — The classic baseplate compass that teaches you to navigate properly from day one.
  2. Inov-8 X-Talon 212 V3 — The definitive O-shoe: grippy lugs, light build, and handles forest terrain trail runners can't.
  3. Ochine Wrist Map Holder — A waterproof arm map holder that keeps your map readable and folded at a full run.
Budget total
$30
Typical total
$150
Your first event costs almost nothing: borrow a compass, pay the entry fee ($10-15). Once you own a Silva Ranger ($30), a map holder ($10), and O-shoes ($110), you're fully kitted for any event.

We earn commission on qualifying Amazon purchases — see our affiliate disclosure. Price tiers and budget totals shown above are editorial estimates; actual Amazon prices vary.

At a glance

Our top pick in each category

The fastest path through this guide — each best-starter pick by category. Scroll for the budget and upgrade alternatives.

CategoryTop pickPriceWhere to buy
CompassSilvaSilva Ranger 2.0 Compass$$ See on Amazon →
FootwearInov-8Inov-8 X-Talon 212 V3$$$ See on Amazon →
O-SuitCraftCraft ADV Essence Tight$$ See on Amazon →
Map ProtectionOchineOchine Wrist Map Holder$ See on Amazon →
GPS WatchGarminGarmin Forerunner 255$$$ See on Amazon →
Before you buy anything

A few things worth knowing first

Go to one event before buying gear. Orienteering clubs loan compasses to newcomers, and the event map is provided at registration. Your first outing costs only the entry fee, typically $10-15. After one event you'll know whether it's worth investing in your own kit.

Your current trail runners will handle the first few events. O-shoes (orienteering-specific footwear with studded soles) genuinely improve traction in rough forest, but the gap is small at beginner level when navigation errors, not footspeed, are what's losing you time.

GPS watches are banned during competition. They're useful for training replay (uploading your route to Livelox to see where you went wrong), but they have no role on race day. Don't let anyone convince you a GPS device is essential gear before your first event.

The gear

What you actually need

clear and white compass with ruler on map illustration

Photo by Hendrik Morkel on Unsplash

Compass

The compass is the most important piece of gear in orienteering. You use it to take bearings off the map and hold a straight-line direction through forest where you can't see landmarks. For beginners, a baseplate compass is the right starting point: it rests on your map like a protractor and makes the navigation logic visible and learnable. Thumb compasses come later. They strap to your thumb and let you hold map and compass together at a run, which is faster once you have the fundamentals down. Any compass from Silva or Suunto will last years; don't let the price range paralyze you.

Compass — what's the difference?

A few common shapes, each making a different trade.

Baseplate (Plate) Compass

Rests flat on your map. Take a bearing, follow the needle. The right place to start.

Style
Plate compass
Best for
Beginners, learning navigation
Map contact
Full plate on map

Best for Anyone learning orienteering navigation from scratch

Tradeoff Slower than thumb compass in races; both hands engaged during reading

↓ See our pick
Thumb Compass

Clips to thumb, held against the map while running. Faster navigation once you know bearings.

Style
Thumb mount
Best for
Competitive racing, experienced navigators
Map contact
Thumb holds map and compass together

Best for Orienteers who have mastered bearings and want to race faster

Tradeoff Disorienting for beginners; navigation logic is less obvious

↓ See our pick
Silva Ranger 2.0 Compass Best starter
Silva

Ranger 2.0 Compass

$64.99 as of Jun 22, 2026

Our rating · Only 7 left in stock - order soon.

Silva has been making orienteering compasses for nearly 90 years, and the Ranger is their most trusted all-around model. The magnifying lens reads fine map symbols clearly, the large baseplate works as a ruler for precise bearings, and the needle settles fast. It's what most US orienteering clubs hand to first-time members.

What we like

  • Magnifying lens reads dense orienteering map symbols clearly
  • Needle settles faster than budget compasses; no wobble mid-course
  • Large baseplate doubles as a distance-measuring ruler on the map

What to know

  • Heavier than a thumb compass; not what competitive racers use
  • Declination adjustment takes 5 minutes to learn once
Suunto A-10 Compass Budget pick
Suunto

A-10 Compass

$24.00 as of Jun 22, 2026

Our rating

Under $20 and built by one of the two compass brands that matter in orienteering. The A-10 is stripped down but teaches the same navigation skills as a pricier model. If you're testing whether this sport is for you, this is the smart way in.

What we like

  • Under $20 from one of orienteering's two trusted compass brands
  • Lightweight and durable; beginner-proof build

What to know

  • No magnifying lens; small map symbols harder to read in dim light
  • No fixed declination adjustment; requires manual calculation
Silva ARC Jet S Left Compass Upgrade pick
Silva

ARC Jet S Left Compass

$89.99 as of Jun 22, 2026

Our rating · Only 2 left in stock - order soon.

Once you've mastered navigation with a baseplate compass, this is what competitive orienteers use. The ARC Jet S straps to your left thumb and lets you read map and compass simultaneously at a run, genuinely faster once the technique clicks. Expect an adjustment period of 3-4 events before it feels natural.

What we like

  • Read map and compass simultaneously while running at race speed
  • Lightweight housing adds nothing perceptible to wrist weight

What to know

  • Confusing for beginners; start with a baseplate compass first
  • Left-hand only design (intentional, but worth knowing upfront)
Feet wearing sneakers on a forest floor.

Photo by Hanna Lazar on Unsplash

Footwear

Trail runners get you onto courses without spending extra, especially on parkland or groomed forest. The case for O-shoes (orienteering-specific footwear) is traction: the studded or lugged rubber outsole grips root-covered ground, wet leaves, and muddy slopes that trail runners struggle on. In rough forest, a real O-shoe is the difference between confident movement and ankle-rolling hesitation. Use what you have for your first two or three events. When the sport sticks, O-shoes are worth the $80-120.

Inov-8 X-Talon 212 V3 Best starter
Inov-8

X-Talon 212 V3

$$$

Our rating

The most proven orienteering shoe on the market. Inov-8 was built around this category, and the X-Talon's 6mm lugs handle forest terrain that eats most trail runners. Lightweight, low-profile, and fast out of the gate. Most orienteers who try it don't go back to trail runners for events.

What we like

  • 6mm lugs give real grip in rooted, muddy forest terrain
  • Inov-8's orienteering heritage; built for exactly this category
  • Low stack height keeps you agile and responsive on uneven roots

What to know

  • Narrow last; wide-footed runners should try before committing
  • Minimal cushioning punishes feet on long courses with road sections
Salomon Speedcross 6 Budget pick
Salomon

Speedcross 6

$$$

Our rating

If you already own a pair of Speedcross (or any aggressive trail runner), use them for your first events. The chevron lugs handle most orienteering terrain reasonably well, and they're available everywhere. Not as fast as O-shoes in rough forest, but the gap is small when navigation, not footspeed, is the limiting factor.

What we like

  • Widely available and familiar to trail runners making the switch
  • Aggressive lugs handle most beginner-course terrain adequately

What to know

  • Heavier and less agile than O-shoes on tight, twisty forest routes
  • Lugs clog with mud in wet conditions where studs outperform
Icebug Arcus BUGrip GTX Specialty pick
Icebug

Arcus BUGrip GTX

$59.99 as of Jun 22, 2026

Our rating

Carbide steel studs instead of rubber lugs, which means grip on wet rock, hardpack, and icy conditions that O-shoes cannot match. The Arcus BUGrip also has a waterproof Gore-Tex upper, making it the choice for wet Pacific Northwest and Rocky Mountain forest events. Overkill for parkland courses; genuinely valuable in serious technical terrain.

What we like

  • Carbide studs grip wet rock and hardpack where rubber lugs slip
  • Upper wraps tight and low for confident movement in dense brush

What to know

  • Expensive; overkill for most beginners on parkland courses
  • Studs degrade on pavement; avoid road connections mid-course

O-Suit

Loose clothing catches on branches and slows you down. Orienteering suits are tight, snag-resistant, and cut for running. For your first few events, compression tights and a close-fitting long sleeve do the job without spending anything extra. An actual O-suit (a single-piece or two-piece racing garment in lightweight stretch fabric) is worth buying once you're attending events regularly. It dries fast, protects your skin from undergrowth, and moves with you. Many clubs sell branded club kits, which is also the fastest way to feel like part of the community.

Craft ADV Essence Tight Best starter
Craft

ADV Essence Tight

$$

Our rating

Craft makes compression tights used across Scandinavian orienteering circuits, where the sport is essentially a religion. The ADV Essence is lightweight, stays put on rough terrain, and is tight enough not to snag on undergrowth. Functions as a proper starter O-suit bottom until you're ready to buy a full club kit.

What we like

  • Craft's compression fabric trusted in Scandinavian orienteering
  • Tight cut won't snag on undergrowth like looser running tights do
  • Dries quickly between morning warmup and afternoon race start

What to know

  • No built-in leg protection for dense briar terrain
  • Not a full O-suit; you'll want a proper club kit after a few events
Budget pick
Under Armour

HeatGear Armour Compression Tight

$

Our rating

Any close-fitting compression tight gets you through beginner events without snagging. Under Armour's HeatGear is widely available, under $40, and tight enough to handle most orienteering terrain. Not purpose-built for the sport, but a perfectly functional solution while you're deciding if orienteering will stick.

What we like

  • Available everywhere; no specialty ordering required
  • Close fit prevents most snagging on light undergrowth

What to know

  • Heavier fabric than racing O-suits; warm in summer events
  • You'll want to upgrade to proper orienteering clothing eventually

Map Protection

At events you're handed a printed orienteering map: high-detail, ISOM-standard, with vegetation and terrain information packed into every centimeter. You need to protect it from sweat and rain without slowing down your ability to read it at a run. The minimum solution is a zip-lock bag. A proper arm map holder keeps the map folded to your current section and slightly elevated for quick glances, and stays put through rough forest. This is the cheapest upgrade in orienteering with the most immediate impact on your experience.

Ochine Wrist Map Holder Best starter
Ochine

Wrist Map Holder

$9.99 as of Jun 22, 2026

Our rating · Only 1 left in stock - order soon.

A clear, elastic-backed wrist holder with a transparent window for reading your map at a run. Fold your map to the current section, slide it in, and glance down mid-stride without breaking your stride. Under $15, and the same wrist-holder concept that club-level orienteers use in training.

What we like

  • Elastic back holds the map steady through rough forest sections
  • Under $15; same solution club-level orienteers use in training

What to know

  • Map can shift if not folded tightly before the start
  • Limited to one map section at a time; fold discipline takes practice
SealLine Map Case Specialty pick
SealLine

Map Case

$$

Our rating

A waterproof, welded-seam map case that keeps your orienteering map bone-dry even in heavy rain. SealLine makes bomber waterproof cases for paddlers and hikers; this small version holds a folded orienteering map and is tough enough to handle forest snagging and sweat-soaked courses.

What we like

  • Welded seam is fully waterproof; map survives downpours and sweat
  • Durable enough to handle forest brush without tearing

What to know

  • Heavier and bulkier than a bare arm strap or zip-lock bag
  • Overkill for dry-weather park events; adds unnecessary bulk
a man's arm with a smart watch on it

Photo by Omar Ramadan on Unsplash

GPS Watch

GPS devices are banned during competition. This category is purely about training. A GPS watch lets you record your route as a GPX track, upload it to Livelox or Attackpoint after the event, and see exactly where you lost time against competitors who took faster routes. Route analysis is how intermediate orienteers improve fastest. If you're doing two or three events per year casually, skip this category entirely. If you're training seriously and want to get better, a Garmin with multiband GPS is the single best improvement tool you can buy.

Garmin Forerunner 255 Best starter
Garmin

Forerunner 255

$297.99 as of Jun 22, 2026

Our rating · In Stock

The Forerunner 255 hits the sweet spot for orienteering training: multiband GPS accurate to 1-2 meters in tree cover, 14-day battery, and a light form factor. The GPX export works directly with Livelox and Attackpoint, the two main route-replay tools. It's the watch most club-level orienteers carry.

What we like

  • Multiband GPS gives 1-2m accuracy in dense forest canopy
  • GPX export works directly with Livelox and Attackpoint
  • 14-day battery handles weekly training runs plus events

What to know

  • Expensive ($350+) if you're still testing whether orienteering sticks
  • No map display; you still navigate by paper map on race day
Garmin Forerunner 55 Budget pick
Garmin

Forerunner 55

$149.99 as of Jun 22, 2026

Our rating · In Stock

Under $200 and tracks accurately enough for post-event route replay. Lighter than the 255, simpler feature set, and still exports GPX for Livelox. The right choice if you're doing 5-10 events per year and don't need the accuracy or battery premium of the higher-end model.

What we like

  • Under $200 and GPX export works with Livelox for route replay
  • Lighter than the 255; barely notice it during a forest run

What to know

  • Single-band GPS drifts 10-15m in tree cover; less precise for analysis
  • Shorter battery; needs charging between multi-day event weekends
Going deeper

Your first 5 events of orienteering

The sport looks simple from the outside: map, compass, forest. The inside is a different story. Here's what actually happens across your first five events, and how to stop getting lost by event three.

Man with map hiking in a forest
Photo by Vitaly Gariev on Unsplash

Orienteering has an unusual learning curve. The sport is easy to start: show up, grab a map, follow the flags. But navigation is a skill with real depth, and there’s a gap between completing a course and understanding what you’re doing. Most beginners experience that gap across their first three to five events, and knowing what’s coming makes it much less frustrating.

Here’s what those five events actually look like.

Event 1: Just finish the course

Your first event, the goal is simply to finish. Take the White or Yellow course, borrow a compass from the club if you don’t have one, and follow the flags without worrying about speed or elegance.

A few things to know before you start:

The map is not a hiking map. Orienteering maps use the ISOM international standard with five colors: white (runnable forest), green (slow vegetation), yellow (open land), blue (water), and brown (contours). Black marks are man-made or rock features. Five minutes reading the legend before you start is not wasted time.

Controls are orange-and-white flags. Each has a punch (a spike or dibber) that marks your card to prove you visited. At bigger events you’ll get a SI (SportIdent) chip that registers electronically when you touch the box at each flag.

You navigate between controls, not to the finish line. Each leg is its own problem. The shortest path through forest is almost never the straight line on the map; route choice matters from day one.

Your first course will probably take twice as long as you expect. That’s normal. You’ll stop, turn the map around, look up, look down, second-guess yourself. This is the sport working as designed.

white The Pursuit flaglet
Photo by Darren DeLoach on Unsplash

Events 2-3: The map starts making sense

By your second event, the map symbols are starting to feel like language rather than noise. This is when a few things click:

Always orient your map to north. Hold the map so north on the paper matches north in the terrain. Most beginners hold the map like a brochure, rotating it to their direction of travel instead. Don’t. A map oriented to north means features on your left are features to your west, always.

Contour lines tell you the shape of the ground. Closely-spaced lines mean steep; widely-spaced lines mean gentle. A circle of contour lines means a hilltop or depression. Once you learn to read elevation from contours, forests stop looking like random trees and start looking like shaped landscapes you can navigate by feel.

Attack points. The most reliable orienteering technique is not navigating directly to a control. Instead, navigate to a large, unmissable feature near the control (a trail junction, a hilltop, a lake edge), then navigate carefully the last 50-100 meters. The unmissable feature is your attack point. Every competitive orienteer uses this technique. It removes the moment of panic that comes from navigating blind into featureless forest.

The second and third events are when beginners discover what kind of mistakes they make. The most common: drifting from a bearing by 15-20 degrees over 200 meters (you think you’re going straight; you’re not), and confusing similar-looking terrain features (two small hills that both look like “the one on the map”).

Event 4: Route choice becomes real

Around event four, you stop navigating by survival instinct and start making actual decisions. Route choice is the puzzle at the heart of orienteering: the straight line may cross a cliff, a swamp, or impenetrable green. The path around may be longer on the map but faster on the ground.

Running track around a forest versus shorter forest route is the classic beginner trade-off. At event one, most people just go straight. By event four, you’re measuring the two options and estimating which is faster given your current fitness and the terrain type shown on the map.

This is also when pace counting becomes useful. Pick a known distance on the map (say, 100 meters) and count your double-steps over that distance on flat ground. Know that number. In featureless terrain, counting paces is the only way to know you’ve gone the right distance before you expected a control to appear.

a person holding a map in their hand
Photo by Matilda Vistbacka on Unsplash

Event 5: You start competing with yourself

By event five, you have enough repetitions to track your own improvement. Most clubs time every course and post results. Look up where you finished relative to other competitors in your age class.

More useful than your finish place is your split analysis. After the event, if your club uses Livelox or similar route-replay software (most US clubs do), upload your GPS track and see which legs you ran well and which you blew time on. A 10-minute leg where you averaged 4 minutes per leg and then spent 8 minutes on one control tells you exactly what to work on.

The things that separate improving orienteers from plateaued beginners:

  • Consistent compass use. Beginners check the compass at the start of a leg and put it away. Better orienteers follow a bearing the entire leg, checking every few steps.
  • Map contact. Never let yourself not know where you are on the map. If you’re unsure, stop, figure it out, then move. Running while confused is how you lose 10 minutes.
  • Aggressive attack points. Instead of navigating vaguely “toward” a control, pick a specific attack point, navigate to it precisely, then use precise techniques for the last section.

The best orienteers aren’t the fastest runners in the field. They’re the ones who are never lost. Speed matters; navigation precision matters more.

What to do between events

The skill that develops fastest outside of events is map reading. Get any map with topographic contour detail (even a USGS 7.5-minute topo sheet works) and practice reading the shape of the landscape from the lines. Orienteering maps are more detailed, but the contour logic is identical.

MapRun (maprun.net) has thousands of permanent orienteering courses set on downloadable maps around the world. You can run them any day without an event. Your GPS phone triggers the controls. It’s the best way to accumulate map-and-compass repetitions between club events.

Reading the terrain while you run is a skill. It takes around 30-50 hours of active practice before it feels automatic. Five events gets you started. The rest is repetition.

a person holding a compass in a forest
Photo by Hendrik Morkel on Unsplash
Save your money

What you don't need yet

Beginners get pressured to buy a lot of stuff that doesn't help them play better. Here's what we'd skip on day one.

  • A GPS navigation app active during events — GPS devices are banned in competition. Learn to navigate with map and compass; that's the whole point.
  • Trail running poles — Orienteering requires both hands free to hold and read a map. Poles make you slower, not faster.
  • A night-orienteering headlamp — Night-O is a fun specialty format, but most beginner events are daytime. Get into the sport first.
  • A custom club kit — Your club will sell you one after you join. Don't buy branded gear for a club you haven't chosen yet.
  • A thumb compass on day one — Start with a baseplate compass. Thumb compasses have a learning curve; buying one before you know bearings is backwards.
First week

Your first seven days

A short, real plan to get from gear-on-doorstep to actually playing.

  1. Find your nearest orienteering club and check their upcoming events. · Action
  2. Register for a beginner course (White or Yellow in the US color system). You'll be handed a map and can borrow a compass at the event. · Action
  3. Watch a 10-minute how-to-use-a-compass video before your first event. Just the basics: take a bearing, follow the needle. · Learn
  4. After your first event: order a Silva Ranger compass so it arrives before the next one. · Buy
  5. Install MapRun and try a virtual orienteering course in your local park. Free, no event registration required. · Action
  6. Go to a second event. Orienteering skills develop fast with repetition; the map reads differently by your third course. · Action
FAQ

Common questions

How fit do I need to be to start orienteering?

Not very. Beginner courses (White and Yellow in the US) are typically 2-4 km on mostly runnable terrain, and most beginners walk more than they run. Fitness matters more as you move up the course difficulty ladder, not on your first day.

Can I start without buying a compass?

Yes. Most clubs loan compasses to first-timers at no charge. Try one event with a loaner, then buy your own if the sport sticks. A $20 Suunto A-10 is plenty for the first year.

What are the course color levels?

US orienteering courses go White (easiest, follows trails), Yellow, Orange, Brown, Green, Red, Blue (hardest). Start at White or Yellow. Orange is where real forest navigation starts, which is also when the sport gets genuinely addictive.

Is orienteering just hiking with a map?

On the easy courses, essentially yes. On Orange and above, it's a different sport: tight forest navigation, split-second route choices, and running hard between controls. The physical and mental demands compound as you move up the ladder.

How do I find events near me?

Orienteering USA's club directory (orienteeringusa.org/find-a-club) lists every affiliated club in the country with their event calendars. Most clubs run events monthly, with more in spring and fall when the weather cooperates.

Do I need to be good at reading maps before I start?

No. Orienteering maps use a simple visual language that beginners pick up quickly. The White and Yellow courses are designed to teach that language while you move. One coached warmup walk at an event teaches more than hours of map-reading study at home.

Going further

Where to next

Authoritative sources

  • Orienteering USA — The national governing body. Event calendar, club directory, beginner guides, and official rules. Start here.
  • International Orienteering Federation — Global governing body. Map standards, rules, and World Championships coverage.
  • Attackpoint — The orienteering training log and community. Upload routes, analyze splits, follow top athletes. Essential once you're training seriously.
  • Livelox — Route replay tool. Most US events upload GPS routes post-race; seeing where you lost time is the fastest way to improve.
  • World of O — News, events, and resources. The closest thing orienteering has to its own sports desk.
  • MapRun — Free virtual orienteering app. GPS-triggered scoring on thousands of permanent courses worldwide. The best way to train between events.