A book nook is a tiny lit-up scene that slides onto your shelf between the books, like an alley you could walk into. Your first one takes an evening or two and about $60 all in. Here's which kit to start with, the handful of tools that make it pleasant, and what you can skip.
By Colin B. · Published November 5, 2026 · Last reviewed November 5, 2026
Original Tacky Glue (4 oz)
— Tacky glue grabs paper, wood and fabric and gives you a minute to adjust. About $3.
Budget total
$55
Typical total
$110
A $30 kit plus glue, tweezers, a knife and a cheap mat gets you building for about $55. Our recommended kit and tools land around $110, and everything except the kit carries over to your next build.
We earn commission when you buy through links on this page, including
Amazon. See our affiliate disclosure.
Price tiers and budget totals shown above are editorial estimates;
actual prices vary.
At a glance
Our top pick in each category
The fastest path through this guide — each best-starter pick by category.
Scroll for the budget and upgrade alternatives.
Start with a snap-fit kit, not a glue-heavy one. Rolife's beginner kits press together, so your first build is about patience, not about managing glue. Once you've finished one, a cheaper glue-it-yourself kit like CUTEBEE will feel easy.
Check the battery type before you start. Almost every kit runs its LEDs off 2 AAA batteries that are not in the box. Have them on hand, and test the lights before you close up the back panel, not after.
Measure your shelf. Most kits are about 8 to 10 inches tall and 4 to 5 inches wide. If your shelf is shorter than that, the nook won't fit between your books, and that is the whole point.
The kit is the hobby. Every piece is laser-cut and printed, so your job is following steps, not designing anything. The real choice is between snap-fit kits, where pieces press together, and glue kits, which are cheaper and more detailed but ask more of you. For a first build, pick snap-fit and a theme you'll want to look at every day. Budget 3 to 8 hours, and expect to take longer than the box says.
Best starter
Rolife
Beginner Friendly Book Nook Kit (3.5 hour build)
$46.99 as of Nov 5, 2026
★★★★★Our rating· In Stock
Rolife makes the kits most people start on, and this one is built for exactly that. Pieces snap together with no glue, the instructions are clear, and the LEDs and a dust cover are in the box. The box says 3.5 hours; plan on an evening or two. About $47.
What we like
Snap-fit pieces, no glue to manage
LED lights and a dust cover included
Clear instructions written for first-timers
What to know
Needs 2 AAA batteries, not included
Some reviewers took two to three times the listed build time
Around $30 and one of the best-reviewed kits on Amazon, with more than 1,500 ratings. The detail is excellent for the price. The catch is you glue it yourself, so it suits your second build or a patient first one.
The step up once you've finished a first kit. More layers, more furniture, a fuller scene, and still Rolife's clear instructions. Plan on 5 to 8 hours. Around $47, with more than 800 ratings at 4.7 stars.
Even snap-fit kits have a few loose pieces, and glue kits need it everywhere. You want two kinds. A tacky craft glue for paper, wood and fabric, because it grabs fast but gives you a minute to nudge a piece into place. And a gel super glue for the odd plastic or metal bit. Wood glue is a nice extra for structural joints on scratch builds, but it's not the first bottle to buy.
Best starter
Aleene's
Original Tacky Glue (4 oz)
$3.00 as of Nov 5, 2026
★★★★★Our rating· In Stock
The craft-table standard for a reason. It's thick, so it doesn't run down the walls of a tiny room, it holds paper and wood, and it dries clear. A 4 oz bottle is about $3 and lasts several kits.
What we like
Thick formula stays put on vertical surfaces
Dries clear on paper, wood and fabric
About $3, lasts several builds
What to know
Takes a few minutes to set, so hold pieces briefly
For the parts tacky glue won't hold: plastic lamp shades, metal wire, a snapped peg. The gel doesn't run, and the squeeze bottle lets you put down a dot the size of a pinhead. About $4.
If you start modifying kits or building your own scenes from basswood, this is the wood glue woodworkers swear by. A small bottle is about $3. Overkill for a first snap-fit kit, perfect for your third.
This is the tool that makes the hobby fun instead of frustrating. Book nooks are full of things the size of a grain of rice: books, cups, picture frames, lamp shades. Fingers can't place them and can't reach into the back of a finished room. A set with a fine straight tip and a curved tip covers almost everything.
Best starter
Antonki
12-in-1 Precision Tweezers Set
$9.49 as of Nov 5, 2026
★★★★★Our rating· In Stock
Twelve shapes for about $10, including the fine straight and curved tips you'll use most, in a case that keeps them from rolling off the table. More than 12,000 ratings. You'll use four of them constantly and the rest occasionally.
If you want the essentials and nothing else, this is three anti-static stainless tweezers for about $6, with the straight and curved tips that do most of the work.
Laser-cut parts still hang on by tiny tabs, and tearing them out leaves fuzzy edges that show. A sharp hobby knife cuts them clean. You also need it for trimming printed paper and cleaning up pegs. Change the blade often. A dull blade tears paper and slips, and that's when people cut themselves.
Best starter
X-ACTO
#1 Z-Series Precision Knife
$8.09 as of Nov 5, 2026
★★★★★Our rating· In Stock
The knife every craft table has. An aluminum handle, a safety cap, and the standard #11 blade that you can buy anywhere. About $8 and it will outlast every kit you build.
Two handles and a pile of spare blades in a magnetic case for about $12. If you want to change blades as often as you should without thinking about it, this is the cheaper way to do it.
A cutting mat protects your table and keeps the blade sharp longer. It also gives you a gridded surface to sort tiny parts on, which matters more than it sounds. A 9 by 12 inch mat is big enough for any kit sheet and small enough to leave out.
Best starter
OLFA
9x12" Double-Sided Self-Healing Cutting Mat
$14.99 as of Nov 5, 2026
★★★★★Our rating· In Stock
OLFA invented the snap-off blade and makes mats that last. This one is double-sided, 2 mm thick, and the right size for kit sheets. About $15.
The lights are what make a book nook. Almost every kit runs its LEDs from a small box that takes 2 AAA batteries, and they are not included. Rechargeables pay for themselves fast if you leave the nook lit in the evenings. Test the lights early in the build, before the wiring is hidden.
Best starter
Panasonic
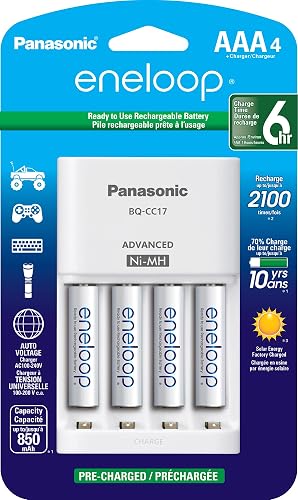
Battery Charger with 4 AAA eneloop Batteries
$25.87 as of Nov 5, 2026
★★★★★Our rating· In Stock
eneloop are the rechargeables people stick with: they hold their charge for months in a drawer and last for hundreds of cycles. Four AAA plus a charger for about $26 runs two nooks, with a spare set charging.
What we like
Holds a charge for months between uses
Charger included, ready out of the box
Four cells run two nooks
What to know
About $26, more than a pack of alkalines
Slightly lower voltage than alkaline, lights a touch dimmer
A first book nook takes three or four evenings, not one. Here's what each session looks like, from opening the box to switching on the lights, and the mistakes that cost people an extra night.
A book nook kit looks like a weekend afternoon. For most people it’s three or four evenings, and that’s the good news: it’s a calm, absorbing thing to sit down to after work. Nothing about it is hard. It’s small, it’s slow, and it punishes rushing.
Here’s how a first build usually goes, using a snap-fit kit like Rolife’s beginner range.
Evening 1: Open the box, sort, and build the shell
Don’t start building yet. Spend the first twenty minutes sorting.
Lay out every sheet and bag and check them against the parts list. Missing pieces are rare, but you want to know now, not at step 40.
Find a tray for the small parts. A muffin tin or a few small bowls, one per stage of the instructions. Tiny parts left loose on a table end up on the floor.
Read the whole manual once, quickly. You’re looking for where the wiring goes in, because that decides when you need batteries.
Then build the outer box: the floor, walls and back panel. This is the easy, satisfying part. Pop parts out of the sheet with a hobby knife rather than pushing them out with your thumb. Pushed parts tear at the tabs and leave fuzzy edges that show in the finished scene.
This is the evening that takes longest, and it’s where people either fall in love with the hobby or get frustrated.
Books, chairs, cups, lamp shades, picture frames. Each one is a few small pieces, and there are dozens of them. Use tweezers for everything smaller than your fingertip. Hold the part with the tweezers, add a dot of glue with a toothpick if it needs one, and set it in place.
A few things that help:
Work in good light, ideally from the side so the details cast a shadow.
Dry-fit before gluing. Press a piece into place without glue to check it’s the right one and facing the right way.
Stop when your hands get clumsy. Tired fingers knock over finished pieces. Twenty careful minutes beats an hour of fixing.
Evening 3: Lights and wiring
The lights are what make a book nook feel alive, and the wiring is the one step that trips beginners up.
Most kits use a small battery box with 2 AAA batteries. Put the batteries in and test every light before you hide any wires. If an LED doesn’t light, it’s almost always a loose plug or a wire pinched behind a wall. Fixing that now takes a minute. Fixing it after the back panel is on means taking the back panel off.
Route the wires along corners and behind furniture, and tape them down with a small piece of masking tape so they stay put.
Fit the front facade, the roof and any outside details. Then slide the nook onto your shelf between two books and switch it on with the room lights low. That’s the moment that sells people on building a second one.
If your kit came with a dust cover, use it. Dust settles into tiny scenes and is surprisingly hard to get out.
What comes after the first one
Your second kit will take half the time. That’s when people usually try one of these:
A glue kit, like CUTEBEE’s, which is cheaper and more detailed.
A lighting upgrade, swapping the battery box for USB power.
Small customizations, like a book cover from your own shelf printed tiny, or a little weathering with paint.
Save your money
What you don't need yet
Beginners get pressured to buy a lot of stuff that doesn't help them play
better. Here's what we'd skip on day one.
A full scratch-building toolkit — Basswood sheets, a miter box and a pin vise are for designing your own scenes. Build two or three kits first and you'll know if you want that.
A rotary tool — Laser-cut kits don't need any power tools. A hobby knife and a sanding stick do everything.
Upgraded LED kits — The kit's lights are fine for a first build. Swapping in USB or warmer LEDs is a fun second-build project.
Acrylic paint sets — Most kits come printed and pre-colored. Paint only matters once you start weathering or customizing.
A magnifying lamp — Nice for very fine work, but good daylight or a desk lamp is plenty for your first kit.
First week
Your first seven days
A short, real plan to get from gear-on-doorstep to actually playing.
Measure the shelf where the nook will live, height and depth. · Action
Sort the sheets and small parts into a tray or muffin tin before you start, by the step they belong to. · Action
Test the lights and battery box as soon as the wiring is in, before closing the back. · Action
Post your finished nook and ask what to build next. · Action
r/BookNooks · Friendly community, lots of kit advice
FAQ
Common questions
How long does a book nook take to build?
Most beginner kits take 3 to 8 hours. The box time is optimistic, and many first-timers take two or three times as long. That's fine; most people spread it over a few evenings.
Do I need glue for a book nook kit?
It depends on the kit. Rolife's beginner kits snap together with no glue at all. Cheaper kits like CUTEBEE need your own liquid glue throughout. A $3 bottle of tacky glue covers both.
What batteries do book nooks use?
Almost all kits use a small battery box with 2 AAA batteries, which are rarely included. Some newer kits also take USB power. Rechargeable AAA batteries are worth it if you leave the lights on in the evenings.
Are book nooks hard for beginners?
No, but they reward patience. There is no skill barrier beyond following instructions and handling small parts. Pick a snap-fit kit for your first build and use tweezers for the tiny pieces.
Will a book nook fit on my shelf?
Most kits are about 8 to 10 inches tall, 4 to 5 inches wide and 7 to 9 inches deep. Measure your shelf height and depth before you buy; a nook that sticks out past the books loses the effect.
Can kids build book nooks?
Teens can, and kits make good gifts for them. Younger kids will need an adult for the knife work and the wiring, and the tiny parts are a choking hazard for small children.
r/BookNooks — The busiest book nook community. Build logs, kit comparisons, and plenty of photos of lighting mods once you want to go further.
Rolife (official site) — The biggest kit maker. Their site lists build times and difficulty for every kit, which is handy for picking your second one.
Book nook build videos (YouTube) — Watching one full build before you start shows you where people get stuck (usually the wiring and the tiny furniture).
JustBeginning earns commission from affiliate programs. As an Amazon
Associate, we earn from qualifying purchases. This costs you nothing
extra and doesn't change our recommendations.
Prices and availability are accurate as of the date and time
shown and can change; the price on Amazon when you buy is what
applies.
How this works.
Our top pickBeginner Friendly Book Nook Kit (3.5 hour build)


 Best starter