Find beautiful rocks and minerals in the field, bring them home, and learn their names. The gear list is short. A rock hammer, a loupe, and a field guide cover your first year. Here is what is worth buying on day one and what you can add once you know the hobby will stick.
By Colin B. · Published June 6, 2026 · Last reviewed June 6, 2026
Vansky UV Flashlight 365nm
— 365nm UV turns a dull gray collection into a light show. Minerals glow orange, green, and pink in the dark.
Budget total
$60
Typical total
$120
A hammer, loupe, and field guide run about $60. Add display cases and a UV lamp once you know the hobby will stick.
We earn commission on qualifying Amazon purchases — see our
affiliate disclosure.
Price tiers and budget totals shown above are editorial estimates;
actual Amazon prices vary.
At a glance
Our top pick in each category
The fastest path through this guide — each best-starter pick by category.
Scroll for the budget and upgrade alternatives.
You do not need any geology background to start. The Audubon field guide is organized by visual properties, not chemical formulas. Pick up the first interesting rock you find and spend five minutes looking it up. That is the whole learning loop.
A UV lamp is optional for your first few months. Many excellent collections focus entirely on visual specimens with no fluorescence angle at all. Buy the hammer and field guide first, then add UV once you know what draws you in this hobby.
Rock hammering is more technique than force. The goal is splitting rock along natural planes and seams, not smashing it. One YouTube video on basic technique saves you a lot of wasted effort and missed specimens before you get your first one right.
The gear
What you actually need
Rock Hammers
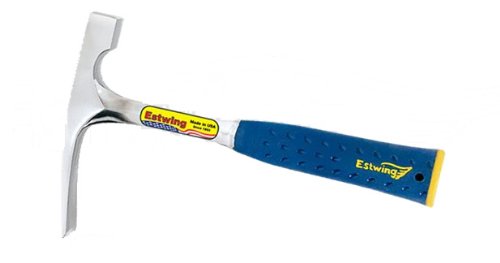
Every serious mineral collector uses a rock hammer. For most people, the pointed-tip pick is the right first choice: you can wedge it into seams, break off loose matrix material, and test a specimen before you carry it out. Estwing makes the go-to brand in this category, solid steel construction, forged in Rockford, Illinois. A cheap imported hammer is false economy: it chips at the face, transmits shock badly into your wrist, and fails at the moment you need it. Spend $35 on an Estwing and you will not buy another for decades.
Rock Hammers — what's the difference?
A few common shapes, each making a different trade.
Pointed Tip
For wedging seams and splitting matrix from specimens. The default starter choice.
Best use
Quartz veins, limestone, igneous rock
Weight
22 oz (E3-22P)
Best for General collecting, first-time buyers, most field environments
Tradeoff Less effective on flat-cleaving sedimentary layers
For splitting sedimentary layers along bedding planes.
Best use
Shale, schist, layered limestone
Weight
22 oz (E3-14C)
Best for Collectors focused on sedimentary geology or fossils in matrix
Tradeoff Less versatile than pointed; buy second, not first
Best starter
Estwing
E3-22P Rock Pick
$39.66 as of Jun 22, 2026
★★★★★Our rating· In Stock
Estwing has made rock picks in Rockford, Illinois since 1923. The E3-22P is solid forged steel with no separate handle to loosen, and the pointed tip works for everything from quartz veins to limestone beds. Cheap hammers chip at the face and transmit shock badly into your wrist. Spend $35 on an Estwing and you will not buy another for decades.
What we like
Forged in the US since 1923, no separate handle to loosen over time
Pointed tip handles quartz veins, limestone, and most field conditions
Shock-absorbing grip reduces wrist fatigue vs. raw steel handles
What to know
22 oz adds up on long hikes; pace yourself on full field days
Vinyl grip gets slippery when wet; overgrip tape helps in rain
A fair entry point if you want to try mineral collecting before committing to the Estwing. Works for surface picking and evaluating specimens at gem shows. Not built for aggressive hammer work on granite or quartzite, but it will tell you quickly if the hobby is worth a real tool investment.
What we like
Under $20, a low-risk way to try the hobby before upgrading
Pointed tip works fine for soft rock and specimen evaluation at shows
What to know
Welded handle loosens with repeated hard use
Transmits shock to your wrist noticeably compared to the Estwing
★★★★☆Our rating· Only 2 left in stock - order soon.
The chisel-tip version splits sedimentary rock along bedding planes, opening layered limestone, shale, and schist where a pointed pick would glance off. Most serious collectors end up with both tip styles. Add the chisel version after your first few months once you know what terrain you are collecting in.
What we like
Same Estwing quality, optimized for splitting layered rock
Opens shale, schist, and limestone along natural cleavage planes
What to know
Less versatile than the pointed tip for general field use
Redundant if you are not collecting in sedimentary environments
Safety glasses are non-negotiable. Rock hammering sends chips flying at surprising speeds, and an unprotected eye is the most common serious injury in this hobby. Pair them with a 10x hand lens: you will use it every session to study crystal habit, cleavage angles, and surface luster before you even know what you are looking at. A geology pick and chisel set covers more aggressive specimen extraction without committing to individual tools at full price.
Best starter
Uvex
Stealth OTG Safety Goggles
$25.82 as of Jun 22, 2026
★★★★★Our rating· In Stock
Rock chips fly at speeds that surprise beginners. A fragment hitting an unprotected eye is the most preventable collecting injury. These fit over prescription glasses, wrap around the sides for real chip protection, and cost less than ten dollars. Buy these before anything else on this page.
What we like
Fits over prescription glasses, wraps sides for real chip protection
Under $10, the best insurance in this hobby
Meets ANSI Z87.1 impact protection standard
What to know
Can fog up in warm conditions; tilt slightly off face between swings
Every mineral collector lives by a hand lens. Ten-power magnification shows you crystal habit, cleavage planes, surface luster, and inclusions invisible to the naked eye. Bausch & Lomb's lens corrects for color fringing so what you see is accurate. Take it into the field every session.
What we like
10x magnification reveals cleavage and crystal form invisible to the eye
Bausch & Lomb optics correct for color fringing at the edges
Folds into a compact metal case, fits in any pocket
What to know
Requires technique to focus properly; takes a few sessions to get used to
Not a triplet loupe, so very edge accuracy is slightly lower
When a specimen is embedded in matrix, you need to chisel, not just hammer. This set covers flat chisels for splitting seams and a variety of pick sizes for controlled extraction. Not as refined as individual Estwing tools, but useful for learning what you actually need before buying premium pieces.
What we like
Covers multiple chisel sizes for different specimen-extraction needs
Low cost entry before committing to individual premium tools
What to know
Import quality; handles loosen over time with heavy use
Identifying minerals is the core skill of the hobby. You will not learn it from a guide on day one, and that is fine. Buy the Audubon field guide, flip through it on your couch, and then take it into the field. The streak plate and hardness set add physical testing to visual ID: dragging a mineral across an unglazed porcelain tile reveals its powder color, which differs from its surface color and is a key ID clue. Between visual inspection and two physical tests, you can name 80% of common minerals without internet access.
Best starter
Audubon
National Audubon Society Field Guide to Rocks and Minerals
$20.63 as of Jun 22, 2026
★★★★★Our rating· In stock
The standard North American reference with 800 full-color photographs organized by color and visual properties for field identification. Not chemistry lab analysis: you look at your specimen, match a color, and follow a visual key to the name. Covers every US state, fits in a cargo pocket, and has been the go-to guide for collectors for three decades.
What we like
800 photographs organized by color, the most useful field ID system
Covers all US states and most minerals a beginner will encounter
Portable enough for field use, detailed enough for home reference
What to know
Some older photos are less crisp than newer digital references
Not strong on formation stories; read alongside a second reference
More coffee table than field guide, but the depth is exceptional: detailed formation stories, world occurrence maps, and photography that helps you recognize specimens you would otherwise overlook. A useful second reference once you move past basic ID and want to understand why minerals form where they do.
What we like
World-class photography helps ID specimens by visual match
Formation stories explain why minerals appear in certain geologies
Covers gemstones and their mineral relationships thoroughly
What to know
Large format, not a field guide; better for home reference
Visual ID only gets you so far. A streak plate shows the powder color of a mineral dragged across unglazed porcelain, which is different from its surface color and a reliable ID clue. The hardness picks let you test Mohs hardness in the field. These two tests eliminate most wrong guesses and are the same method real mineralogists use.
What we like
Streak color is a reliable ID clue that visual inspection alone misses
Mohs hardness testing eliminates most field ID guesses quickly
Inexpensive and reusable; streak plates last years of regular use
What to know
Requires learning a reference chart; not plug-and-play on day one
Hardness picks scratch only relative to each other, not absolute values
Some minerals that look ordinary in daylight glow brilliantly under ultraviolet light. Fluorite, calcite, willemite, and scheelite are dull gray specimens in a shoebox until you cut the lights and hit them with UV. A 365nm longwave flashlight is the right starting point: it shows common fluorescence without the heavy purple bleed that cheaper 395nm models produce. Shortwave UV at 254nm unlocks a second tier of rarer mineral fluorescence but requires dedicated eye protection. Most collectors spend months with longwave before shortwave becomes relevant.
Best starter
Vansky
UV Flashlight 365nm
$19.97 as of Jun 22, 2026
★★★★★Our rating· In Stock
True 365nm UV delivers clean mineral fluorescence without the visible purple glow that washes out results on cheaper 395nm flashlights. Common calcite glows red-orange, fluorite shows cyan or green, and specimens you bought for visual beauty reveal a second identity in the dark. Compact, battery-efficient, and the light rockhound forums consistently reach for.
What we like
True 365nm shows clean fluorescence without purple bleed-through
Common fluorite, calcite, and scheelite glow visibly with this lamp
Compact enough for field carry and gem show walks
What to know
Does not trigger shortwave-only minerals; 254nm lamp needed for those
Must be used in the dark to see fluorescence clearly
Shortwave UV at 254nm unlocks mineral fluorescence invisible to longwave lamps: vivid green willemite from Franklin, NJ, fire-orange esperite, brilliant white calcite. Most collectors hit this stage after 6 to 12 months. The payoff is dramatic, but this is not a beginner tool. Eye protection is mandatory.
What we like
Reveals fluorescence invisible to 365nm, including Franklin willemite
The collector reward for a year of hunting fluorescent minerals
What to know
Requires UV-blocking safety glasses, not optional at 254nm
How you store specimens matters more than it looks. Minerals with perfect crystal terminations chip against each other in a shoebox. Water-soluble minerals like halite soften in humid storage. Riker mounts are the collector standard: glass-front foam-backed display cases that protect specimens while showing them off. Label everything with the locality when you acquire it. You will not remember where a specimen came from six months later, and provenance is part of what makes a collection worth something.
Best starter
Riker
Mount Display Cases
$33.08 as of Jun 22, 2026
★★★★★Our rating· In Stock
The display case standard at mineral shows and in every serious home collection. Foam backing cushions each specimen, the glass front lets light through, and the shallow depth keeps everything visible. Available in sizes from 6x8 for small specimens to 18x24 for display pieces. Buy a mix of sizes with your first batch.
What we like
Industry standard at mineral shows; protects and displays simultaneously
Glass front lets light through for true specimen color
Stack cleanly on shelves and in drawers
What to know
Foam eventually compresses; premium collectors upgrade to cotton batting
Shallow depth limits use for very tall crystal clusters
For smaller specimens, gem jars offer individual labeled storage without the display formality of Riker mounts. Each jar holds one specimen, has a clear twist-off lid, and you can label the bottom with mineral name and locality. Ideal for suites of related specimens or a systematic reference collection.
What we like
Individual labeled storage for each specimen with locality info
Stackable and compact for small apartment collections
Clear lid shows specimen without opening
What to know
Not airtight; humidity-sensitive minerals need desiccant packets too
Clear plastic scratches over time with frequent opening
Once your collection outgrows a shelf of Riker mounts, a glass-front cabinet keeps specimens dust-free and visible at the same time. Adjustable shelves accommodate everything from thumbnail specimens to large display pieces. Looks like furniture, not a storage solution.
What we like
Glass doors keep dust off without hiding specimens from view
Adjustable shelves fit thumbnails to 12-inch display specimens
What to know
Heavy and awkward to move once assembled; pick location first
Most people start by picking up a pretty rock and wondering what it is. Here is how that curiosity becomes a real collection, and what you will learn along the way.
Mineral collecting starts with a single question: what is this? You pick up a piece of quartz from a stream bed, or buy a purple fluorite cluster at a flea market, and something about the geometry of it stops you. Crystals grow in mathematically predictable shapes. Colors come from trace amounts of elements measured in parts per million. The same mineral can look completely different depending on where it formed.
That curiosity is the whole hobby. Everything else, the field tools, the identification guides, the UV lamps, the display cases, is just infrastructure for following that question further.
Here is what your first season actually looks like.
The first month: learning to look
The single most useful thing you can do in your first month is get to a gem and mineral show. They run every month in most mid-size cities, often at fairgrounds or convention centers, and admission is usually $5 to $10. Walk every aisle before you buy anything.
What you will see: hundreds of vendors selling specimens from all over the world, priced from $1 rocks to $10,000 display pieces. The important thing is not the buying. It is the looking. You will handle more minerals in two hours than most people see in a year. You will start learning what calcite looks like vs. quartz, what a druzy surface means, why some specimens are labeled “fluorescent” with a UV lamp sitting next to them.
Talk to the vendors. Most mineral dealers are collectors first, and they like talking about the specimens. Ask what something is and where it came from. You will learn more from ten minutes of conversation than from any field guide.
Buy your first specimens at a show, not online. Buying blind online is fine once you know what you are looking for. For your first purchases, you want to hold the specimen, see the color in real light, and pay what it is actually worth. A $5 specimen box from a show table is a better start than a $50 “lot” from an unknown eBay seller.
Identification: the physical approach
Visual identification works for maybe half the minerals a beginner encounters. The other half requires a few physical tests that take the guesswork out.
Streak. Drag the mineral across an unglazed porcelain tile (a “streak plate”). The powder color is often different from the surface color and is a reliable, consistent property. Hematite looks shiny silver-gray but leaves a red-brown streak. Pyrite looks like gold but leaves a black streak. This single test eliminates most wrong guesses.
Hardness. Mohs hardness is a relative scale from 1 (talc, softest) to 10 (diamond). A copper coin is about 3.5. Your fingernail is about 2.5. A steel nail is about 5.5. Knowing that a mineral scratches glass (hardness 5.5) and is scratched by a steel nail tells you a lot about what it could be. The Audubon field guide lists hardness for every mineral.
Luster. This is the way light reflects off the surface: metallic, glassy (vitreous), pearly, silky, resinous. Not a diagnostic test by itself, but it narrows the field significantly. Quartz has a glassy luster. Galena has a bright metallic luster. Malachite has a silky luster on fibrous specimens.
Most beginners over-rely on color and under-rely on these physical properties. Color is one of the least reliable identifying features because trace impurities change it dramatically. A purple mineral and a green mineral can both be fluorite. The physical properties are consistent.
The field: where minerals actually come from
Most minerals in collections came from one of a handful of environments: hydrothermal veins (where hot mineral-rich water moved through fractures and deposited minerals as it cooled), pegmatites (coarse-grained igneous rocks that form large crystals), sedimentary formations (where evaporites and carbonates concentrate), and contact zones (where magma met other rock and metamorphism occurred).
You do not need to understand all of that to collect. What you need to know is where to look:
Road cuts are excellent. Highway construction slices through geology that would take decades of erosion to expose naturally. A fresh road cut through granite, limestone, or schist often exposes minerals that have never seen daylight. Drive slowly through hilly terrain and look for fresh-cut faces.
Stream gravels and creek beds concentrate heavy and durable minerals. Quartz is everywhere. Garnets, tourmalines, and heavy oxides like magnetite accumulate in gravel bars where lighter material washes away. You can work a creek gravel pile with nothing but your eyes and a hand lens.
Mine dumps and tailings (where legal) are historically productive collecting sites. Old mine waste was dumped because it was not economically interesting to the mining operation, not because it lacks minerals. Some of the finest collector specimens come from dumps. Check land ownership and regulations before collecting on or near active mine property.
Mindat.org lists known mineral localities by state, county, and mineral type. Search your region and read the locality descriptions. Many list GPS coordinates and collecting notes from other collectors who have visited.
UV fluorescence: the second collection inside your collection
Once you own a 365nm UV flashlight and turn off the lights, something happens to a mineral collection. Specimens you bought for their visual properties glow in colors that have nothing to do with how they look in daylight.
Common calcite glows red-orange or bright white. Fluorite shows cyan, green, or cream. Scheelite glows bright blue-white. Chalcedony often shows a faint bluish glow. Hyalite opal, a colorless variety, glows neon green so brightly it looks fake.
The UV angle adds a second dimension to collecting: you start evaluating specimens for their fluorescent properties as well as their visual ones. A gray limestone cobble that would otherwise sit in a shoebox becomes interesting when it glows orange under UV. A clear quartz cluster gets a second look when the matrix lights up.
Start with a true 365nm flashlight. The cheaper 395nm lights have strong visible purple light that washes out the mineral fluorescence and makes it harder to see. True 365nm is in the $30 to $50 range and is worth the difference.
Building a collection with intention
Random accumulation produces a pile of rocks. A collection has a shape.
The shape can be almost anything: a focus on one mineral species collected from many localities (a quartz collection, a garnet collection), a focus on one geographic region and everything that comes from it, a focus on fluorescent specimens only, a focus on miniature or thumbnail specimens that fit in small jars, a focus on minerals that represent the full range of crystal systems.
Pick a direction early, even if you change it later. It gives your purchases meaning and prevents the “I have 200 random specimens and no idea what to do with them” problem that hits collectors around year two.
Label everything. When you acquire a specimen, write the mineral name, the locality, the date, and what you paid (optional) on a small label. Store the label with the specimen. In two years you will not remember where anything came from, and provenance, knowing the specific mine or locality, adds real value and interest to the collection.
Save your money
What you don't need yet
Beginners get pressured to buy a lot of stuff that doesn't help them play
better. Here's what we'd skip on day one.
A rock saw or trim saw — Useful for cutting specimens and revealing internal structure, but costs $200 to $800 and requires space and water management. Add one after a year of collecting if you are finding specimens worth preparing.
Shortwave UV lamp (at first) — Start with longwave 365nm. Shortwave unlocks rarer fluorescence but costs more and requires eye protection. Most collectors are happy with longwave for their first year.
Specific gravity testing equipment — Useful for distinguishing dense minerals like barite from lighter lookalikes, but streak and hardness testing solves 90% of beginner ID questions without additional equipment.
A professional prep kit — Air scribes, dental picks, and micro-blasters are for removing matrix from museum-quality specimens. Buy a second field season before worrying about preparation.
Collecting permit applications (immediately) — Many great sites are on public land where surface collecting is free. Learn the rules for each site first; permits are only needed for certain federal or commercial operations.
First week
Your first seven days
A short, real plan to get from gear-on-doorstep to actually playing.
Order the Estwing E3-22P rock pick and Audubon field guide so they arrive before the weekend. · Buy
Look up collecting sites in your state on Mindat.org. The locality database lists thousands of known mineral-bearing sites with GPS coordinates and what to look for. · Action
Find a local gem and mineral club through the AMFMS club finder. Joining a club gets you field trips, ID help, and access to private collecting sites. · Action
Read the color section of the Audubon guide before you go into the field. You do not need to memorize anything, just get a feel for how the ID system works. · Learn
Pick up the best-looking rock you can find, even if it is in your own backyard, and spend ten minutes trying to ID it with the field guide. The process is the point. · Action
Check for a local gem and mineral show in the next 30 days. Shows are the best place to handle dozens of minerals side by side, talk to experienced collectors, and buy your first specimens for a fair price. · Action
Three main places: in the field (road cuts, river gravels, mine dumps, and known geological sites), at gem and mineral shows (the fastest way to build a collection fast), and online through dealers and eBay. Most serious collectors use all three. Field collecting is the most rewarding because you found it yourself.
Do I need any geology background to start?
None. The Audubon field guide is organized by visual properties, not chemistry. You look at color, luster, crystal shape, and cleavage, and follow a visual key. The science deepens as you go, but you can start identifying minerals on day one with zero background.
What is the difference between mineral collecting and crystal collecting?
Minerals include all naturally occurring inorganic solids, whether crystallized or not. Crystal collecting tends to focus on the dramatic visual specimens: clear quartz points, amethyst clusters, selenite wands. Mineral collecting is broader, covering ore minerals, sulfides, oxides, and scientific specimens that may not look flashy but are mineralogically interesting. Most collectors do both.
Is mineral collecting expensive to get into?
No. A rock hammer, loupe, and field guide run about $60 total. The hobby scales as expensively as you want it to, from free field collecting to five-figure show specimens, but you can have a serious collection with almost no spending if you focus on field finds.
What is a streak plate and do I really need one?
A streak plate is a piece of unglazed porcelain tile. You drag an unknown mineral across it to reveal its powder color, which is a reliable ID clue that differs from the specimen's surface color. Hematite looks shiny gray but leaves a red-brown streak. At $5 for a set, this is one of the highest-value purchases in the hobby.
Can I collect minerals on public land?
In most cases, yes. BLM land allows casual surface collecting for personal use without a permit. National Forests generally allow the same. National Parks prohibit all collecting. Always check the specific regulations for each site. Mindat.org locality pages often note the land status and any collecting restrictions.
Mindat.org — The world's largest mineral database with 5,800 mineral species and 1.3 million locality records. The first place to look for what minerals occur in your area and how to identify an unknown specimen.
American Federation of Mineralogical Societies — The umbrella organization for mineral clubs in the US. Their club finder links to local groups who run field trips, shows, and beginner ID nights. Joining a local club is the single best way to accelerate in this hobby.
The Mineralogical Record — The premium print magazine for serious collectors. Deep dive articles on specific minerals, famous localities, and historical collections. Worth subscribing once you're past the beginner stage.
r/mineralidentification — Active subreddit for ID help on unknown specimens. Post a clear photo and the community will often identify it within hours. A useful resource while your visual ID skills are developing.
Rock & Gem Magazine — Long-running collecting magazine with field site guides, show schedules, and beginner-focused articles. Their show calendar is the most comprehensive list of upcoming gem and mineral shows by state.
As an Amazon Associate, JustBeginning earns from qualifying purchases.
We may also earn commission from other affiliate programs linked on this
page. Editorial recommendations are independent; we don't choose
products based on commission rates.
Product prices and availability are accurate as of the date and time
indicated and are subject to change. Any price and availability
information shown on Amazon at the time of purchase will apply.