Orchids have a reputation for being fussy, but that reputation comes from growing them in the wrong conditions. Give them bark instead of soil, indirect light, and a weekly watering rhythm, and they'll bloom for months and rebloom for years. Here's exactly what you need to start.
By Colin B. · Published June 10, 2026 · Last reviewed June 10, 2026
A grocery-store Phalaenopsis plus bark mix, clear pots, and fertilizer runs $55-70. Add a grow light for dim windows and you're closer to $120.
We earn commission on qualifying Amazon purchases — see our
affiliate disclosure.
Price tiers and budget totals shown above are editorial estimates;
actual Amazon prices vary.
At a glance
Our top pick in each category
The fastest path through this guide — each best-starter pick by category.
Scroll for the budget and upgrade alternatives.
Start with a Phalaenopsis (moth orchid). It's the most forgiving orchid species, blooms for 3-5 months at a stretch, and is sold everywhere from grocery stores to hardware stores for $10-20. Master one Phalaenopsis before branching into Cattleyas, Dendrobiums, or anything else.
The plant you buy at the grocery store probably came in bark, but the grocery-store pot has no real drainage. Before the bloom spike finishes, plan to repot it into a clear plastic slotted pot with fresh bark. That single repot does more for long-term health than any fertilizer.
Orchids don't like sitting in water. The number one killer is overwatering into poor drainage. The second is direct sun. Solve both of those and you're most of the way to a thriving plant.
Orchids are mostly epiphytes, meaning they evolved growing on tree bark in the wild, not in soil. Plant a Phalaenopsis in potting soil and the roots suffocate within weeks. You need a chunky, fast-draining bark mix that holds moisture briefly, then dries out between waterings. The right medium is the most impactful purchase a new orchid grower makes. Fine bark works for most Phalaenopsis; coarser bark suits larger-rooted types like Cattleyas.
Potting & Growing Media — what's the difference?
A few common shapes, each making a different trade.
Fine Bark (6-12mm)
Right for Phalaenopsis and small-root orchids in 4-6 inch pots.
Particle size
6-12mm
Drainage
Moderate-fast
Best for
Phalaenopsis, Dendrobium
Best for Beginners with Phalaenopsis or compact orchid types
Tradeoff Breaks down faster than chunky bark; repot more often
rePotme is the go-to brand in the orchid community. Their bark mix blends fir bark, perlite, and charcoal in proportions that drain well and hold just enough moisture. Works for Phalaenopsis, Dendrobium, and most beginner orchid types without adjustment.
What we like
Fir bark, perlite, and charcoal blend trusted by serious hobbyists
Drains fast enough that overwatering is much harder to do
Works out-of-bag for Phalaenopsis with no custom mixing needed
What to know
Bark breaks down after 1-2 years; plan on repotting annually
If you're still testing whether orchid growing will stick, Miracle-Gro's orchid mix gets you started at roughly half the price of specialty bark. Coarser and less refined than rePotme, but fine for a first orchid. Widely available at hardware and garden stores.
What we like
Half the cost of specialty bark, good for testing the hobby
Available at most hardware and garden stores, not just online
What to know
Breaks down faster than premium bark; repot more often
Not the medium for your first orchid, but essential once you're growing mounted orchids or high-humidity types like Miltonias. Long-fiber sphagnum holds water longer than bark and retains its structure far longer than shredded moss. A gallon bag lasts several repotting seasons.
What we like
Long-fiber structure stays intact far longer than shredded moss
Ideal for mounted orchids and high-humidity tropical types
What to know
Holds too much moisture for Phalaenopsis; leads to root rot
More expensive per repot than bark when filling larger pots
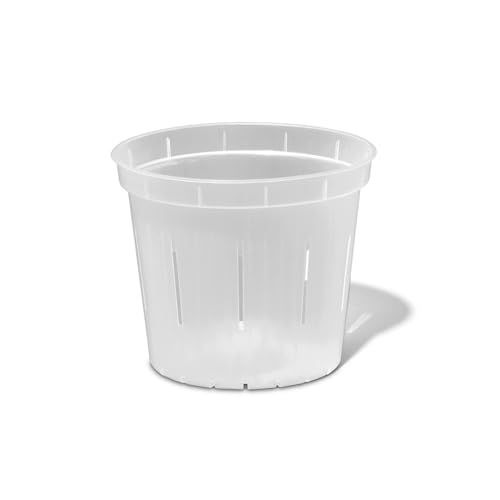
Clear plastic pots are the orchid world's most practical tool, and beginners consistently undervalue them. When you can see the roots, you know instantly whether the plant needs water: gray-green roots mean dry, bright green means still moist. Slotted sides add airflow around roots, preventing the rot that kills most beginner orchids. Start with clear plastic before worrying about decorative containers.
Best starter
rePotme
Crystal Clear Slotted Orchid Pots 4-inch (6-Pack)
$23.95 as of Jun 22, 2026
★★★★★Our rating· In Stock
The clear wall lets you see root color at a glance, the single most reliable watering signal for new orchid growers. Slotted sides add airflow that most standard pots lack. A 6-pack means you can repot multiple plants and have spares ready when bark breaks down.
What we like
Clear walls show root color, the most reliable watering signal
Slotted sides provide airflow that prevents root rot
6-pack covers multiple plants and future repots
What to know
Not decorative; most growers nest inside a cachepot for display
Thinner plastic; rim can crack under rough handling at repot time
Once your Phalaenopsis is reblooming and you want something displayable, a clean ceramic planter with a matching saucer is the low-fuss upgrade. Drainage hole in the base keeps roots from sitting in water. Use the clear plastic pot inside it as a liner and swap for bloom season.
What we like
Clean ceramic look works on a windowsill or table without an outer pot
Matching saucer catches water for neat indoor display
What to know
Non-clear wall means you rely on schedule, not visual root checks
Heavier than plastic; roots cling harder at repot time
The orchid fertilizer rule: weakly, weekly. A quarter-strength dose every week keeps nutrient levels steady without salt buildup that burns roots. Most standard houseplant fertilizers are too concentrated for orchids and not balanced to encourage repeat blooming. Use an orchid-specific formula and flush the pot monthly with plain water to clear accumulated salts.
Best starter
Miracle-Gro
Orchid Plant Food Mist
$11.00 as of Jun 22, 2026
★★★★★Our rating
The spray bottle format makes it nearly impossible to over-fertilize, which is the main beginner mistake with concentrated liquid. Mist it on bark and foliage after watering, every one or two weeks, and your Phalaenopsis gets consistent nutrition without risk of root burn.
What we like
Spray bottle format makes over-fertilizing nearly impossible
Formulated specifically for orchids, not repurposed houseplant food
What to know
Mist format limits dosing control at specific growth stages
More expensive per feeding than concentrated liquid diluted to dose
The serious hobbyist's formula. Dyna-Gro's 7-8-6 is what orchid society members and commercial growers reach for. Use at 1/4 teaspoon per gallon at every watering and flush monthly with plain water. Results in spike production and root health are noticeably better than general-purpose food.
What we like
Trusted by orchid society growers and commercial greenhouse staff
Urea-free nitrogen means no root burn at regular dosing
What to know
Concentrate requires measuring; not as simple as spray-and-go
Most apartments and north-facing rooms don't give orchids enough light to bloom reliably. Phalaenopsis wants bright indirect light, think an east-facing window or a few feet from a south-facing one. Below that, a grow light is the fix. T5 LED bars or full-spectrum LED strips provide consistent light and put orchids into predictable bloom cycles regardless of season or window.
Best starter
Barrina
T5 Full Spectrum LED Grow Light Bars (4-Pack)
$39.99 as of Jun 22, 2026
★★★★★Our rating· In Stock
Four 2-foot bars for around $30 is one of the most cost-effective ways to supplement dim windows. Clip-links let you daisy-chain them across a shelf. For Phalaenopsis, 12-14 hours on a separate timer and they'll spike every autumn on schedule.
What we like
Four 2-foot bars under $30, covers a full shelf of orchids
Daisy-chain connectors let multiple bars run off one outlet
Low heat output; leaves won't burn even at close mounting distance
What to know
Needs a separate outlet timer for reliable photoperiod control
Better for a dedicated grow shelf than a display-focused setup
Steps up to a built-in timer, broader spectrum coverage, and a flexible mounting arm. When your collection grows to 8-12 plants, you want this over individual bar lights. It covers more footprint from one unit and the built-in timer removes one more thing to manage.
What we like
Built-in timer eliminates the need for a separate outlet timer
Double-chip LEDs produce more intensity than single-chip bar lights
What to know
Single unit covers less footprint than a multi-bar daisy-chain setup
Clip mount less stable than a rail or shelf-mounted bar system
Orchids evolved in humid climates and most want 50-70% relative humidity. Most homes run at 30-40%, especially in winter. Two tools solve this: a humidity tray under the pot adds localized moisture, and a small fan keeps air moving. Still air around orchid roots and crowns invites fungal rot. A gentle fan running a few hours a day changes the equation.
Best starter
Beta Craft
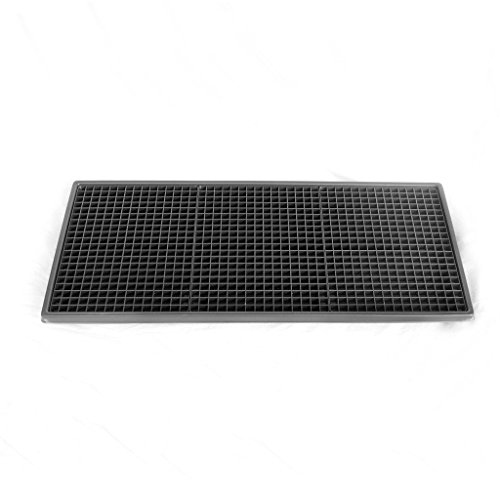
Humidi-Grow Humidity Tray for Orchids and Bonsai
$
★★★★★Our rating
Fill it with water to just below the pebble surface, set your potted orchid on top, and you get 10-15% more humidity in the immediate microclimate without electronics. Around $15 and lasts indefinitely. The cheapest meaningful improvement to indoor orchid growing.
What we like
Adds 10-15% localized humidity with no electronics or refilling
Pebbles keep pot elevated so roots never sit in standing water
What to know
Needs weekly water top-off; evaporation is fast in heated homes
Only effective within a few inches of the tray, not room-wide
When pebble trays aren't enough in dry winter months, a compact humidifier near your grow shelf maintains the 50-60% that Phalaenopsis and Cattleyas prefer. The 2.5L tank runs overnight without constant refilling and is quiet enough for a bedroom shelf.
What we like
Maintains 50-60% humidity that pebble trays can't reach in dry winter
2.5L tank runs 12-16 hours on low without needing a refill
What to know
Needs cleaning every 2-3 days to prevent mold in the reservoir
Cool mist in a cold room can lower temperature near roots at night
Circulating air matters as much as humidity. Stagnant air breeds fungal and bacterial rot on crowns and pseudobulbs. A small fan on low for 4-6 hours daily is standard practice in any serious growing setup. The HT-900 is compact, tough, and has been the reliable pick in this category for years.
What we like
Compact size fits on a narrow grow shelf without blocking light
Prevents crown rot and fungal issues that still air encourages
What to know
No tilt adjustment; aim by repositioning the whole unit
Louder than a tower fan at the same airflow output
Orchids are one of the most purchased houseplants in the country and also one of the most frequently killed. Not because they’re fragile, but because everything you’d intuitively do for a plant is wrong for an orchid.
You water it too often. You put it in potting soil. You move it to a darker corner because the leaves look a little pale in the sun. And then six months later you wonder what went wrong.
This is what your first month actually looks like, with the adjustments that make the difference.
Week 1: The setup matters more than you think
Most orchids sold at grocery stores and hardware stores are Phalaenopsis, the moth orchid. It’s the right place to start. Phalaenopsis blooms for 3-5 months, tolerates home conditions better than most orchid types, and tells you clearly when something’s wrong.
When you bring one home, resist the urge to do anything to it immediately. Let it acclimate for a few days. Then check two things:
The pot. The plastic pot it came in almost certainly has no drainage slots or has slots too small to matter. If water sits at the bottom after watering, the roots will rot within weeks. Order a pack of clear slotted orchid pots and plan to repot once the current bloom spike finishes.
The location. Phalaenopsis wants bright indirect light. An east-facing window is ideal: morning sun, afternoon shade. A south or west window works if the plant is a few feet back from the glass. Direct afternoon sun on the leaves will cause yellow scorch patches within a week.
Week 2: The watering rhythm
Here’s the one that trips up almost everyone. Orchids are epiphytes. In the wild they grow on tree bark, not in soil, and their roots are exposed to air most of the time. They want to dry out fully between waterings.
The right time to water is when the bark feels dry and the roots are gray-green, almost silver. If you have a clear plastic pot, this takes two seconds to check. Bright green roots mean still moist; gray-silver roots mean time to water.
When you do water, do it properly. Take the pot to a sink and run water through the bark until it drains freely from the bottom. You’re flushing the bark, not just dampening the surface. Then let it drain completely before returning it to its spot or cachepot. Never let it sit in standing water.
In most homes this cycle lands around every 7-10 days in summer and 10-14 days in winter. There’s no fixed schedule. The roots tell you.
The most common first-month mistake: watering on a schedule rather than checking the roots. People set a weekly reminder and water regardless. Overwatering into poor drainage is what kills more Phalaenopsis than anything else.
Week 3: Fertilizing and light adjustments
Once your orchid is stable and you’ve got the watering rhythm, add fertilizer. The rule: weakly, weekly. A diluted dose of orchid-specific fertilizer after every watering keeps nutrient levels steady without salt buildup that burns roots.
The spray bottle format is the most beginner-proof option. Mist it onto the bark and foliage right after watering. If you’re using a liquid concentrate, dilute to about a quarter of the recommended dose.
Around week three you’ll also notice whether your light situation is working. Signs the orchid is getting enough light: dark green, glossy leaves. Signs it’s getting too little: very dark green but no new growth, no spike forming. Signs of too much direct sun: yellow or reddish patches on the upper leaves.
If your windows aren’t bright enough, a T5 LED grow light strip mounted 12-18 inches above the plant will solve it. Run it 12-14 hours daily. Phalaenopsis on grow lights spike reliably every autumn when the nights start getting longer.
Week 4: What to expect (and what not to worry about)
By the end of the first month you will probably not have done anything dramatic. Your orchid will still be in bloom, the same roots will be there, and nothing will have obviously changed.
That’s correct. Orchid growing is slow. The victories are months apart: the first rebloom, the first new leaf, the first healthy white root tip pushing out of the bark.
What the first month does is establish the habits that make those later victories possible.
Things that look alarming but aren’t:
Aerial roots growing out of the pot and heading toward the light. This is healthy behavior. Epiphytic roots reach for air and light. Don’t stuff them back in the pot.
Old leaves yellowing and dropping. Phalaenopsis typically keep 3-5 leaves and shed the oldest ones as new ones form. One yellow leaf near the base isn’t a problem.
Roots that look wrinkled. Slightly wrinkled white or silver roots in dry bark are just thirsty. Water and they’ll plump back up.
Things that actually need attention:
Brown, mushy roots anywhere. That’s root rot. Repot immediately into fresh bark, trimming away all soft roots with sterilized scissors.
Dark or water-soaked patches on a leaf. Could be bacterial rot, especially if you got water in the crown. Improve airflow and keep the crown dry.
Very small flying insects in the bark. Likely fungus gnats. Let the bark dry more thoroughly between waterings.
When the flowers finally fall, usually after 3-5 months, cut the spike back to the base. This isn’t failure; it’s the start of the next cycle.
Now is the time to repot. Take the orchid out of its pot, shake off the old bark, trim any dead or mushy roots, and repot into fresh bark in a clear slotted pot. This is the most important maintenance task in orchid growing and most people do it far too rarely.
After repotting, skip fertilizer for 2-4 weeks while the roots adjust, then resume the weekly routine. Keep the orchid in its bright spot. Over the next 6-12 months, new leaves will form, then a new spike, then buds. The rebloom is deeply satisfying in a way that’s hard to explain until you’ve done it.
Save your money
What you don't need yet
Beginners get pressured to buy a lot of stuff that doesn't help them play
better. Here's what we'd skip on day one.
A greenhouse or grow tent — A Phalaenopsis on a windowsill or under a grow light does not need a dedicated enclosure. Overkill until you have 20+ plants and a reason to control the whole microclimate.
Orchid bloom booster fertilizer — A consistent weakly-weekly regimen with a balanced formula drives more blooms than any separate bloom booster. One formula applied consistently beats switching products.
A dedicated misting bottle — Misting foliage daily feels productive but doesn't meaningfully raise humidity. A humidity tray or small humidifier is more effective and less work.
Bark mounts and wire frames — Mounted orchids look beautiful and suit certain species, but they dry out in hours and need near-daily watering. Learn the potted rhythm first.
Rooting hormone or root stimulator — Healthy bark, adequate light, and consistent fertilizer produce healthy roots on their own. Root stimulator products add cost without a clear benefit for beginners.
First week
Your first seven days
A short, real plan to get from gear-on-doorstep to actually playing.
Buy a Phalaenopsis orchid from a grocery store, garden center, or hardware store. Expect $10-25. Pick one with buds not yet open so you get the full bloom. · Action
Order clear slotted orchid pots and fresh bark mix. Repot after the bloom spike finishes, not during. · Buy
Find your sunniest indirect-light window. East-facing is ideal; south-facing a few feet back works. Direct afternoon sun will scorch the leaves. · Action
Water by running water through the bark until it drains freely, then don't water again until the bark feels dry and the roots look gray-green. · Learn
Join r/orchids and post a photo for free care feedback. The weekly ID thread alone teaches more than most books. · Learn
r/orchids · Active community with weekly ID and troubleshooting threads
FAQ
Common questions
How often should I water my orchid?
There's no fixed schedule. The right time to water is when the bark feels dry and the roots are gray-green (almost silver). In most homes that's every 7-10 days in summer and 10-14 days in winter. The clear pot makes this visual check instant.
Why are my orchid's roots turning gray or silver?
Healthy roots are bright green when moist and gray-green when dry. Gray roots mean it's time to water. Brown, shriveled, mushy roots mean root rot from overwatering or poor drainage. Repot into fresh bark immediately and cut away the dead roots.
My orchid bloomed and now the spike is brown. Did I kill it?
No. The bloom cycle finished and the spike is dying back naturally. Cut it down to the base and the plant will spend the next 6-12 months building energy for a new spike. Consistent light and fertilizer are what drive reblooming.
What kind of orchid should I start with?
Phalaenopsis, full stop. They're the most forgiving species, bloom for months, and are sold at virtually every garden center and grocery store. Once you've kept one alive through two bloom cycles, branch into other genera.
Can I grow orchids under artificial light?
Yes, easily. Phalaenopsis does well under T5 or LED grow lights run 12-14 hours daily. Most experienced indoor growers supplement with grow lights because consistent artificial light produces more predictable bloom cycles than seasonal sun variation.
When and how do I repot?
Repot when bark breaks down into mush (usually every 1-2 years), when roots overflow the pot, or when you see root rot. Repot after a bloom cycle ends, not during. Remove all old bark, trim dead roots, pot in fresh bark, and skip fertilizer for 2-4 weeks while the plant adjusts.
American Orchid Society — The authoritative body for orchid cultivation in the US. Free care sheets for every major species. Membership gets you access to local chapters with plant auctions and reputable vendors.
Orchid Board — Long-running forum community. The ID threads and disease and pest sections are the best free diagnostic resource on the internet for orchid problems.
r/orchids — Active subreddit. Post a photo for an ID or care diagnosis. Weekly threads cover everything from repotting to reblooming.
Hausermann's Orchids — One of the oldest and most respected orchid specialty nurseries in the US. Browse for new plants or buy from people who actually know what they're selling.
MissOrchidGirl (YouTube) — The most-watched orchid care channel. Patient explanations, real plants, honest troubleshooting. Start here before anywhere else.
As an Amazon Associate, JustBeginning earns from qualifying purchases.
We may also earn commission from other affiliate programs linked on this
page. Editorial recommendations are independent; we don't choose
products based on commission rates.
Product prices and availability are accurate as of the date and time
indicated and are subject to change. Any price and availability
information shown on Amazon at the time of purchase will apply.