Most bike repairs are simpler than a shop bill suggests: fixing flats, cleaning and lubing a chain, adjusting brakes and gears, tightening bolts to the right torque. About a dozen tools cover nearly all of it. Here's what to buy first, what can wait, and which cheap tools are fine versus which ones strip bolts.
By Colin B. · Published November 12, 2026 · Last reviewed November 12, 2026
A floor pump, tire levers, a hex set, a chain checker, lube and cleaner come to about $130. Add a repair stand, a torque wrench, master link pliers and brushes and you're near $320.
We earn commission when you buy through links on this page, including
Amazon. See our affiliate disclosure.
Price tiers and budget totals shown above are editorial estimates;
actual prices vary.
At a glance
Our top pick in each category
The fastest path through this guide — each best-starter pick by category.
Scroll for the budget and upgrade alternatives.
Buy in the order you'll need things. A floor pump and tire levers come first, because flats and pressure are the most common jobs. Then hex keys, lube and a chain checker. A stand and a torque wrench come next. Specialty tools like bottom bracket wrenches can wait until a job actually needs one.
Spend on the tools that touch bolts. Cheap hex keys with soft tips round out bolt heads, and a stripped bolt turns a ten-minute job into a shop visit. Tire levers, brushes and stands are fine to buy cheaply.
Check what your bike uses before buying specialty tools. Chain speed (9, 10, 11 or 12), valve type (Presta or Schrader), and whether it has a master link all change which tools fit. The number of cogs on your cassette is the chain speed.
Tires lose air slowly every day, and the right pressure makes a bigger difference to ride feel and flat protection than almost any upgrade. A floor pump with a gauge is the most-used tool you'll own. Tire levers get the tire off the rim to fix a flat or change a tube. Plastic levers are kinder to rims than metal ones.
Best starter
Topeak
JoeBlow Sport III Floor Pump, 160 psi, 3-inch Gauge
$63.91 as of Nov 12, 2026
★★★★★Our rating· In Stock
The floor pump shops recommend most. A steel barrel, a stable base and a large gauge mounted up top where you can read it. The TwinHead fits Presta and Schrader valves without swapping parts. It lasts for years, and replacement heads are available. Sold by Amazon. About $64. 5,600+ reviews at 4.6 stars.
Three nylon tire levers with a hook on the end that clips onto a spoke, so you can hold the tire bead out while you work the next lever in. They won't scratch rims. Keep one set at home and one in your saddle bag. About $7. 3,500+ reviews at 4.7 stars.
What we like
Won't scratch rims
Spoke hooks free up your hands
Small enough for a saddle bag
What to know
Very tight tubeless tires may need a stronger lever
Almost every bolt on a modern bike is a hex (Allen) bolt between 2 and 10mm, with 4, 5 and 6mm doing most of the work. Good hex keys have hard, precise tips that don't round out bolts. A torque wrench tells you when to stop tightening, which matters most on carbon parts, stems and seatposts, where too much force cracks things and too little lets them slip.
Best starter
Park Tool
HXS-1.2 Professional L-Shaped Hex Wrench Set
$28.95 as of Nov 12, 2026
★★★★★Our rating· In Stock
Nine L-shaped hex keys from 1.5 to 10mm, hardened so the tips stay sharp and don't round out bolts. These are the shop-quality keys you'll keep for decades, and the holder keeps them in order on the bench. About $29. 370+ reviews at 4.8 stars.
Seven hex keys from 1.5 to 6mm plus a T25 Torx, all folding into one handle like a pocket knife. A good first tool if you only want one, and it fits a jersey pocket for roadside adjustments. About $13. 1,900+ reviews at 4.7 stars.
Bike Torque Wrench 1/4-Inch Drive 15-Piece Kit, 2 to 26 Nm
$59.97 as of Nov 12, 2026
★★★★☆Our rating· In Stock
A click-type torque wrench in the range bikes actually use, with hex, Torx and extension bits in a case. Set the number printed next to the bolt, tighten until it clicks, and stop. Cheap insurance for carbon bars, seatposts and stems. About $60. 3,100+ reviews at 4.6 stars.
Chains stretch as they wear, and a worn chain quietly chews up the much more expensive cassette and chainrings. A chain checker tells you when it's time: replace at 0.5 percent wear on 11- and 12-speed drivetrains, and at 0.75 percent on 10-speed and below. Most modern chains join with a master link, which needs pliers to open, and a chain tool to shorten a new chain to length.
Best starter
Park Tool
CC-3.2 Chain Checker, 5 to 12 Speed
$12.85 as of Nov 12, 2026
★★★★★Our rating· In Stock
Drop it onto the chain and it either falls in or it doesn't. One side reads 0.5 percent wear, the other 0.75 percent, so you know at a glance whether to replace the chain. Check every few hundred miles. About $13. 3,100+ reviews at 4.8 stars.
Squeeze to open a master link, or flip them to close one. Removing the chain for a proper cleaning becomes a thirty-second job instead of a fight with your fingers. About $19. 7,000 reviews at 4.9 stars.
A shop-grade chain breaker for shortening a new chain to the right length and pushing out damaged links. Works on single-speed through 12-speed chains, with a replaceable pin. You'll need one the first time you replace a chain yourself. About $49. 2,300+ reviews at 4.7 stars.
A clean, lubed chain shifts better, runs quieter and lasts much longer. Wash the bike when it's dirty, scrub the chain every few rides, then apply lube to each roller and wipe the outside dry. Dry lube suits dry, dusty riding and stays cleaner. Wet lube lasts longer in rain but attracts grime. Never spray degreaser into hubs or bottom brackets.
Best starter
Finish Line
Dry Bike Chain Lube, Ceramic Dry-Film
$16.74 as of Nov 12, 2026
★★★★★Our rating· In Stock
A ceramic dry lube that goes on wet, then dries to a thin film that doesn't grab dust and grit. The best everyday choice for road and dry trail riding, and it keeps the drivetrain far cleaner than oily lubes. Sold by Amazon. About $17. 3,900+ reviews at 4.7 stars.
The pink spray you see in every bike shop. Spray the whole bike, let it sit for a few minutes, brush, then rinse with low-pressure water. Safe on carbon, paint, rubber and disc brakes. About $17. 17,000+ reviews at 4.6 stars.
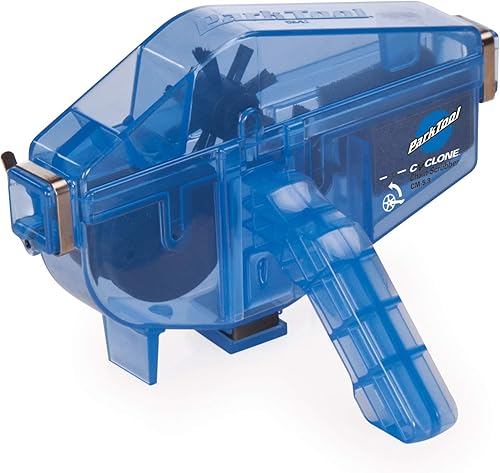
A clamshell with rotating brushes that clips around the chain. Fill it with degreaser, backpedal for a minute, and the chain comes out clean without taking it off the bike. About $35. 7,900+ reviews at 4.7 stars.
Four brushes shaped for the jobs a rag can't reach: a large soft brush for the frame, stiffer ones for tires and the drivetrain, and a thin one for getting between cassette cogs. About $26. 2,800 reviews at 4.7 stars.
A stand holds the bike off the ground at working height, so the wheels spin freely while you adjust gears and brakes. It's the single biggest upgrade to how pleasant home repairs feel. Clamp the seatpost, never the frame tubes, especially on carbon. Folding stands store in a closet and travel to races.
Best starter
CXWXC
Bike Repair Stand, Shop Home Mechanic Rack
$86.98 as of Nov 12, 2026
★★★★★Our rating· In Stock
The best-selling home repair stand on Amazon. Height adjusts for sitting or standing, the clamp swivels to angle the bike, and it folds flat for storage. A tool tray keeps hex keys from rolling away. Plenty for home tune-ups. About $87. 9,900+ reviews at 4.6 stars.
A much sturdier stand with a wide tripod base and Park's quick-adjust clamp, which grips any seatpost securely in seconds. It barely moves when you're cranking on a stuck pedal, and it handles heavier bikes. Folds for storage. About $280. 1,000+ reviews at 4.6 stars.
You don't need a mechanic's training to keep a bike running well. Four weekends of small jobs, in the right order, teach you the repairs that come up most: flats, chain care, brakes and gears. Here's the plan.
Most bike problems are small, and most small problems get worse when ignored. A squeaky chain becomes a worn cassette. A soft tire becomes a pinch flat. Learning to fix things yourself mostly means learning to notice them early.
Work through one job per weekend. Use the Park Tool repair guides as you go: every job below has a free step-by-step article with photos.
Week 1: Tires and flats
Start with the job you’ll do most. Check pressure before every ride, using the range printed on the tire sidewall. Lighter riders and rough roads go toward the low end, heavier riders and smooth pavement toward the high end.
Then practice a flat at home, not on the side of the road. Take the wheel off, push the tire bead toward the center of the rim to give it slack, and use two levers to lift one side of the tire off. Pull the tube, run your fingers carefully around the inside of the tire to find whatever caused the flat, and fit a new tube with a little air in it so it doesn’t twist.
Check chain wear with a chain checker. If it drops in at the 0.5 percent mark on an 11- or 12-speed bike, or 0.75 percent on 10-speed and below, buy a new chain now.
Then clean it. With a chain scrubber, degreaser and a minute of backpedaling, the chain comes out clean on the bike. Rinse, dry with a rag, then put one drop of lube on each roller while you turn the cranks backward. Spin for a minute and wipe off everything on the outside. Lube belongs inside the rollers, not on the surface where it collects grit.
If you need a new chain, this is the week to fit it. Count the links on the old one, shorten the new one to match with a chain tool, and join it with the master link.
Week 3: Brakes
Squeeze each brake lever. It should feel firm and stop well before it touches the handlebar.
For rim brakes, check the pads for wear lines and make sure they hit the rim squarely, not the tire. Adjust cable tension with the barrel adjuster near the lever. For mechanical disc brakes, the same barrel adjuster pulls the pads closer. If a disc rotor rubs, loosen the two caliper bolts, squeeze the brake, and retighten them while holding the lever.
Hydraulic brakes that feel spongy usually need a bleed. That’s a good job to leave to a shop until you’re more confident.
Shifting problems are usually cable tension. With the bike in a stand, shift through the gears while pedaling. If it hesitates going to bigger cogs, turn the barrel adjuster at the derailleur or shifter a quarter turn counterclockwise. If it hesitates going to smaller cogs, turn it clockwise. Small turns, then test.
Finish by going over every bolt with a torque wrench: stem, handlebar clamp, seatpost clamp, brake calipers. The correct torque is usually printed right next to the bolt. Tighten until the wrench clicks, then stop.
After a month you’ll handle most of what a basic shop tune-up covers. Keep the habit going with a quick check before each ride: air, brakes, chain and cranks.
Need the tools? Our bike maintenance gear guide lists the pump, hex keys, chain tools and stand worth buying first.
Save your money
What you don't need yet
Beginners get pressured to buy a lot of stuff that doesn't help them play
better. Here's what we'd skip on day one.
A full 40-piece tool kit — Big kits pad the count with tools for parts you don't have. Buy single tools as jobs come up.
Bottom bracket and cassette tools — These jobs come up every few thousand miles, and the tools depend on your exact parts. Buy them when you need them.
Wheel truing stand — Small wobbles can be trued in the frame with a spoke wrench. A stand is for building wheels.
Ultrasonic chain cleaner — A chain scrubber and degreaser get the job done for a fraction of the cost.
First week
Your first seven days
A short, real plan to get from gear-on-doorstep to actually playing.
Check your valve type (Presta or Schrader) and your chain speed by counting the cogs on the rear cassette. · Learn
Buy a floor pump, tire levers and a hex set. · Buy
Fixing flats, setting tire pressure, cleaning and lubing the chain, replacing a chain, adjusting rim and mechanical disc brakes, tuning derailleurs, and tightening loose bolts. Those cover most of what a shop charges for in a basic tune-up.
How often should I lube my chain?
Every 100 to 200 miles in dry weather, and after any wet or muddy ride. If the chain squeaks or looks dry, it's overdue. Always wipe off the excess afterward, since lube on the outside of the chain only collects dirt.
When should I replace my chain?
When a chain checker shows 0.5 percent wear on 11- or 12-speed, or 0.75 percent on 10-speed and below. That's often every 1,500 to 3,000 miles. Waiting longer wears out the cassette and chainrings, which cost far more.
Do I really need a torque wrench?
If your bike has carbon bars, a carbon seatpost or a carbon frame, yes. Overtightening cracks carbon and undertightening lets parts slip. On an all-aluminum or steel bike it's less critical, but it still takes the guessing out of stem and brake bolts.
What jobs should I leave to a shop?
Hydraulic brake bleeds, suspension servicing, wheel building, headset and bottom bracket installs on press-fit frames, and anything involving facing or reaming a frame. Those need expensive tools or experience that's hard to get from a few home jobs.
JustBeginning earns commission from affiliate programs. As an Amazon
Associate, we earn from qualifying purchases. This costs you nothing
extra and doesn't change our recommendations.
Prices and availability are accurate as of the date and time
shown and can change; the price on Amazon when you buy is what
applies.
How this works.
Our top pickJoeBlow Sport III Floor Pump, 160 psi, 3-inch Gauge


 Best starter