A cyberdeck is a homemade portable computer: a Raspberry Pi, a small screen, a keyboard and a battery, built into a case you choose, often a rugged hard case. It's part electronics project, part industrial design. Here's the parts list to start with, the power gotchas that trip people up, and how to build one without soldering.
By Colin B. · Published November 5, 2026 · Last reviewed November 5, 2026
1200 Case With Foam
— The Pelican 1200: rugged, waterproof and the classic cyberdeck shell.
Budget total
$275
Typical total
$475
A Raspberry Pi 5 4GB, power supply, microSD card, a 7 inch DSI screen, a mini keyboard and a budget hard case come to about $275. An 8GB kit, a 1024x600 touchscreen, a mechanical keyboard, a battery board with cells and a Pelican case land around $475. Raspberry Pi and memory card prices are high right now.
We earn commission when you buy through links on this page, including
Amazon. See our affiliate disclosure.
Price tiers and budget totals shown above are editorial estimates;
actual prices vary.
At a glance
Our top pick in each category
The fastest path through this guide — each best-starter pick by category.
Scroll for the budget and upgrade alternatives.
Plan power first. A Raspberry Pi 5 wants 5 V at 5 A. On a typical 3 A power bank it will boot but limit USB power, so keyboards and drives may misbehave. Use the official 27 W supply at your desk and a Pi 5 UPS board for battery power.
Mock it up on a desk before you cut anything. Connect the board, screen and keyboard with cables, get the software working, then figure out the layout in the case. Most first-build frustration is from cutting holes before knowing what goes where.
Pick a screen interface on purpose. DSI ribbon screens connect neatly with no extra cables. HDMI screens need a micro HDMI cable or adapter for the Pi 5, plus a USB cable for touch. Both work; DSI is tidier inside a case.
The Raspberry Pi 5 is the default brain for a cyberdeck: fast enough for a full desktop, a browser and coding, with lots of community support. 4GB is plenty for most decks; 8GB helps if you run many browser tabs. A starter kit adds the power supply, cooling, a preloaded card and cables, which is easier for a first build even if you replace the case.
Boards — what's the difference?
A few common shapes, each making a different trade.
Bare board
Just the Pi 5. Cheapest, and you choose every other part.
RAM
4GB
Price
~$130
Best for Builders who want to pick each part
Tradeoff Needs a power supply, card, cooler and cables
The Pi 5 with 4GB of RAM, about $130. Plenty for a portable terminal, a light desktop, a browser and coding. Add the official power supply and a good microSD card.
A complete Pi 5 8GB kit: a preloaded 128GB card, a 45 W PD power supply, a case with fan, a heat sink and two display cables. About $260. The easiest way to get booted and testing on day one.
Seven inches is the classic cyberdeck size: big enough to read, small enough for a hard case lid. DSI screens connect to the Pi with a flat ribbon cable and need nothing else. HDMI screens use a micro HDMI cable and a USB cable for touch but come in higher resolutions. Check that the screen supports the Pi 5 and that drivers aren't needed.
Best starter
Hosyond
7 Inch IPS Touch Screen, 1024x600, HDMI
$45.99 as of Nov 5, 2026
★★★★★Our rating· In Stock
A 7 inch IPS capacitive touchscreen at 1024x600 for about $46, sharper than the common 800x480 panels, which makes terminal text much easier to read. Plug-and-play over HDMI plus USB for touch. 600+ reviews.
The official 7 inch DSI display at 720x1280, about $107. Perfect integration with Raspberry Pi OS and a sharp panel. Native portrait orientation, rotated in settings.
The keyboard decides the shape of your deck. A tiny wireless keyboard with a touchpad keeps the build compact and needs no mouse. A 60 percent mechanical keyboard types far better and gives the deck that chunky look, but it sets the minimum size of your case.
Best starter
Rii
X8 Mini Keyboard with Touchpad
$20.89 as of Nov 5, 2026
★★★★★Our rating· In Stock
A tiny wireless keyboard with a built-in touchpad and rechargeable battery for about $21. One USB dongle covers typing and pointing, so the deck stays small. 5,200+ reviews.
A compact 60 percent mechanical keyboard with Bluetooth and wired modes for about $45. Real typing for coding and writing on the deck, and the look a lot of builders want. 9,700+ reviews.
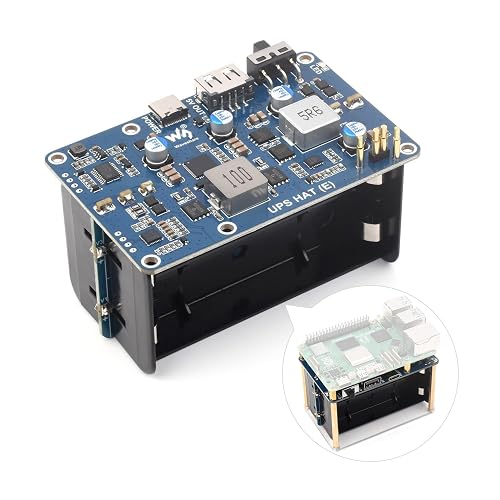
Power is the hardest part of a portable Pi 5. At your desk, use the official 27 W supply. For battery power, a UPS board built for the Pi 5 delivers a steady 5 V at high current and lets you charge and run at the same time. Lithium cells are sold separately; buy them from a reputable battery specialist, because counterfeit cells are common online.
Best starter
Raspberry Pi
27W USB-C Power Supply
$23.32 as of Nov 5, 2026
★★★★★Our rating· In Stock
The official 5.1 V, 5 A supply the Pi 5 is designed around, about $23. It's the only easy way to get full USB power at your desk. Use it while you build and test.
A battery board with a stable 5 V, 6 A output, pogo-pin connection, USB-C fast charging and a fuel gauge the Pi can read. Takes four 21700 cells, not included. About $45.
The case gives a cyberdeck its personality. Hard plastic equipment cases are the classic: rugged, cheap and easy to cut, with the screen in the lid and the keyboard in the base. 3D-printed enclosures come later, once you know your layout. Measure your screen and keyboard before you buy.
Best starter
Pelican
1200 Case With Foam
$47.95 as of Nov 5, 2026
★★★★★Our rating· In Stock
The classic cyberdeck shell: a watertight, crushproof case with an interior of about 9.25 by 7.12 by 4.12 inches, room for a 7 inch screen in the lid and a mini keyboard in the base. About $48, 3,600+ reviews.
Your operating system lives on a microSD card. Buy a fast, name-brand card; cheap no-name cards are slower and fail more often. 128GB leaves room for software and files.
Best starter
SanDisk
128GB Extreme microSD Card
$39.70 as of Nov 5, 2026
★★★★★Our rating· In Stock
A fast, reliable A2-rated card that runs Raspberry Pi OS smoothly, about $40. Over 150,000 reviews.
A first cyberdeck takes a few weekends: one to get the Pi and screen working on the desk, one to plan the layout and power, and one to cut, mount and close the case. Here's the order that avoids rework.
The fun of a cyberdeck is the moment it all closes up into one strange, self-contained machine. The trick is getting there without cutting a hole in the wrong place. Build it in three stages and you’ll avoid most of the rework.
Weekend 1: The bench build
Before you touch a case, get everything working on your desk.
Flash Raspberry Pi OS to the microSD card with the official Raspberry Pi Imager. Set your Wi-Fi, username and SSH while you’re there.
Boot the Pi on a normal monitor with the official power supply. Update everything.
Connect your 7 inch screen and keyboard. For a DSI screen, seat the ribbon cable carefully in the Pi’s display connector. For HDMI, use a micro HDMI cable plus USB for touch.
If the screen is upside down or sideways, fix the rotation in the display settings now. If touch doesn’t line up, check the screen maker’s notes for the Pi 5.
This is the planning weekend, and the one that matters most.
Power. Decide whether your deck runs on mains or battery. For battery, mount the Pi on a Pi 5 UPS board, add good cells from a reputable battery seller, and check the battery level shows in the OS. Test it for an hour with the screen on to see your real runtime.
Layout. Lay every part on the open case and move them around:
Screen in the lid, keyboard in the base, is the classic layout.
Leave room for cables to bend. Ribbon and HDMI cables need space to curve, not fold.
Plan airflow. A Pi 5 under load gets warm. Keep the cooler’s fan clear, and think about a vent.
Plan ports. Which USB, power and charging ports need to reach the outside?
Sketch the layout on paper with measurements. Then sleep on it.
Weekend 3: Cut, mount, close
Now cut. Mark everything twice. Pluck foam is your friend: it holds parts in place without screws, so you can adjust later. For the screen, a simple bezel of thin plywood, acrylic or foam board in the lid looks clean and protects the edges.
Mount the Pi and UPS board on standoffs or foam, route cables, and close the case. Power it on. That first boot inside the case is the payoff.
The best decks have a purpose. Make it a writing machine with a distraction-free editor, a portable terminal for your homelab, an offline reference library, a retro gaming console, or a radio or Meshtastic station for the field. The software is what turns a box of parts into your machine.
What not to worry about yet
Don’t start by soldering custom power circuits. Don’t buy a 3D printer for the first build. And don’t aim for the perfect deck from photos online; those are usually someone’s third or fourth. Get one working, use it, then build the next one better.
Save your money
What you don't need yet
Beginners get pressured to buy a lot of stuff that doesn't help them play
better. Here's what we'd skip on day one.
A soldering station — A first deck can be built entirely with plug-in parts, cables and standoffs.
A 3D printer — Hard cases and foam get you a great first build. Print custom parts on the second.
An NVMe SSD — A good microSD card is fine to start. Add NVMe later for speed.
LoRa, SDR or GPS modules — Fun add-ons, but get the basic deck working first.
Custom-built batteries — Don't build packs from loose lithium cells. Use a UPS board designed for the Pi.
First week
Your first seven days
A short, real plan to get from gear-on-doorstep to actually playing.
Order a Raspberry Pi 5, the official power supply and a microSD card. · Buy
Measure everything and sketch the layout on paper before buying a case. · Action
Set up the software you want: a terminal, a text editor, offline docs or a game emulator. · Action
FAQ
Common questions
What is a cyberdeck?
A DIY portable computer, usually built around a Raspberry Pi with a small screen, keyboard and battery in a custom or repurposed case. The name comes from cyberpunk fiction; the hobby is about building your own unusual machine.
Do I need to solder to build a cyberdeck?
No. A first deck can be entirely plug-in parts: board, DSI or HDMI screen, USB keyboard and a UPS board, mounted with standoffs and foam. Soldering opens up more options later.
Raspberry Pi 5 or Pi 4 for a cyberdeck?
The Pi 5 is much faster and handles a desktop and browser comfortably, but it needs more power. A Pi 4 runs cooler and on less power, which helps battery life, but feels slower.
Can I run a Raspberry Pi 5 from a power bank?
It will boot from many USB-C power banks, but most only supply 3 A, so the Pi limits USB power and may warn you. A UPS board designed for the Pi 5 is more reliable for battery use.
How much does a cyberdeck cost?
Roughly $275 for a basic Pi 5 build with a screen, keyboard and case, and $450 to $500 for a battery-powered build with better parts. Raspberry Pi and memory prices have been high lately.
What case should I use for a cyberdeck?
Hard equipment cases like a Pelican 1200 are the classic choice: rugged, easy to cut and the right size for a 7 inch screen. Many builders move to 3D-printed cases once they know their layout.
Raspberry Pi documentation — Official setup, power requirements and display configuration for every Pi. Check the power section before buying batteries.
r/cyberDeck — The main community. Endless build photos and parts lists to borrow ideas from.
Hackaday.io — Detailed build logs for cyberdecks and portable computers, often with 3D files and wiring diagrams.
Waveshare UPS HAT (E) wiki — Setup, battery requirements and the battery monitoring script for the UPS board we recommend.
JustBeginning earns commission from affiliate programs. As an Amazon
Associate, we earn from qualifying purchases. This costs you nothing
extra and doesn't change our recommendations.
Prices and availability are accurate as of the date and time
shown and can change; the price on Amazon when you buy is what
applies.
How this works.


 Best starter