Rock tumbling turns dull, rough stones into glossy ones that look wet even when they're dry. The machine does the work; your job is picking the right rocks and being patient for about four weeks. Here's the tumbler to start with, the grit and media you'll go through, and the mistakes that ruin a first batch.
By Colin B. · Published November 5, 2026 · Last reviewed November 5, 2026
The National Geographic kit comes with grit and rough rock, so $58 gets your first batch going. Add a refill grit kit, ceramic media and a bag of good rough and you're around $120, which covers your first several batches.
We earn commission when you buy through links on this page, including
Amazon. See our affiliate disclosure.
Price tiers and budget totals shown above are editorial estimates;
actual prices vary.
At a glance
Our top pick in each category
The fastest path through this guide — each best-starter pick by category.
Scroll for the budget and upgrade alternatives.
Plan for a month. A full rotary tumble is four stages of about a week each, and the first stage often needs a second week. If you want polished stones by a birthday, start five weeks early.
Pick where it will run before you buy. A rotary tumbler runs 24 hours a day for weeks, and even quiet ones make a steady rumble. A garage, a laundry room or a basement is ideal; a bedroom is not.
Never pour used grit down a drain. The slurry settles like cement and clogs pipes. Rinse stones into a bucket, let it settle outside, and throw the sludge in the trash.
The gear
What you actually need
Tumblers
Rotary tumblers spin a rubber barrel on two rollers, which slowly rounds and smooths rough stones over about a month. That's what every beginner kit is, and it's what you want: it shapes rocks as well as polishing them. Vibratory tumblers are faster but only polish, so they suit people who already shape stones. Start with a small rotary with a rubber barrel, which is far quieter than hard plastic.
Tumblers — what's the difference?
A few common shapes, each making a different trade.
Hobby rotary kit
Small rubber-barrel tumbler sold with grit and rough. The usual first machine.
Barrel
~1-2 lb
Price
~$60
Lifespan
A few years
Best for First-timers and families
Tradeoff Small batches, and the motor is lighter-duty
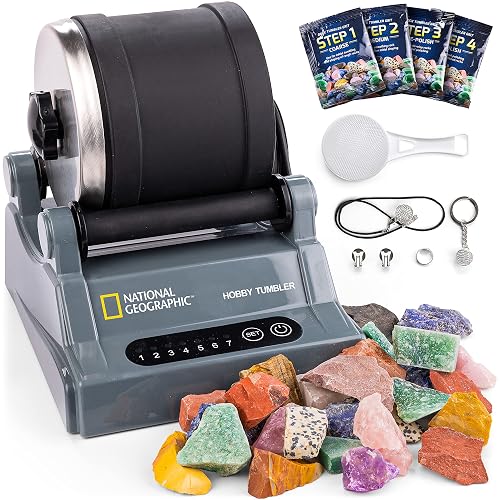
The kit with nearly 26,000 reviews for a reason. A rubber barrel that's much quieter than plastic, four grits, nine kinds of rough gemstones and a sifter, so your first batch is in the box. About $58.
What we like
Everything for a first batch, including rough rock
A close rival at about $60 with a digital 9-day timer and three speeds, so it shuts itself off at the end of a stage. Comes with grit, a mesh strainer and half a pound of rough. 9,500+ reviews.
Thumler's is the American workhorse brand: steel frame, heavy motor and a 3 lb barrel that hobbyists run for decades. This kit adds grit and accessories. About $200, the one to buy once you're sure.
Grit is the consumable that does the shaping. Each batch uses four stages: coarse grit (around 60/90) to round the rock, medium (around 150/220) to smooth it, fine pre-polish (around 500) and a final polish. A refill kit with all four is the easiest buy. Kit grits run out after a couple of batches, so order a refill with your tumbler.
Best starter
Polly Plastics
Rock Tumbler Grit and Polish Refill with Ceramic Media
$29.99 as of Nov 5, 2026
★★★★★Our rating· In Stock
All four stages plus ceramic filler media for about $30, rated 4.8 stars by more than 7,000 buyers. The included media means you can fill out a small batch without adding more rock.
Made for the National Geographic tumbler but works in any rotary, and polishes up to 20 lbs of rock for about $25. The straightforward refill if you're happy with the kit's results.
Ceramic media are small, hard pellets that tumble with your rocks. They fill the barrel to the right level when you don't have enough rock, cushion stones so they don't chip each other, and carry grit into crevices. They're reusable for years. Rinse them well between stages so coarse grit doesn't follow you into the polish.
Best starter
GANGOU
Ceramic Tumbling Media, 2 lb
$13.99 as of Nov 5, 2026
★★★★★Our rating· In Stock
Two pounds of 3/16 inch cylinder pellets for about $14, which is right for a small hobby barrel. 1,000+ reviews at 4.6 stars.
The rock decides the result more than the machine does. Agate, jasper and quartz are the beginner's friends: hard, cheap and they take a great shine. The rule that matters is to tumble rocks of similar hardness together, because soft stones get ground away or scratched by hard ones. Skip fluorite, calcite and anything man-made like opalite for your first batches.
Best starter
FORBY
Rough Madagascar Stones Mix, 3 lb
$19.99 as of Nov 5, 2026
★★★★★Our rating· In Stock
Three pounds of 1 to 2 inch mixed rough for about $20, the right size for a hobby barrel. The mixes are mostly hard agate-family stones that polish well together. 2,300+ reviews.
Five pounds and 28 or more kinds of stone for about $27. Great variety, but it mixes hard quartz with softer stones like fluorite and apatite and man-made opalite, so sort it by hardness before you tumble.
Your first batch takes about four weeks, one grit stage at a time. Here's what happens each week, what the stones should look like before you move on, and the cleanup step that decides whether they shine.
Rock tumbling is mostly waiting, and that’s the charm. You spend twenty minutes a week on it and the machine does the rest. The skill is in the in-between moments: choosing rocks, judging when a stage is done, and cleaning like you mean it.
Here’s how your first month goes.
Week 1: Coarse grit (the shaping stage)
Sort your rough first. Keep hard stones like agate, jasper and quartz together, and set aside anything soft, crumbly or badly cracked. Mixing hardness is the most common first-batch mistake: soft stones get ground to nothing.
Then load the barrel:
Fill it two-thirds to three-quarters full with rock. Top up with ceramic media if you’re short. Too empty and stones smash into each other; too full and they don’t move.
Add coarse grit using the amount your kit’s instructions give for your barrel size.
Add water until it’s just below the top layer of rocks.
Seal it, set it on the rollers, and switch it on. After a day or two, open it once to let out any gas and make sure nothing is leaking. Then leave it alone for the rest of the week.
At the end of week one, rinse a few stones and look at them. They should be rounded with no sharp edges, pits or deep scratches. Most first batches aren’t there yet. Run another week of coarse grit. It’s normal, and skipping it is why people end up with lumpy, half-polished stones.
When they’re properly shaped, clean everything: stones, barrel and media. Scrub the barrel lid seal with an old toothbrush. Any coarse grit left behind will scratch the stones in later stages.
Week 3: Medium and pre-polish
Medium grit (around 150/220) takes about a week and leaves stones smooth and evenly matte. Clean everything again, then run pre-polish (around 500) for another week. Stones come out silky and dull, almost satin.
If you see a deep scratch you missed, put that stone aside to go back through coarse with the next batch. One rough stone in the polish stage can scratch the rest.
The cleanest clean of the month comes before this stage. Then run the polish for about a week. When you open the barrel and rinse the stones, they’ll look wet even once they’re dry. That’s the moment.
If the shine is patchy, a day of tumbling with just water and a little bar soap (a “burnish”) often brings it up.
The cleanup rule
Never pour grit slurry down a drain. It settles like cement and clogs pipes. Rinse everything into a bucket, let it settle outside, pour off the water on the ground and throw the sludge in the trash.
What comes next
Your second batch will go faster because you’ll know what each stage should look like. That’s when people try harder rough, bigger barrels or a club field trip to collect their own stones.
Save your money
What you don't need yet
Beginners get pressured to buy a lot of stuff that doesn't help them play
better. Here's what we'd skip on day one.
A vibratory tumbler — Faster, but it only polishes. A rotary does the shaping a beginner needs.
A double-barrel machine — Handy for running two stages at once, but wait until you know you'll keep at it.
Expensive gem rough — Learn on cheap agate and jasper. Save the pricey stones until your process is dialed in.
A lapidary saw or cabbing machine — That's a different hobby. Tumbling needs no cutting at all.
Plastic pellets — Some people add them in the polish stage for cushioning. Ceramic media does the job for a first batch.
First week
Your first seven days
A short, real plan to get from gear-on-doorstep to actually playing.
Pick a spot where the tumbler can run day and night: garage, laundry room or basement. · Action
Sort your rough. Keep the hard agate, jasper and quartz together and set aside anything soft or cracked. · Action
Load the barrel about two-thirds to three-quarters full, add coarse grit and water to just below the top of the rocks, and start stage one. · Action
Open the barrel after a few days to check for gas buildup and see how it's going. Then let it run. · Action
FAQ
Common questions
How long does rock tumbling take?
About four weeks with a rotary tumbler: roughly a week each for coarse, medium, pre-polish and polish. The coarse stage often needs a second week for rough, angular stones.
What rocks are best for tumbling?
Agate, jasper and quartz. They are hard (around 7 on the Mohs scale), cheap and polish to a high shine. Tumble rocks of similar hardness together so the soft ones don't get ground away.
Are rock tumblers loud?
They make a steady rumble, like a dryer with a few stones in it. Rubber barrels are much quieter than plastic. Run it somewhere you won't hear it at night.
Why are my stones dull after polishing?
Usually grit contamination or rushing a stage. Clean the stones, barrel and media thoroughly between stages, and don't move on until stones look smooth and evenly matte. Some people also run a final soap burnish for a day.
Can I put the grit down the sink?
No. Used grit slurry settles into a cement-like mass and clogs plumbing. Let it settle in a bucket, pour off the water outside and throw the sludge in the trash.
Is rock tumbling good for kids?
Yes, it's one of the best science hobbies for kids 8 and up. An adult should handle the grit mixing and cleanup, and the month-long wait is part of the lesson.
Rock Tumbler (rocktumbler.com) — The most complete free instructions on the web: step-by-step grit stages, troubleshooting and which rocks tumble well. Bookmark the beginner's guide.
Mindat.org — Mineral database. Look up any rock's Mohs hardness before you tumble it with others.
r/RockTumbling — Friendly community full of before-and-after photos, which is the best way to learn what each stage should look like.
JustBeginning earns commission from affiliate programs. As an Amazon
Associate, we earn from qualifying purchases. This costs you nothing
extra and doesn't change our recommendations.
Prices and availability are accurate as of the date and time
shown and can change; the price on Amazon when you buy is what
applies.
How this works.

 Best starter


