Air-dry clay is pottery without the kiln: shape it at the kitchen table, let it harden overnight, then sand, paint and seal it. Trinket dishes, charms, planters and little sculptures are all within reach for about $30. Here's which clay to buy, how to stop cracks, and the honest truth about waterproofing.
By Colin B. · Published November 5, 2026 · Last reviewed November 5, 2026
A 5 lb tub of Crayola clay, a basic tool set and a bottle of varnish is about $30. DAS clay, a tool kit, a set of artist acrylics and varnish comes to around $60, enough for a dozen small projects.
We earn commission when you buy through links on this page, including
Amazon. See our affiliate disclosure.
Price tiers and budget totals shown above are editorial estimates;
actual prices vary.
At a glance
Our top pick in each category
The fastest path through this guide — each best-starter pick by category.
Scroll for the budget and upgrade alternatives.
Air-dry clay is not food safe or truly waterproof, even sealed. It's perfect for trinket dishes, jewelry holders, ornaments and dry planters, but don't eat or drink from it, and don't put water straight in it. Use a glass or plastic liner for real flowers.
Cracks come from uneven drying. Keep pieces an even thickness, under about half an inch, and dry them slowly away from heaters and sun. Thick and thin parts on one piece shrink at different rates, and that's where cracks start.
Buy one clay, not five. DAS is the all-rounder for adults. Crayola is cheap and fine for playing around. Paper clay is lighter and stronger for fine detail. Start with one and learn how it behaves.
Air-dry clays harden as water evaporates, usually in one to three days. They differ in texture, strength and how they sand. DAS is smooth and fine, with fibers that help it hold together. Crayola's terra cotta is cheap and easy but cracks more readily. Paper clay is light and strong with great detail. Stone-type clays dry with a hard, stony finish. Keep opened clay wrapped tightly in plastic.
Air-Dry Clay — what's the difference?
A few common shapes, each making a different trade.
Standard air-dry clay
Smooth, all-purpose clay that sands well. The everyday choice for dishes and decor.
Texture
Smooth
Price
~$13 for 2.2 lb
Best for Trinket dishes, charms and general projects
The air-dry clay most adult makers start with: smooth, fine-grained and easy to sand to a clean finish. A 2.2 lb block is about $13 and covers several small projects. 44,000+ reviews.
Paper-based clay that's lighter and stronger than standard air-dry clay, with a fine texture that holds small detail and sands smooth. About $16 for a pound. Great for figurines and ornaments.
DAS's stone-effect clay dries to a hard surface with a stony gray look, so it looks good even unpainted. About $14. Nice for planters, bookends and minimalist decor.
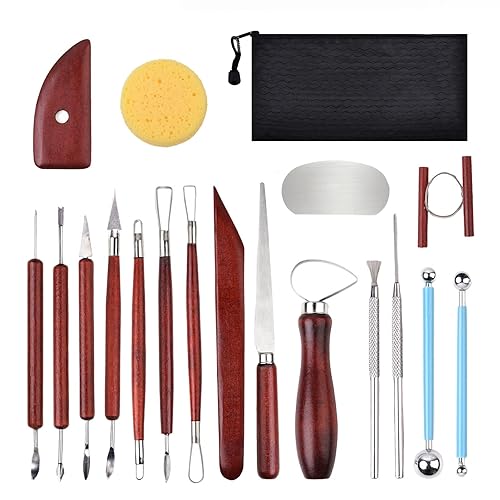
You can start with a butter knife and a toothpick, but a cheap tool set makes it easier: loop tools for carving, ball tools for smoothing, needle tools for detail and wooden shapers for joining. Add a sponge and a cup of water, and a rolling pin or smooth bottle for slabs.
Best starter
Amrules
27 Pcs Clay Sculpting Tools Kit
$8.99 as of Nov 5, 2026
★★★★★Our rating· In Stock
Twenty-seven tools including loop carvers, ball styluses, needles and shapers for about $9. Everything you need to carve, smooth and add detail. 1,800+ reviews.
Dry air-dry clay is porous and a bit dusty. A coat or two of varnish after painting seals it, adds shine and protects it from handling. Gloss looks like glazed ceramic; matte looks natural. Remember: sealed pieces handle a splash, not soaking, and are never food safe.
Best starter
Liquitex
BASICS Gloss Varnish, 250 ml
$8.99 as of Nov 5, 2026
★★★★★Our rating· In Stock
A water-based gloss varnish for about $9 that gives painted clay a glazed-ceramic shine. Brush on two thin coats, letting each dry. 3,500+ reviews.
A varnish made for air-dry clay that makes pieces water-resistant enough for vases and planters, used with care. About $15. Still not food safe, and still best with a liner for standing water.
Acrylic paint is the go-to for air-dry clay: it sticks well, dries fast and comes in every color. Paint after the piece is completely dry and lightly sanded. Artist acrylics cover better; craft acrylics are cheaper and fine for most projects.
Best starter
Liquitex
BASICS Acrylic Paint Set, 12 x 22 ml
$22.97 as of Nov 8, 2026
★★★★★Our rating· In Stock
Twelve artist-grade tubes for about $23 with strong, opaque color that covers clay in one or two coats. Mixes well, so twelve colors become many more. 14,000+ reviews.
The fastest way to learn air-dry clay is five small projects, each teaching one skill: pinching, slabs, joining, detail and finishing. Here's the order to do them in and what each one teaches.
Air-dry clay forgives a lot, but it teaches through mistakes: a crack here, a wobbly edge there. Five small projects, done in order, cover nearly every skill you need. Each one takes an evening to make, plus a day or two to dry.
Project 1: A pinch pot
Roll a ball of clay about the size of a lime. Press your thumb into the middle, then pinch the walls between thumb and fingers as you turn it. Aim for walls that are the same thickness all the way round, about a quarter inch.
This teaches you how the clay feels: how fast it dries on your hands, when it needs a damp finger, how it cracks if you thin it too much. Keep a damp sponge nearby and wipe small cracks smooth as you go.
Roll the clay between two wooden spoons or chopsticks laid flat, so the slab comes out an even quarter inch thick. Cut a circle or an oval around a bowl or a jar lid, then lift the edges gently and rest the piece inside a shallow bowl to dry in shape.
Dry it slowly. Cover it loosely with plastic for the first day, then uncover. Fast, uneven drying is the number one cause of cracks.
Project 3: Something with joined parts
A dish with little feet, a mug-shaped pen holder with a handle, a planter with a rim. Whatever you choose, the skill is joining:
Score both surfaces with crosshatched scratches.
Slip them with a dab of clay mixed with water.
Press and smooth the seam with a tool or a damp finger.
Joins done without scoring look fine wet and fall off dry. Do it every time.
Project 4: Small, detailed charms
Roll small shapes, press in texture with a fork, a leaf or lace, and use a needle tool to add lines. Poke a hole for a ring or string before it dries. This is where fine clays like paper clay shine.
Take one of your earlier pieces, now bone dry. Sand rough spots and edges with fine sandpaper, wiping off the dust. Paint with acrylics, two thin coats rather than one thick one. Once the paint is dry, brush on two thin coats of varnish.
Now it looks like something from a shop. And you know how to make it again, better.
What not to worry about yet
Don’t buy molds, stamps or specialty clays yet. Don’t expect your first pieces to be perfectly smooth. And remember the rule: decorative, not food safe. Make dishes for rings and keys, not for snacks.
Save your money
What you don't need yet
Beginners get pressured to buy a lot of stuff that doesn't help them play
better. Here's what we'd skip on day one.
A kiln — That's pottery. Air-dry clay hardens on its own with no firing.
A pottery wheel — Air-dry clay isn't made for throwing on a wheel. Hand-building is the whole craft.
Molds and stamps — Fun later. Learn to roll slabs and pinch shapes by hand first.
Resin — Some people coat pieces in resin, but it's a separate hobby with its own safety gear.
Professional sculpting tools — A cheap tool kit plus a sponge and a toothpick does everything at the start.
First week
Your first seven days
A short, real plan to get from gear-on-doorstep to actually playing.
Order a block of air-dry clay, a tool set and varnish. · Buy
Usually 24 to 72 hours, depending on thickness and humidity. Thin pieces dry overnight; thick ones can take several days. Turn pieces over partway so the bottom dries too.
Why does my air-dry clay crack?
Usually uneven drying or uneven thickness. Keep pieces an even thickness, dry them slowly away from heat, and fill small cracks with a paste of clay and water, then sand.
Is air-dry clay waterproof?
No. Sealing makes it water-resistant to splashes, but it softens if it sits in water. Use a glass or plastic liner for vases and planters.
Is air-dry clay food safe?
No, not even sealed. Use it for decorative pieces like trinket dishes, ornaments and jewelry holders, not plates, cups or anything you eat from.
How do I join two pieces of air-dry clay?
Score both surfaces with crosshatched scratches, brush on a little slip (clay mixed with water), press together and smooth the seam.
What's the difference between air-dry clay and polymer clay?
Air-dry clay hardens by drying in the air. Polymer clay is plastic-based and hardens in a home oven. Polymer is more durable and comes in colors; air-dry clay is cheaper, paints well and needs no oven.
JustBeginning earns commission from affiliate programs. As an Amazon
Associate, we earn from qualifying purchases. This costs you nothing
extra and doesn't change our recommendations.
Prices and availability are accurate as of the date and time
shown and can change; the price on Amazon when you buy is what
applies.
How this works.
Our top pickDAS Air Hardening Modeling Clay, White, 2.2 lb


 Best starter