A backyard weather station tells you what's actually happening at your house: the real rainfall, the gust that took down the patio umbrella, the frost that hit your garden but not the airport. Here's which station to buy, where to mount it so the numbers are honest, and how to share your data with the weather networks.
By Colin B. · Published November 8, 2026 · Last reviewed November 8, 2026
An AcuRite Iris and a mounting pole come to about $158. Our pick, the Ambient WS-2902, plus a pole is about $235. Add an extra indoor sensor or soil probe for $16 to $24 each later.
We earn commission when you buy through links on this page, including
Amazon. See our affiliate disclosure.
Price tiers and budget totals shown above are editorial estimates;
actual prices vary.
At a glance
Our top pick in each category
The fastest path through this guide — each best-starter pick by category.
Scroll for the budget and upgrade alternatives.
Siting decides accuracy. Mount the sensor in open air, away from walls, roofs, pavement and trees. Ideally the temperature sensor sits about 5 feet up over grass, and the wind sensor is as high and clear as you can safely get it. A station bolted to a sunny fence will read hot no matter what you paid.
All-in-one or separate sensors? All-in-one arrays put everything on one pole, which is easy to install but forces a compromise between good wind height and good temperature height. Separate-sensor systems let you place each part properly but cost more and take longer to set up. For most backyards, an all-in-one is the right call.
Decide how you'll see your data. Some stations come with an indoor display, some with a small Wi-Fi gateway and a phone app, and some offer both. If you want to share to Weather Underground or the Citizen Weather Observer Program, make sure the station has Wi-Fi.
These put temperature, humidity, wind, rain and often UV and light sensors on one outdoor unit that talks wirelessly to an indoor display. They're the easiest way to start, and good ones are accurate enough for gardening, weather watching and sharing to online networks. Look for Wi-Fi uploads, a solar-assisted sensor and a display you'll actually glance at.
All-in-one weather stations — what's the difference?
A few common shapes, each making a different trade.
All-in-one array
Every sensor on one unit and one pole. Easy to install and maintain.
Install time
Under an hour
Cost
$120 to $350
Siting
One compromise height
Best for Backyards, first stations, gardeners
Tradeoff Wind reads low if the pole isn't high enough
Wind, rain and temperature each mounted where they read best.
Install time
An afternoon or more
Cost
$300 and up
Siting
Each sensor placed properly
Best for Rooftop wind masts, serious data, CWOP reporting
Tradeoff More parts, more cables or batteries, more cost
Best starter
Ambient Weather
WS-2902 Wi-Fi Smart Weather Station
$199.99 as of Nov 8, 2026
★★★★★Our rating· In Stock
The station most hobbyists start with. One outdoor array measures temperature, humidity, wind, rainfall, UV and solar radiation, and the color indoor display uploads over Wi-Fi to the Ambient Weather Network and Weather Underground. Works with Alexa and Google Home. About $200. 13,100+ reviews at 4.4 stars.
Measures temperature, humidity, wind speed, wind direction and rainfall, shows it on a large color display and connects to Weather Underground over Wi-Fi. Skips UV and solar readings to save money. About $123. 2,900+ reviews at 4.0 stars.
Moving parts wear out: cups seize, wind vanes stick and tipping-bucket rain gauges clog with leaves. Newer designs replace them with ultrasonic wind sensors and haptic rain sensors that count raindrops as they hit. They cost more up front but need far less upkeep, which matters if your sensor is on a roof.
Best starter
ECOWITT
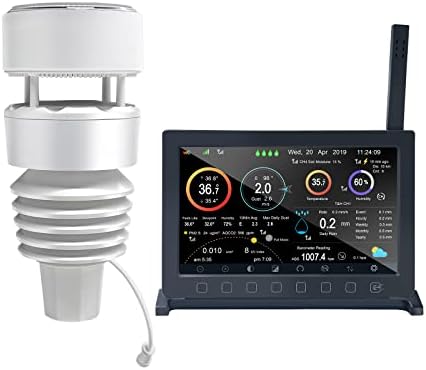
Wittboy Weather Station GW2001 (GW2000 Hub and WS90 7-in-1 Sensor)
$199.99 as of Nov 8, 2026
★★★★★Our rating· In Stock
A solar-powered 7-in-1 outdoor sensor with a haptic rain sensor on top instead of a tipping bucket, plus the GW2000 Wi-Fi hub that also accepts Ecowitt's add-on sensors. Range is up to about 500 feet with obstacles. About $200. 209 reviews at 4.1 stars.
Wittboy Pro Weather Station HP2564 with 7 Inch Display
$299.99 as of Nov 8, 2026
★★★★☆Our rating· In Stock
The same Wittboy outdoor sensor paired with a 7-inch color display console, so you get a screen on the wall as well as app and web access. The kit to buy if you want the low-maintenance sensor and a real display. About $300. 289 reviews at 4.3 stars.
Weather Station with Built-in Wind Meter and Rain Gauge
$349.00 as of Nov 8, 2026
★★★★☆Our rating· In Stock
A single solar-powered sensor with no moving parts that measures wind, rain, temperature, humidity, pressure, UV, solar radiation and nearby lightning. Its app is the best in the category, with hyperlocal forecasts built from your own readings. About $349. 2,200+ reviews at 4.2 stars.
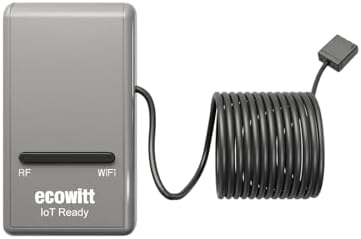
A gateway is a small box that receives your outdoor sensors and puts the data online. Ecowitt's gateways also pick up indoor temperature, humidity and pressure, and can collect add-on sensors such as soil moisture, leak and lightning detectors. Most people start with a gateway to add sensors to an Ecowitt system, or to get a cheap indoor station they can expand later.
Best starter
ECOWITT
GW1200 Wi-Fi Gateway with Built-in Temperature, Humidity and Pressure Sensor
$33.99 as of Nov 8, 2026
★★★★★Our rating· In Stock
A USB-powered Wi-Fi gateway with its own indoor temperature, humidity and pressure sensor. It pairs with Ecowitt outdoor arrays and add-ons, including soil, leak and WH57 lightning sensors, up to 16 devices. About $34. 127 reviews at 4.4 stars.
Ecowitt's newer gateway with both Wi-Fi and wired Ethernet, plus built-in indoor temperature, humidity and pressure sensing. Ethernet is the better choice if your router is close or your Wi-Fi is patchy. About $60. 63 reviews at 4.5 stars.
Once the basics are running, extra sensors are where the hobby gets fun: a temperature probe in the greenhouse, a soil moisture sensor in the vegetable bed, a lightning detector for summer storms. Add-ons are brand-specific, so match them to your gateway or console. The picks here are Ecowitt sensors and need an Ecowitt gateway or Wittboy hub.
Best starter
ECOWITT
WN31 Wireless Multi-Channel Thermometer and Hygrometer Sensor
$15.60 as of Nov 8, 2026
★★★★★Our rating· In Stock
A small wireless temperature and humidity sensor for a greenhouse, garage, wine closet or nursery. Add several on different channels and see them all in one app. About $16. 900+ reviews at 4.6 stars.
A probe you push into a garden bed or big planter to track soil moisture from your phone. Great for knowing when to water instead of guessing. About $24. 1,000+ reviews at 4.3 stars.
A sturdy pole gets your sensor up out of the heat bouncing off the ground and the wind shadow of your house. Most stations clamp to a 1 to 1.25 inch mast. A short J-pole on an eave or fence is fine for a backyard; a taller mast kit helps the wind sensor read closer to true. Always keep well clear of power lines.
Best starter
imbesel
Universal Antenna Mounting Pole for Weather Station, 1.25 x 33.25 in J-Pole
$35.00 as of Nov 8, 2026
★★★★★Our rating· In Stock
A heavy steel J-pole with a 1.25-inch mast that bolts to a fascia, fence post or wall and fits most station clamps. A simple way to get the sensor above the roofline or fence. About $35. 670 reviews at 4.5 stars.
Six 14-inch galvanized steel mast sections that join up to 66 inches tall, plus two clamps and lag screws for mounting to a post or wall. Gets an all-in-one array higher for better wind readings. About $70. 420+ reviews at 4.5 stars.
A weather station is only as good as where you put it. Here's a four-week plan for testing, siting and mounting your station, cleaning up bad readings, and sharing your data with the networks that use it.
The first week with a weather station is mostly unboxing excitement. The real hobby starts when you notice your backyard is two degrees warmer than the station down the road and want to know why. This plan gets you from the box to trustworthy, shareable data.
Week 1: Bench test everything
Before you climb anything, set the outdoor sensor and the display or gateway on a table indoors. Put in batteries, pair them, and watch every reading come alive: temperature, humidity, wind, rain, pressure. Spin the wind cups, tip the rain gauge, and make sure the app connects.
It’s much easier to fix a pairing problem or a dead sensor at the kitchen table than on top of a pole. Note the indoor and outdoor readings side by side so you know how the sensor behaves in still air.
Week 2: Site and mount
Walk your yard with the rules in mind. Temperature wants open air over grass, about 5 feet up, away from walls, roofs, pavement, air conditioners and dryer vents. Wind wants height and clear air in every direction. Rain wants nothing overhead. An all-in-one array can’t be perfect at all three, so pick the spot that’s open and well away from buildings.
Mount the pole solidly so the array doesn’t sway, level the sensor, and point it the way the manual asks, usually with an arrow toward north or the solar panel toward the sun. Stay well clear of power lines, and don’t work on a roof alone.
Now compare. Look up nearby stations on Weather Underground and the nearest airport reading. Your temperature should track within a degree or two; humidity a few percent. Pressure needs to be set to sea level in your console or app, which means entering your elevation or matching a nearby airport’s reading.
If temperature reads high on sunny afternoons, the sensor is getting reflected heat, so move it. If wind reads low, it’s sheltered. Rain gauges under-read when they’re near trees or not level. Fix the siting before reaching for calibration offsets.
Week 4: Share your data
Register your station on Weather Underground so your readings show up on its map. If you’d like your data used by forecasters, sign up with the Citizen Weather Observer Program, which passes quality-checked home-station data to NOAA. Many stations can upload to both at once.
Then start using the data. Set an alert for frost before planting season, track the rainfall total for the garden, or watch pressure drop as a storm rolls in. That’s when the station stops being a gadget and becomes a hobby.
What not to worry about yet
Don’t worry about roof masts, home weather servers, or buying every add-on sensor. Run one well-sited station for a season first.
Beginners get pressured to buy a lot of stuff that doesn't help them play
better. Here's what we'd skip on day one.
A Davis Vantage Pro2 or Vantage Vue — Davis stations are the long-lasting pro standard, but the sensor suite, console and data logger add up to several hundred dollars. Start cheaper and upgrade if the hobby sticks.
A roof-mounted wind mast — Climbing on the roof is the riskiest part of this hobby. Start on a fence or eave pole and only go higher once you know what you want.
Weather software on a home server — Tools like Weewx and Cumulus are great later. The station's own app and Weather Underground cover everything at first.
Every add-on sensor — Run the base station for a month. You'll quickly see which extra reading, soil, lightning or indoor, you actually want.
First week
Your first seven days
A short, real plan to get from gear-on-doorstep to actually playing.
Ambient's WS-2902 is the easiest all-round starter with a display. Ecowitt is the best system to grow, with many cheap add-on sensors. Tempest has no moving parts and the best app but no display. AcuRite is the cheapest way in.
How high should I mount my weather station?
Ideally the temperature sensor sits about 5 feet above grass and the wind sensor is as high and unobstructed as you can safely manage. All-in-one stations force a compromise, so most backyard owners aim for just above the roofline or fence, away from walls.
Why does my station read hotter than the forecast?
Usually siting. Sun on nearby walls, pavement, roofs or a poorly shaded sensor all push readings up. Move the sensor into more open air over grass, and make sure its radiation shield is clean and not blocked.
Do I need Wi-Fi at the mounting spot?
No. The outdoor sensor talks to the indoor display or gateway by radio, usually over a few hundred feet. Only the display or gateway needs to reach your Wi-Fi.
Can I share my data with the National Weather Service?
Yes, through the Citizen Weather Observer Program. Your station uploads to CWOP, which quality-checks the readings and passes them to NOAA. Many stations support it directly; others go through Weather Underground or free software.
How long do home weather stations last?
Budget stations often run three to five years before a sensor or anemometer bearing fails. Low-maintenance designs with fewer moving parts and premium brands like Davis can run a decade or more with occasional battery and cleaning care.
JustBeginning earns commission from affiliate programs. As an Amazon
Associate, we earn from qualifying purchases. This costs you nothing
extra and doesn't change our recommendations.
Prices and availability are accurate as of the date and time
shown and can change; the price on Amazon when you buy is what
applies.
How this works.


 Best starter