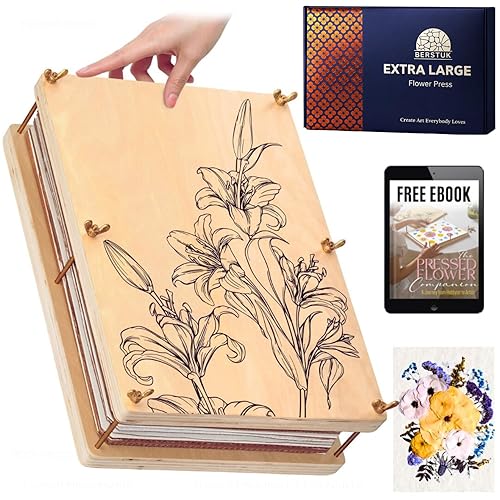
Flower pressing is the slow, quiet craft of drying flowers flat so they keep their color for years, ready for frames, cards and journals. A $24 press and a walk outside is all it takes. Here's which press to start with, the flowers that press beautifully, and how to stop them turning brown.
By Colin B. · Published November 5, 2026 · Last reviewed November 5, 2026
A six-layer wooden press kit with paper and tweezers is about $24. Add extra blotting paper, a floating frame and a jar of Mod Podge and you're around $55, ready to finish and display your first pieces.
We earn commission when you buy through links on this page, including
Amazon. See our affiliate disclosure.
Price tiers and budget totals shown above are editorial estimates;
actual prices vary.
At a glance
Our top pick in each category
The fastest path through this guide — each best-starter pick by category.
Scroll for the budget and upgrade alternatives.
Start with a wooden press, not a heavy book. Books work, but the pressure is uneven and the pages wick moisture slowly, so flowers brown more often. A small screw-down press with blotting paper gives flatter, brighter results for about the price of a hardcover.
Pick flat, thin flowers first. Pansies, violas, cosmos, daisies, ferns, larkspur and single petals from hydrangeas press beautifully. Thick, fleshy flowers like whole roses, lilies and succulents rot or brown; take them apart and press the petals.
Plan for two to four weeks. A traditional press takes that long to dry flowers fully. If you want results in minutes, a microwave press does it, but it costs more and works best on small flowers.
A press squeezes flowers flat between absorbent sheets while they dry. Wooden screw-down presses are the classic: cheap, quiet and good for any flower that fits. Large presses fit whole stems and ferns. Microwave presses dry flowers in seconds to minutes and hold color better, but they're smaller and pricier. Start with a small wooden press; add a microwave press if you get impatient.
Flower Presses — what's the difference?
A few common shapes, each making a different trade.
Wooden screw press
Boards, cardboard and blotting paper tightened with wing nuts. Slow and reliable.
Six layers, 20 sheets of absorbent paper, tweezers, scissors and a craft knife for about $24. It presses a good handful of flowers at once and is small enough to leave on a shelf. 1,000+ reviews at 4.5 stars.
A big 15 by 11.4 inch press for whole stems, ferns and bouquet keepsakes, about $55. 1,800+ reviews. The one to get once you're pressing wedding flowers or big leaves.
The best-known microwave press. Felt pads and cotton liners between two plates dry small flowers in seconds to a couple of minutes, which keeps their color far better than weeks in a press. About $40.
Blotting paper pulls moisture out of the flower. The single best thing you can do for color is replace damp sheets after the first two or three days, when the flower releases the most water. Damp paper is what causes brown spots and mold. Reusable sheets dry out and go back in the press.
Best starter
Aboofx
A4 Blotting Paper for Flower Press, 20 Sheets
$9.99 as of Nov 5, 2026
★★★★★Our rating· In Stock
Twenty thick, absorbent A4 sheets for about $10. Enough to swap the paper in a small press a few times, which is when the colors really improve. 4.7 stars.
Floating frames hold pressed flowers between two panes so light passes through and the flowers seem to hang in mid-air. They're the easiest way to make your first pieces look finished. Keep framed flowers out of direct sun, which fades them in months.
Best starter
NCYP
5x7 Floating Glass Frame with Chain
$15.21 as of Nov 5, 2026
★★★★★Our rating· In Stock
A small double-glass frame with a hanging chain for about $15. Just the right size for a few flowers or one perfect fern, and it looks good on a window or a nail. 1,600+ reviews.
Pressed flowers are paper-thin and break if you look at them wrong. Fine tweezers let you lift and place them without tearing. For cards, journals and bookmarks, a thin coat of matte decoupage glue sticks them down and seals them in one step.
Best starter
Antonki
12-in-1 Precision Tweezers Set
$9.49 as of Nov 5, 2026
★★★★★Our rating· In Stock
Fine and curved tips for lifting fragile petals off blotting paper without tearing them, in a case, for about $10. Far better than the single pair in most press kits.
The decoupage standard: brush a thin layer under and over a pressed flower to glue and seal it onto cards, journals or wood. About $4 for 8 oz, and the matte finish won't look plasticky.
Pressing is easy; pressing flowers that stay bright is the skill. Here's how your first month goes, from picking and laying out to swapping paper, checking dryness and finishing your first frame.
Flower pressing asks for about ten minutes of work and three weeks of patience. The first batch is always a little hit and miss. By the second, you’ll know which flowers come out like stained glass and which turn into brown tissue paper.
Week 1: Pick and press
Pick in the right conditions. Mid-morning on a dry day, after the dew has burned off and before the flowers wilt in the heat. Wet flowers mold and brown in the press.
Start with flowers that are naturally flat: pansies, violas, cosmos, daisies, small ferns and single hydrangea petals. Take thick flowers apart. A rose pressed whole rots; its petals pressed one by one look lovely.
Then lay them out:
Face-down on blotting paper, with space between each one so they don’t stick together.
Arrange petals now. Whatever shape the flower is in when you close the press is the shape it keeps.
Cover with another sheet, add the cardboard layer, and tighten the press evenly at all four corners.
Write the date and flower on a sticky note on the press. You’ll forget otherwise.
This is the step that separates bright flowers from brown ones. Fresh flowers release most of their water in the first few days, and damp paper sitting against them is what causes browning and mold.
Open the press gently, lift each top sheet, and move the flowers onto fresh, dry blotting paper with tweezers. Damp sheets can be dried flat and reused.
Weeks 2 to 3: Leave it alone
Tighten the press a little more and put it somewhere dry and warm, out of the sun. Resist checking every day; every opening risks curled petals.
After two weeks, check one thick flower. It’s ready when it feels papery and stiff, not cool or bendy. Thin flowers may be done sooner, thick ones may need another week.
Lay out a few pressed flowers inside a floating frame before you close it. Odd numbers and a little space look better than a crowded frame. Tweezers help, and so does holding your breath; pressed petals blow away easily.
For cards, bookmarks and journals, brush a thin layer of matte Mod Podge where the flower goes, set it down, and brush another thin layer over the top. Thick coats wrinkle petals.
What comes next
Once you’ve got a stack of pressings, the hobby opens up: botanical cards, phone cases, resin, a framed record of a garden through the seasons. And you’ll never walk past a patch of wildflowers the same way again.
Save your money
What you don't need yet
Beginners get pressured to buy a lot of stuff that doesn't help them play
better. Here's what we'd skip on day one.
Resin kits — Resin is a fun next step, but it's a separate craft with its own safety gear. Get good at pressing first.
Silica gel — Silica dries flowers in 3D, not flat. It's a different technique for whole roses and bouquets.
A laminator — Lamination makes bookmarks quick, but it looks plasticky. Mod Podge or a frame looks better.
Professional herbarium supplies — Herbarium mounting paper and labels are for scientific collections. Craft pressing doesn't need them.
Store-bought dried flowers — Pressing your own from a walk or a bouquet is the whole fun. Buy only if you need a color you can't find.
First week
Your first seven days
A short, real plan to get from gear-on-doorstep to actually playing.
Order a small wooden press kit and some extra blotting paper. · Buy
Label each layer with the flower and date so you know when it's ready. · Action
FAQ
Common questions
How long does it take to press flowers?
Two to four weeks in a traditional press, depending on the flower's thickness. A microwave press takes seconds to a few minutes. Flowers are ready when they feel papery and stiff, not cool or limp.
What flowers are best for pressing?
Flat, thin flowers: pansies, violas, cosmos, daisies, larkspur, delphinium, Queen Anne's lace, ferns and hydrangea petals. Thick flowers like roses and lilies press better taken apart into petals.
Why did my pressed flowers turn brown?
Usually moisture. Pick flowers dry, not after rain or dew, and replace the blotting paper after the first two or three days. Some flowers, like white petals, brown no matter what; colorful flowers hold up better.
Can I press flowers in a book?
Yes. Put the flowers between sheets of plain paper or parchment, close the book and stack more books on top. It's slower and less even than a press, and ink can transfer onto the flowers, so don't use a book you care about.
How do I keep pressed flowers from fading?
Keep them out of direct sunlight. Framed flowers in a sunny window fade within months. Store unused pressings in paper, flat and dry, somewhere dark.
Can I press flowers from a wedding bouquet?
Yes, and it's one of the most popular uses. Press them within a day or two, before they wilt, and take thick flowers like roses apart. A large press or a microwave press helps for bouquets.
JustBeginning earns commission from affiliate programs. As an Amazon
Associate, we earn from qualifying purchases. This costs you nothing
extra and doesn't change our recommendations.
Prices and availability are accurate as of the date and time
shown and can change; the price on Amazon when you buy is what
applies.
How this works.
Our top pickLarge Wooden Flower Pressing Kit, 6 Layers


 Best starter